3
Jak vyměnit baterii (pouze pro
nahraditelnou verzi baterie)
Jakmile dioda LED (poloha 5) na ADF svítí červeně, je nutné
baterii vyměnit. Postupujte podle následujících pokynů. V
opačném případě nebude ADF fungovat správně a může
poškodit obsluhu.
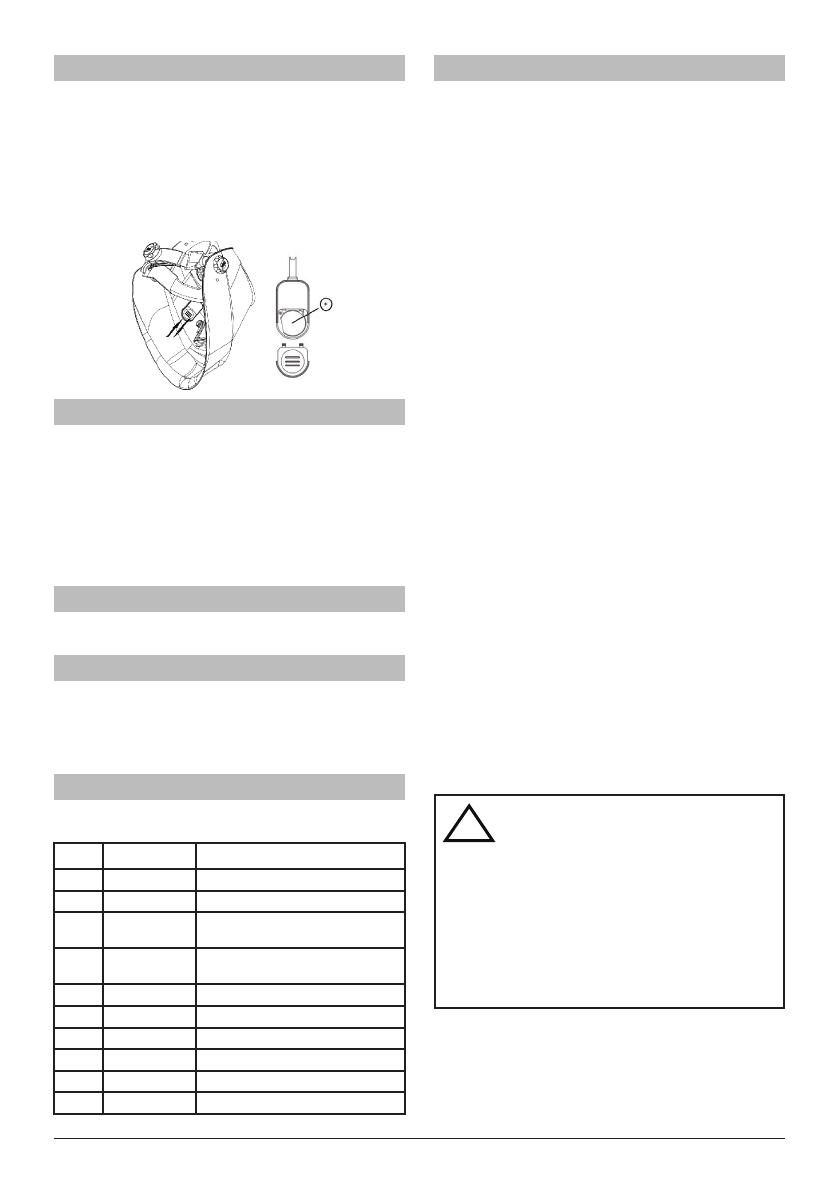
• Odstraňte kryt baterií z pouzdra baterie (poloha 1)
• Akumulátor vyjeďte a Namontujte novou baterii do bate-
riového pouzdra. Poznámka: '+' je nahoře. (POS 2)
• Nasaďte kryt baterií na bateriové pouzdro.
Před použitím ltru:
Před použitím ltru doporučujeme provést následující
nastavení:
• Otočte regulátor citlivosti ve směru hodinových ručiček
na maximum (poz. 2). V závislosti na okolním osvětleni
ltr ztmavne nebo začne blikat (při velmi nízkém okolním
osvětleni ltr neztmavne).
• Otáčejte regulátorem citlivosti (poz. 2) zpět, až ltr zesvětli.
• Nyní je nastavena optimální citlivost ltru (vzhledem k
okolním světelným podmínkám) .
Rozsah použití SAVAGE A40:
Všechny postupy obloukového svařování s výjimkou TIG < 5
A. Dostupný odstín: 9 až 13 (poz. 1).
Nastavení zpoždění
Zpoždění v zesvětlení ltru lze nastavit ručně otáčením re-
gulátorem zpožděni (poz. 3) proti směru hodinových ručiček
do krajní polohy pro rychlé zesvětlení (0,1 s), nebo otáčením
regulátorem zpoždění ve směru hodinových ručiček až do
krajní polohy pro pomalé zesvětlení (1,0 s).
Náhradních dílů SAVAGE A40
Položky bez čísla součásti nejsou k dispozici jako náhradní
díly.
Číslo Číslo dílu Popis
1 0700000480 SAVAGE A40 9-13 černá
1 0700000481 SAVAGE A40 9-13 žlutá
1 0700000490* SAVAGE A40 9-13 nahraditelný aku-
mulátor černý
1 0700000491* SAVAGE A40 9-13 nahraditelný aku-
mulátor žlutý
2 0700000483 ESAB ochrany hlavy
3 0700000414 Potní páska
4 0700000010 Přední krycí čočka
5 0700000482 Vnitřní krycí čočka
6 0700000418 Kolébka ADF
7 0700000419 Upínací prvek čočky se šrouby
* Není k dispozici ve všech oblastech.
Zkoušení ltru:
Před použitím svařovací kukly je nutné zkontroloval samoz-
tmívací ltr a kuklu. Postupujte následovně:
1. Zkontrolujte čistotu a průhlednost vnějšího ochran-
ného skla.
2. Ujistěte se, že senzory nejsou v žádném případě
zakryty a jsou čisté.
Po provedeni těchto kontrol znovu vyzkoušejte samoztmí-
vací ltr.
Otočte vnějším regulátorem do polohy pro nejtmavší
odstín (hodnota 13) a nastavte nejvyšší citlivost (otáčením
ve směru hodinových ručiček). Nyní snímač zaměřte na
světelný zdroj, například na stropní světlo, lampu apod.
Samoztmívací ltr musí teď ztmavnout. (Je-li ltr uskladněn
v tmavém prostoru daleko od světla, je nutné jej nechat
asi 20 minut na silném světle, aby načerpal energii. Jestliže
ani po 20 minutách ltr stále nereaguje, je vadný snímač.)
Jakmile ltr ztmavne, můžete zkontrolovat funkci změny od-
stínu. Jednoduše otáčejte regulátorem odstínu proti směru
hodinových ručiček. Odstín musí být světlejší. Jestliže odstín
nelze změnit, potom je závada v jeho regulaci.
Při zkoušeni funkce zpoždění nastavte maximální hodnotu.
Následně oddalte snímač ltru od světelného zdroje. Filtr
musí zesvětlet během 1 sekundy. Nyní nastavte minimální
zpoždění a postup opakujte. Filtr musí zesvětlet během 0,1
sekundy. Jestliže samoztmívací ltr nereaguje, je závada ve
funkci zpoždění.
Zkouška citlivosti. Nastavte minimální citlivost. Samoztmí-
vací ltr zaměřte na světelný zdroj, který jste použili při
zkoušení ostatních funkcí. (Jestliže ltr ztmavne, vzdalujte
jej od zdroje, až zesvětlí.) Pomalu otáče,e regulátorem
citlivosti ve směru hodinových ručiček, až ltr ztmavne.
(Jestliže neztmavne, přibližujte jej ke světlenému zdroji,
až ltr reaguje.) Jestliže samoztmívací ltr nereaguje, jsou
vadné snímače ltru.
Jestliže některá funkce selže během zkoušení nebo použí-
vání, samoztmívací ltr nepoužívejte a kontaktu,e místního
prodejce.
VAROVÁNÍ
Samoztmívací ltry umístěné kuklách SAV-
AGE A40 nejsou vodovzdorné a přijdou-li do
styku s vodou, nebudou pracovat správně
Svařovací kukly a ltry snesou pouze určitě
množstevní tepla. Neumisťujte je blízko ote-
vřeného plamene, pracovišť s teplotou, apod.
Provozní teplota elektronického ltru je od
-10ºC do +65ºC.
Materiály, které se mohou dostat do styku s
pokožkou, mohou způsobit alergické reakce
na vnímavé jedince.


