Philips FC8812/01 Používateľská príručka

Typ
Používateľská príručka

Táto príručka je tiež vhodná pre

FC8822, FC8812
FC8822
Wheels stuck
ݓઁहሂ
Top cover or dust container not placed properly
רۆࠋࠦӧ๥໇٦ݾ
Bumper stuck
ߓԎሑᇆहሂ
Robot lifted up from oor
՚ֽϴุఓਘᇊୃስײᆋ०༏ӧచ
Colour of oor too dark
ֽϴဂ೨ขτ
Battery not inserted properly / Charging error (switch is o)
׌ԁ໇ሑݾԍ׌մ༆IJऻܵၜܵтij
5
6
4
3
2
1
7
8
9
10
17
20
19
18
22
23
21
25
24
26
16
15
13
14
11
12
-
English 6
Čeština 29
Magyar 52
Română 76
Slovensky 101
Русский 124
Українська 149
Қазақша 173
English
Introduction
Congratulations on your purchase and welcome to Philips! To fully benefit
from the support that Philips offers, register your product at
www.philips.com/welcome.
General description
1 Handle of dust container lid
2 Dust container lid
3 Filter
4 Dust container
5 Top cover
6 Error codes table
7 Fan
8 Bumper
9 Docking station sensor
10 Power switch
11 Front wheel
12 Side brush shafts
13 Drop-off sensors
14 Wheels
15 Suction opening
16 TriActive XL nozzle
17 Side brushes
18 Fixation blocks for dry wipes
19 Dry wipe holder
20 Dry wipes
21 Battery holder
22 Remote control
23 Invisible wall (FC8822)
24 Docking station
25 Adapter
26 Small plug
Display and remote control
Display of robot
1
1110 129
2
3
4
5 6 7 8
1 Spiral mode indicator
2 Wall-following mode indicator
3 Zigzag pattern mode indicator
4 Random mode indicator
5 Cleaning time
6 Docking icon
7 Fan speed indicator
8 Dustbin full indicator
9 Sound sensor
10 Mode selection button
11 Start/stop button
12 Fan speed button
6
English
Remote control
2
1
3
45
1 Navigation buttons and start/stop
2 Cleaning time buttons
3 Cleaning mode buttons
4 Fan speed buttons
5 Docking button
Control panel of docking station
1
2
1 Display with time, day and programming indications
2 Adjusting and setting buttons
How your robot works
What your robot cleans
This robot is equipped with features that make it a suitable cleaner to help
you clean the floors in your home.
The robot is especially suitable for cleaning hard floors, such as wooden,
tiled or linoleum floors. It may experience problems cleaning soft floors,
such as carpet or rugs. If you use the robot on a carpet or rug, please stay
close by the first time to see if the robot can deal with this type of floor. The
robot also needs supervision when you use it on very dark or shiny hard
floors.
How your robot cleans
Cleaning system
The robot has a 3-stage cleaning system to clean your floors efficiently.
7
English
-
The two side brushes help the robot clean in corners and along walls.
They also help to remove dirt from the floor and move it towards the
suction opening.
-
The suction power of the robot picks up loose dirt and transports it
through the suction opening into the dust container.
-
The robot comes with a dry wipe holder that allows you to clean your
hard floor even more thoroughly with dry wipes.
Cleaning patterns
In its auto cleaning mode, the robot uses an automatic sequence of cleaning
patterns to clean each area of the room optimally. The cleaning patterns it
uses are:
1 Z-pattern or zigzag pattern
2 Random pattern
3 Wall-following pattern
8
English
4 Spiral pattern
In its auto cleaning mode, the robot uses these patterns in a fixed
sequence:z-pattern, random pattern, wall-following pattern, and spiral
pattern.
When the robot has completed this sequence of patterns, it starts moving in
Z-pattern again. The robot continues to use this sequence of patterns to
clean the room until the rechargeable battery runs low, or until it is switched
off manually.
If the robot detects a particularly dirty area during its cleaning run, it
switches to spiral mode and switches to turbo fan speed to ensure thorough
dirt removal.
Note: You can also select each mode individually by pressing the
appropriate button on the remote control. The manually selected modes are
only active for a couple of minutes. After that, the robot switches back to
auto-cleaning mode.
For more details, see chapter 'Using your robot', section 'Cleaning modes'.
How your robot avoids height differences
The robot has three drop-off sensors in its bottom. It uses these drop-off
sensors to detect and avoid height differences such as staircases.
Note: It is normal for the robot to move slightly over the edge of a height
difference, as its front drop-off sensor is located behind the bumper.
Caution: In some cases, the drop-off sensors may not detect a staircase or
other height difference in time. Therefore monitor the robot carefully the
first few times you use it, and when you operate it near a staircase or
another height difference. It is important that you clean the drop-off
sensors regularly to ensure the robot continues to detect height
differences properly (see chapter ' Cleaning and maintenance' for
instructions).
Before first use
Mounting the side brushes
1 Unpack the side brushes and place the robot upside down on a table or
on the floor.
9
English
2 Push the side brushes onto the shafts on the bottom of the robot.
Note: Make sure you attach the side brushes properly. Press them onto
the shaft until you hear them lock into position with a click.
Removing the tag from the remote control
The remote control works on a CR2025 coin-shaped battery. This battery is
protected with a protection tag that has to be removed before use.
1 Pull the battery protection tag out of the battery compartment of the
remote control. Now the remote control is ready for use.
Preparing for use
Installing the docking station
1
2
1 Insert the small plug of the adapter into the socket on the docking station
(1) and insert the adapter into the wall socket (2).
-
The display of the docking station comes on.
2 Place the docking station on a horizontal, level floor against the wall.
100
100 cm
30 30
30 cm
80
80 cm
Note: Make sure that there are no obstacles or height differences 80 cm
in front, 30 cm to the right and 100 cm to the left of the docking station.
Tip: To ensure the docking station stays firmly in the selected spot, fasten
it to the wall with screws or with two strips of double-sided tape.
10
English
Charging
When charging for the first time and when the rechargeable battery of the
robot is empty, the charging time is four hours.
Your robot can be charged in two ways:
-
On the docking station, either manually or automatically during use;
-
By connecting the robot directly to the mains.
Note: When the rechargeable battery is fully charged, your robot can clean
for up to 120 minutes
Charging on the docking station
1 Press the power switch to switch on the robot.
2 Place the robot on the plugged-in docking station.
3 The start/stop button starts flashing.
Note: Because this is the first time you charge the robot, the display of
the robot shows the booting indicator.
4 When the rechargeable battery is fully charged, the start/stop button
lights up continuously.
11
English
1 When the robot has finished cleaning or when only 15% of the battery
power remains, it automatically searches for the docking station to
recharge. When the robot searches for the docking station, the light in the
start/stop button turns orange.
2 When the rechargeable battery is fully charged, the start/stop button
lights up continuously.
Preparing the room for a cleaning run
Before you start the robot on its cleaning run, make sure that you remove all
loose and fragile objects from the floor. Also remove all cables, wires and
cords from the floor.
Using your robot
Starting and stopping
1 Set the power switch on the side of the robot to the 'on' position.
2 Press the start/stop button.
-
You can press the start/stop button on the robot.
-
You can also press the start/stop button on the remote control.
3 The start/stop button is continuously on and the robot starts cleaning.
12
English
Charging automatically during use
4 The robot cleans in the auto-cleaning mode until its battery runs low. In
the auto-cleaning mode, it follows repeated sequences of Z-pattern,
random, wall-following and spiral patterns.
Note: To select an individual mode, press one of the mode buttons on
the remote control. See section 'Cleaning mode selection' for more
details.
5 When the battery runs low, the start/stop button turns orange and the
robot searches for the docking station to recharge.
6 You can also press the start/stop button to interrupt or stop the cleaning
run. If you press the start/stop button again and there is still enough
energy in the rechargeable battery, the robot continues cleaning in the
auto-cleaning mode.
7 To make the robot return to the docking station before the rechargeable
battery runs low, press the docking button on the remote control. The
docking icon on the display of the robot comes on and the robot returns
to the docking station.
Cleaning mode selection
Next to the auto-cleaning mode, this robot has four individual cleaning
modes that can each be activated by pressing the appropriate button on the
remote control.
Note: The manually selected modes are only active for a couple of minutes.
After that, the robot switches back to auto-cleaning mode.
Z-pattern mode
In Z-pattern mode, the robot cleans by making Z-shaped loops through the
room to clean large areas.
13
English
In this mode, the robot cleans the room in a mixed pattern of straight and
crisscross movements.
In this mode, the robot follows the walls of the room to give the area
alongside the
walls an extra clean.
In this mode, the robot moves in a spiral pattern to clean a small area. If the
dust detection sensor detects dirt, the robot automatically switches the fan
to turbo speed.
Manual driving
1 Use the arrow buttons above and below and to the left and right of the
start/stop button on the remote control to navigate the robot through the
room.
Note: Be careful when you drive the robot manually close to height
differences and staircases.
Note: The vacuuming function and the side brushes only work when the
robot is driven forward. The left, right or back buttons are only for
maneuvering the robot.
14
English
Spiral mode
Wall-following mode
Random mode
Using the cleaning time buttons
-
By default, the robot cleans in auto cleaning mode until its rechargeable
battery runs low. The robot will then automatically return to its docking
station. If you selected one of the other cleaning times (see below), you
can switch back to the default mode by pressing the maximum cleaning
time button on the remote control.
-
The other cleaning time buttons on the remote control allow you to let
the robot operate for 60, 45 and 30 minutes respectively. When the
cleaning time is finished, the robot returns to its docking station. The
docking icon will light up on the display.
-
If you do not want the robot to return to the docking station at the end of
the cleaning time, press the cleaning time button twice. The docking icon
disappears from the display. When the cleaning time is finished, the robot
stops.
Operating the docking station
Setting clock time and day
If you want to use cleaning programs, you have to set the clock time and the
day of the week on the display of the docking station first.
Note: For the pictures that belong to the steps below, see the pages at the
back of this manual.
1 Press the set button. The set mode indicator and the clock time indicator
start flashing.
2 Press the select button once. The hour indication starts flashing.
3 Use the + and - buttons on the docking station to set the hour.The set
hour appears on the display.
4 Press the select button to confirm the hour set. The minutes indication
starts flashing.
5 Use the + and - buttons on the docking station to set the minutes. The set
minutes appear on the display.
6 Press the select button to confirm the minutes set. The indication 'Su’ for
Sunday starts flashing.
7 Use the + and - buttons on the docking station to set the current day of
the week.
8 Press the select button to confirm the day of the week.
9 Press the set button to confirm the clock time and day of the week
setting. Both the set mode indicator and the clock time indicator stop
flashing and turn solid.
15
English
Note: For the pictures that belong to the steps below, see the pages at the
back of this manual.
The programming options available are:
Program Indications on display
Cleaning every day All day indications are on
Cleaning on weekdays Mo to Fri indications are on
Cleaning on 2 consecutive days Indications of 2 days are on, e.g. Fri and Sa
Cleaning 1 day a week Indication of selected day is on
1 Press the set button. The set mode indicator and the cleaning program
indicator start flashing.
2 Press the select button once. The hour indication starts flashing.
3 Use the + and - buttons on the docking station to set the hour. The set
hour appears on the display.
4 Press the select button to confirm the hour set. The minutes indication
starts flashing.
5 Use the + and - buttons on the docking station to set the minutes. The set
minutes appear on the display.
6 Press the select button to confirm the minutes set. The indication ‘Su’ for
Sunday starts flashing.
7 Use the + and - buttons on the docking station to toggle between
cleaning programs (see the table above for the programming options
available).
8 Press the select button to confirm the program selected.
9 Press the set button to confirm the programming. Both the set mode
indicator and the cleaning program indicator stop flashing and turn solid.
10 When you have set a cleaning program, the display shows the cleaning
program indicator and the day or days selected. If you leave the robot on
standby and its rechargeable battery is fully charged, it will start cleaning
at the programmed time on the programmed day or days.
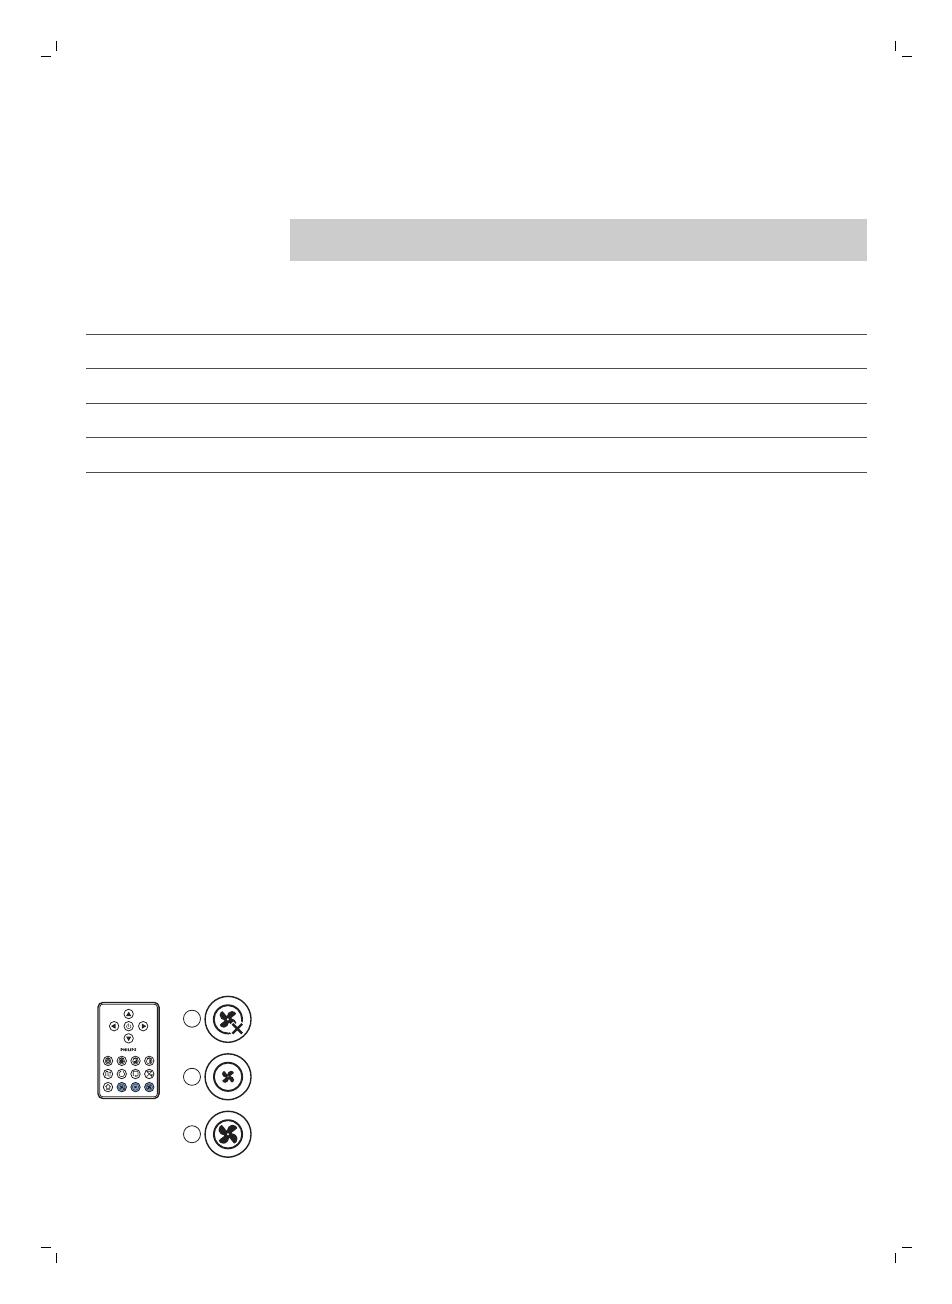
Fan speed buttons
You can use the fan speed buttons to increase the fan speed to turbo or to
switch off the fan. The default setting is normal fan speed.
1
2
3
1 Press this button to switch off the fan
2 Press this button to switch on the fan at normal speed.
3 The turbo fan button increases the fan speed.
16
English
Programming cleaning times
If you have set the time and the day of the week on the display of the
docking station, you can program cleaning times for your robot.
Using the dry wipe attachment
The dry wipe attachment is a feature that allows you to clean hard floors
with dry wipes.
Note: If you use the dry wipe attachment, the robot may have trouble
crossing thresholds or climbing onto rugs.
Preparing the dry wipe attachment for use
1 Turn the robot upside down and place it on the floor or on a table.
2 Place the dry wipe on a table and place the dry wipe attachment on the
wipe with its fixation lugs pointing towards you.
3 Fold both ends of the dry wipe around the dry wipe attachment and
fasten the dry wipe onto the attachment by pushing the fixation blocks
into the recesses.
4 Insert the fixation lug of the dry wipe attachment into the opening just
behind the wheel on one side of the robot and push until you hear it lock
into place with a click. Then repeat these actions on the other side.
5 Turn the robot and place it on the floor on its wheels with the dry wipe
attachment touching the floor.
17
English
Clap response
The clap response is enabled when the robot enters sleep mode in the
following situations:
-
when it stops cleaning due to an error
-
when it cannot find its docking station in 20 minutes
If you do not see the robot, you can locate it by clapping your hands once.
The robot will respond by beeping and by lighting up all icons on its display.
1
2
3 Push one end of the dry wipe attachment towards the wheel on the
other side of the robot to release it. Then pull the attachment off the
robot.
Using the invisible wall (FC8822)
Placing the batteries in the invisible wall
The invisible wall operates on four AA batteries.
1
2
1 Push the two release tabs at the bottom of the back cover (1) and slide
the back cover upwards and off the invisible wall (2).
2 Take four new AA batteries from the pack and insert them into the
battery compartment of the invisible wall.
Note: Make sure the + and - poles of the batteries point in the right
direction.
3 Slide the back cover onto the invisible wall again.
18
English
Removing the dry wipe attachment
1 Remove the dry wipe attachment as soon as you have finished wiping
the floor.
2 Turn the robot upside down and place it on the floor or on a table.
Using the robot with the dry wipe attachment
When
the dry wipe attachment is attached, you can use the robot in any
mode and on all hard floors. Do not use the dry wipe attachment on carpet
or rugs.
1 Place the unit at a point you do not want the robot to cross, e.g at an
open door to a room that is off-limits to the robot.
2 Switch on the invisible wall with the on/off slide on top of the unit.
3 Start the robot.
4 When the robot comes too close to the invisible wall, the light on the
invisible wall starts flashing and the invisible wall emits a beam of
infrared light. This beam of infrared light makes the robot change its
course and move away from the invisible wall.
Note: If you use the invisible wall, regularly check if the batteries still contain
sufficient power. You can check this by switching the virtual wall off and on
again. If there is enough energy in the batteries, the LED on the invisible wall
will light up briefly.
Cleaning and maintenance
Cleaning the robot
To maintain good cleaning performance, you have to clean the drop-off
sensors, the wheels, the side brushes and the suction opening from time to
time.
1 Place the robot upside down on a flat surface
3
1
2
2 Use a brush with soft bristles (e.g. a toothbrush) to remove dust or fluff
from the drop-off sensors.
Note: It is important that you clean the drop-off sensors regularly. If the
drop-off sensors are dirty, the robot may fail to detect height differences
or staircases.
19
English
Positioning the invisible wall to stop the robot
You can use the invisible wall to prevent the robot from entering a room or
area that you want to keep it out of.
1
2
3
3 Use a brush with soft bristles (e.g. a toothbrush) to remove dust or fluff
from the front wheel and side wheels.
4 To clean the side brushes, grab them by the bristles and pull them off
their shafts.
5 Remove fluff, hairs and threads from the shaft and from the side brush
with a soft brush (e.g. a toothbrush) or a cloth.
6 Check the side brushes and the bottom of the robot for any sharp objects
that could damage your floor.
1
2
7 Undo the snap connections of the TriActive XL nozzle by inserting by
inserting your fingers at the places marked with arrows and pull the
TriActive nozzle off the robot.
8 Clean the suction opening with a soft brush (e.g. a toothbrush).
20
English
  • Page 1 1
  • Page 2 2
  • Page 3 3
  • Page 4 4
  • Page 5 5
  • Page 6 6
  • Page 7 7
  • Page 8 8
  • Page 9 9
  • Page 10 10
  • Page 11 11
  • Page 12 12
  • Page 13 13
  • Page 14 14
  • Page 15 15
  • Page 16 16
  • Page 17 17
  • Page 18 18
  • Page 19 19
  • Page 20 20
  • Page 21 21
  • Page 22 22
  • Page 23 23
  • Page 24 24
  • Page 25 25
  • Page 26 26
  • Page 27 27
  • Page 28 28
  • Page 29 29
  • Page 30 30
  • Page 31 31
  • Page 32 32
  • Page 33 33
  • Page 34 34
  • Page 35 35
  • Page 36 36
  • Page 37 37
  • Page 38 38
  • Page 39 39
  • Page 40 40
  • Page 41 41
  • Page 42 42
  • Page 43 43
  • Page 44 44
  • Page 45 45
  • Page 46 46
  • Page 47 47
  • Page 48 48
  • Page 49 49
  • Page 50 50
  • Page 51 51
  • Page 52 52
  • Page 53 53
  • Page 54 54
  • Page 55 55
  • Page 56 56
  • Page 57 57
  • Page 58 58
  • Page 59 59
  • Page 60 60
  • Page 61 61
  • Page 62 62
  • Page 63 63
  • Page 64 64
  • Page 65 65
  • Page 66 66
  • Page 67 67
  • Page 68 68
  • Page 69 69
  • Page 70 70
  • Page 71 71
  • Page 72 72
  • Page 73 73
  • Page 74 74
  • Page 75 75
  • Page 76 76
  • Page 77 77
  • Page 78 78
  • Page 79 79
  • Page 80 80
  • Page 81 81
  • Page 82 82
  • Page 83 83
  • Page 84 84
  • Page 85 85
  • Page 86 86
  • Page 87 87
  • Page 88 88
  • Page 89 89
  • Page 90 90
  • Page 91 91
  • Page 92 92
  • Page 93 93
  • Page 94 94
  • Page 95 95
  • Page 96 96
  • Page 97 97
  • Page 98 98
  • Page 99 99
  • Page 100 100
  • Page 101 101
  • Page 102 102
  • Page 103 103
  • Page 104 104
  • Page 105 105
  • Page 106 106
  • Page 107 107
  • Page 108 108
  • Page 109 109
  • Page 110 110
  • Page 111 111
  • Page 112 112
  • Page 113 113
  • Page 114 114
  • Page 115 115
  • Page 116 116
  • Page 117 117
  • Page 118 118
  • Page 119 119
  • Page 120 120
  • Page 121 121
  • Page 122 122
  • Page 123 123
  • Page 124 124
  • Page 125 125
  • Page 126 126
  • Page 127 127
  • Page 128 128
  • Page 129 129
  • Page 130 130
  • Page 131 131
  • Page 132 132
  • Page 133 133
  • Page 134 134
  • Page 135 135
  • Page 136 136
  • Page 137 137
  • Page 138 138
  • Page 139 139
  • Page 140 140
  • Page 141 141
  • Page 142 142
  • Page 143 143
  • Page 144 144
  • Page 145 145
  • Page 146 146
  • Page 147 147
  • Page 148 148
  • Page 149 149
  • Page 150 150
  • Page 151 151
  • Page 152 152
  • Page 153 153
  • Page 154 154
  • Page 155 155
  • Page 156 156
  • Page 157 157
  • Page 158 158
  • Page 159 159
  • Page 160 160
  • Page 161 161
  • Page 162 162
  • Page 163 163
  • Page 164 164
  • Page 165 165
  • Page 166 166
  • Page 167 167
  • Page 168 168
  • Page 169 169
  • Page 170 170
  • Page 171 171
  • Page 172 172
  • Page 173 173
  • Page 174 174
  • Page 175 175
  • Page 176 176
  • Page 177 177
  • Page 178 178
  • Page 179 179
  • Page 180 180
  • Page 181 181
  • Page 182 182
  • Page 183 183
  • Page 184 184
  • Page 185 185
  • Page 186 186
  • Page 187 187
  • Page 188 188
  • Page 189 189
  • Page 190 190
  • Page 191 191
  • Page 192 192
  • Page 193 193
  • Page 194 194
  • Page 195 195
  • Page 196 196
  • Page 197 197
  • Page 198 198
  • Page 199 199
  • Page 200 200
  • Page 201 201
  • Page 202 202

Philips FC8812/01 Používateľská príručka

Typ
Používateľská príručka
Táto príručka je tiež vhodná pre

V iných jazykoch