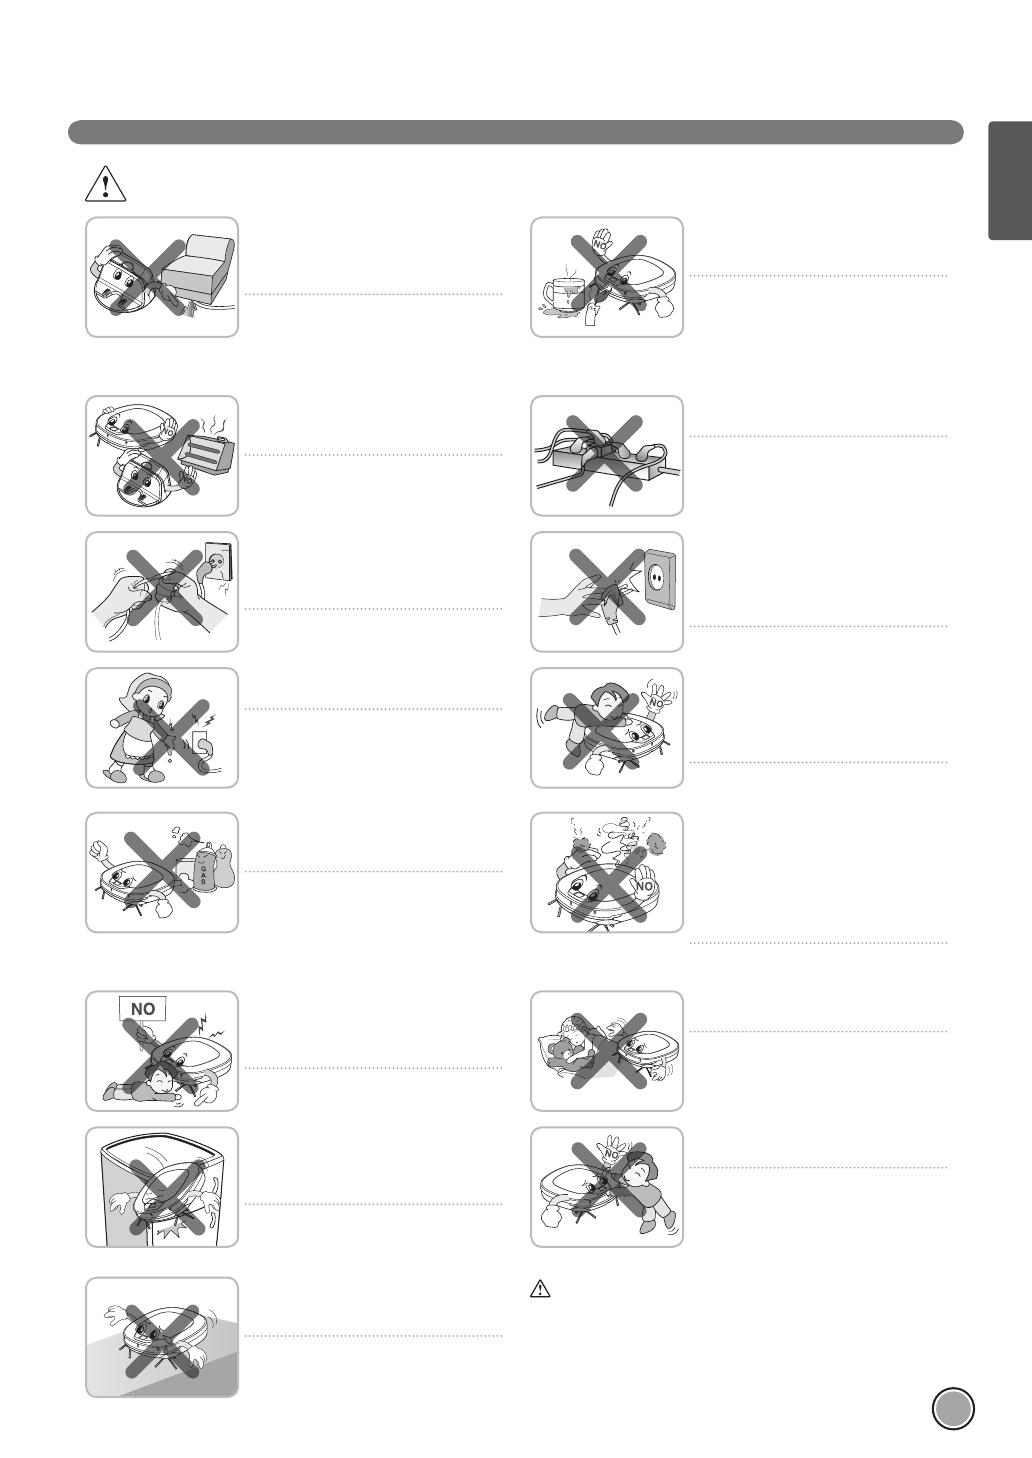
LG VR62601LVM Návod na obsluhu

Kategória
Robotické vysávače
Typ
Návod na obsluhu
OWNER’S MANUAL
CLEANING ROBOT
VR6260 Ser.
VR6270 Ser.
Before using, please carefully read the Safety Precautions pages to
allow for safe operation of the product. After reading the operation
manual, please keep it in an easily accessible location.
www.lg.com
ENGLISH
CZECH
SLOVENSKÝ
FEATURES
Corner Master
By having adopted a brand new concept design that is appropriate for walls,
the Robot Cleaner's cleaning performance is incredibly effi cient.
Learning Mode
The Robot Cleaner is capable of memorizing the cleaning environment via
its Smart Operation feature for smarter cleaning.
Turbo Mode
In the "Turbo" mode, the Robot Cleaner runs more powerful giving cleaner
results.
When selected, the "Turbo" mode is automatically activated on carpets,
which enables the Robot Cleaner to run more effi ciently.
Drawer Mop Plate
The "Drawer mop plate" makes it much easier for users to change the mop
without having to ip the device over.
My Space Mode
By commanding it to clean a particular space, the Robot Cleaner quickly
cleans the desired space.
Repeat Cleaning
The Robot Cleaner will continuously clean until the battery runs out.
Location Search Function
When the Robot Cleaner is moved from a spot while operating, the device
will automatically search for the previous location and return to the spot from
where it was interrupted.
ENGLISH
CONTENTS
Safety precautions
Included with product
Parts description
Button functions
Display status information
Before you start
Overview
1
BEFORE USING
2
METHOD OF USE
3
HANDLING METHOD AFTER USE
35~37
38
How to install the home station
How to turn the Robot Cleaner power supply on & off
How to start and stop cleaning
How to charge the battery
Cleaning modes
Auxiliary cleaning modes
Time setting
Scheduled cleaning
Mop cleaning (option)
Location search function
Smart diagnosis
Cleaning the dust bin
Cleaning the dust bin fi lter
Cleaning the brush
Cleaning the sensor/charging terminal
Cleaning the side brush
Cleaning the ultra microfi ber mop (option)
4
ADDITIONAL INFORMATION
5
REFERENCE
2~5
6
7~8
9~10
11
12
13
14
15
16
17~18
19~20
21~22
23
24
25
26
27~28
29
30
31
32
33
34
Troubleshooting
Before you call for service
Product specifi cations
Reference items
39
40
2
SAFETY PRECAUTIONS
The purpose of the safety precautions described below is for the user to use the product safely and
correctly to prevent any unexpected risk of injury or damage.
Basic safety precautions
After reading this manual, please keep it in an easily accessible location.
This is the safety alert symbol. This symbol alerts you to potential hazards that can result in
property damage and/or serious bodily harm or death.
Indicates a hazardous situation which, if not avoided, could result in death or serious injury.
Indicates a hazardous situation which, if not avoided, could result in minor or moderate
injury.
WARNING
WARNING
CAUTION
1. This appliance is not intended for use by persons
(including children) with reduced physical, sensory or
mental capabilities, or lack of experience and knowledge,
unless they have been given supervision or instruction
concerning use of the appliance by a person responsible
for their safety.
2. Children should be supervised to ensure that they do
not play with the appliance.
3. If the supply cord is damaged, it must be replaced by
LG Electronics Service Agent in order to avoid a hazard
4. This appliance can be used by children aged from 8
years and above and persons with reduced physical,
sensory or mental capabilities or lack of experience
and knowledge if they have been given supervision or
instruction concerning use of the appliance in a safe way
and understand the hazards involved. Children shall not
play with the appliance. Cleaning and user maintenance
must not be made by children without supervision.
For your safety, do not remove the
battery from the Robot Cleaner. If
you need to replace the battery or the
Robot Cleaner, take it to the nearest
authorized LG Electronics service
center or dealer for assistance.
Failure to follow this warning can
cause fi re or product failure.
Never use the Robot Cleaner with
a battery and/or home station from
any other product than the
Robot Cleaner.
Doing so can cause fi re or product
failure.
3
ENGLISH
SAFETY PRECAUTIONS
WARNING
Make sure the power cord of the
home station is not crushed under a
heavy object or damaged by contact
with sharp objects.
Failure to follow this warning can cause
electric shock, fi re or product failure.
If the power cord is broken, do not
plug it in. Take the product to an LG
Electronics Authorised service repairer.
Do not place the home station and
the Robot Cleaner near a heating
device.
Doing so can cause product
deformation, fi re, or product failure.
Do not touch the power plug with
wet hands.
Doing so can cause electric shock.
Do not force the power plug to
bend. Do not use the power plug
when it has been damaged or
loosened.
Doing so can cause fi re or product
failure.
Do not use the Robot Cleaner when
candles or fragile objects are placed
on the fl oor.
Doing so can cause fi re or product
failure.
Always use a dedicated power
outlet with a 10 amp rating.
If multiple appliances are connected
to an outlet simultaneously, they
can generate enough heat to cause
a fi re.
Do not allow children or pets to play
with or rest upon the Robot Cleaner
at any time. Do not use the Robot
Cleaner while an object is hanging
from it.
Doing so can cause injury or
product damage.
When pulling out the home station
power plug, always pull it out by
grabbing the plug, not the cord. When
pulling out the power plug, do not to
touch the prongs with your fi ngers.
Doing so can cause an electric shock.
Do not spray or use infl ammable
materials, surfactants, or drinking water
in the vicinity of the Robot Cleaner.
Doing so can cause fi re or product
failure.
* Infl ammable materials: gasoline,
thinner, etc.
* Surfactant: detergent, articles for
bath, etc.
Do not insert any part of the body,
such as a hand or foot, below the
brush or wheels of the
Robot Cleaner while in use.
Doing so can cause injury or
product damage.
Do not operate the Robot Cleaner
on narrow and high furniture such
as a wardrobe, refrigerator, desk,
table, etc.
Doing so can cause injury, product
failure or damage which is not
covered by the warranty.
Turn the power supply off
immediately if any abnormal sound,
odor, or smoke is generated from
the Robot Cleaner by removing it
from the home station and turning
off the main switch on the rear side
of the unit.
Failure to do so can cause fi re or
product failure.
Do not operate the Robot Cleaner
in a room where a child is sleeping.
Doing so can cause injury or
product damage.
Do not leave Children or pets near
the Robot Cleaner unsupervised.
Doing so can cause injury or
product damage.
This product is intended for indoor domestic home
use and should not be used in mobile applications. it
should not be used in commercial applications such as
workshops or garage, etc.
Gasoline
Detergent
Do not activate the device on a oor
that has more than a 10 degree
incline.
The device may not work properly.
4
SAFETY PRECAUTIONS
Frequently empty the dust bin and
maintain its cleanliness.
The dust collected in the dust
bin can trigger allergies and may
contain harmful insects.
Use the Robot Cleaner indoors only.
Using it outdoors can cause product
failure and irreparable damage to
the unit.
Close the cover of the dust bin
on the main unit before starting
cleaning.
If the cover is not closed, it can
cause injury or product damage.
DO NOT use the Robot Cleaner
around a banister, staircase or any
other dangerous place.
Otherwise, the user or the product
can be exposed to damage.
Do not drop the Robot Cleaner or
subject it to strong impacts.
Doing so can cause injury or
product failure not covered by the
warranty.
Do not expose the Robot Cleaner to
cold temperatures (less than -5 )
for a long period of time.
Doing so can cause product failure.
Remove any cables or string from
the fl oor before starting.
Cable or string can get tangled in
the wheels of Robot Cleaner and
cause product failure or the cord of
an appliance can be disconnected.
Make sure the Robot Cleaner is
not put on a table or desk, with the
power ON.
It may result in injury of the user or
damage in the product.
CAUTION
In rare cases, the Robot Cleaners
brush can damage the carpet. If
this happens, immediately stop the
cleaning operation.
When a carpet has long tassels, the
tassels can be damaged.
Do not let the main unit and
charging terminal of the home
station come into contact with
metallic objects.
Doing so can cause product failure.
Do not put water, detergent, etc.
into the Robot Cleaner.
Doing so can cause product failure.
Do not put any water or detergent
on the Robot Cleaner. If liquids get
inside of the Robot Cleaner, turn off
the power supply and contact an LG
Electronics sales agent or customer
care center.
Do not allow the Robot Cleaner to
sweep up liquids, blades, thumb
tacks, kindling, etc.
These items can cause product
failure.
Do not put sharp objects into the
opening of the Robot Cleaner’s
ultrasonic sensor.
Doing so can cause product failure.
Do not use the Robot Cleaner when
the dust bin is completely fi lled up.
Doing so can cause product failure.
5
ENGLISH
SAFETY PRECAUTIONS
CAUTION
Check the following items before use:
• Empty the dust bin after each operation or prior to it filling up.
• Remove any cables or long strings from the floor.
• Remove any moisture from the floor before cleaning.
• Close the cover of the dust bin before cleaning.
Remove fragile or unnecessary objects from the room to be cleaned.
For example, remove expensive ceramics and valuables from the floor.
• Confirm whether the battery has sufficient power, and if it is low, recharge it.
Close the doors of any room that you do not want the Robot Cleaner to enter.
During cleaning, the Robot Cleaner may enter another room and continue cleaning.
Do not use this product in the room where a child is sleeping alone. The child can be hurt or
woken.
Remove towels, foot towel or any other thin cloth from the floor as they can get caught by the
brush.
Before starting the device, it's better to remove carpets that are thicker than 20  as they
may cause it to malfunction.
Please close any balcony doors. The wheels may get stuck while cleaning.
If the fl oor is wet or has wet spots,
wipe them up before using the
Robot Cleaner. Do not use the
Robot Cleaner on a wet surface.
Failure to do so can cause product
failure.
When attaching the mop, do not
block the bottom camera sensor.
Blocking the bottom camera sensor
may not allow the product to work
smoothly.
When the robot cleaner is
operating, it may hit the chair leg,
desk leg, table leg or other narrow
pieces of furniture.
For quicker and better cleaning,
place the dining chairs on top of the
dining table.
Make sure the plate on the fl oor is
higher than 2  from the ground
before starting the cleaning.
If the threshold is low, the Robot
Cleaner can go over it and perhaps
into an undesirable location. Make
sure that all the doors of the rooms
that are not to be cleaned are closed.
Tip
If you do not use it to save the
energy, turn off the power switch,
and turn on the power switch when
you are cleaning or recharging it.
6
INCLUDED WITH PRODUCT
Figures can be different from actual objects.
Dust bin fi lter (spare)
(option)
Cleaning Tool
Cleaning brush
(It’s on the dust bin cover)
Mop plate (option)
for cleaning
sensors
for cleaning
the fi lter
Ultra microfi ber mop
(2 pieces) (option)
Dry cell for remote controller
(2 units of AAA size)
Quick guide Operation manual
Home station
Robot Cleaner
www.lg.com
Quick Guide
Cleaning Robot
This guide briefly describes how to use the Cleaning Robot.
For more detail, please refer to the user manual
Please read this manual carefully before installing and operating the product.
OWNER’S MANUAL
CLEANING ROBOT
Before using, please carefully read the Safety Precautions pages to
allow for safe operation of the product. After reading the operation
manual, please keep it in an easily accessible location.
www.lg.com
Remote controller
Side brush (2 pieces)
(option)
Carpet Master
(option)
7
ENGLISH
PARTS DESCRIPTION - ROBOT CLEANER
Figures can be different from actual objects.
Plan view
Upper camera sensor
Dust bin cover
Display & Manipulation button
Dust bin cover button
Ultrasonic sensors
Obstacle detecting sensor window
Detecting sensors of home station &
Receiving sensors of remote controller
Power switch
Ventilation port
Cliff detection sensor
Side brush
Charging terminal
Brush
Wheel
Battery
Lower camera sensor
Front view
Rear view
Bottom view
8
PART DESCRIPTION – HOME STATION / DUST BIN
Figures can be different from actual objects.
Home station
Dust bin
Remote controller holder
Charging terminal
Sponge fi lter
Dust bin handle
Cleaning brush
Dust bin cover
Suction port fl ap
HEPA fi lter
Filter cover
Dust bin cover
opening button
Power cord fi xing hook
Power switch
9
ENGLISH
BUTTON FUNCTIONS – ROBOT CLEANER
• If the button is pressed, ‘Turbo Mode’ will be set with a voice confirmation.
• If the button is pressed whilst in ‘Turbo Mode’, it will be canceled.
• Used to change the clean mode setting.
If the machine is at the Home Station, ‘Spot Clean’ option is not available.
The 'My Space' mode can only be selected by remote control (when the Robot
Cleaner is not on the home station).
• Used to return the Robot Cleaner back to the home station for charging.
If cleaning is finished or the battery is low, the Robot Cleaner will return to the
Home Station by itself to recharge its battery.
Pressing the ‘Turbo' and 'Mode' button for 3 seconds will activate or deactivate
the Lock function.
If 'Lock' is ON, a voice announcement "Key has been locked" will be heard each
time a button is pressed.
• Used to turn the power ON, start or stop cleaning.
• If the button is pressed whilst the unit is powered ON, it will start cleaning.
• If button is pressed during the cleaning, it will stop the cleaning.
If the button is pressed for about 2 sec. whilst the power is ON, the power will be
OFF.
• If the button is pressed in 'Smart Diagnosis' mode, it will end the diagnosis.
TURBO
MODE
HOME
BUTTON LOCK
On/Off
START/STOP
10
BUTTON FUNCTIONS – REMOTE CONTROLLER
• Remote Controller does NOT provide a Power ON function.
• With the machine's power OFF, the Remote Controller will not work.
To turn the power ON/OFF, use the 'Start/Stop' button on the upper section of
the Robot Cleaner.
Only use the 'Mode', 'My Space' or 'Clock' button after stopping Robot Cleaner.
Start
Pressing this button will
start the cleaning. (p16)
Home
Used to recharge the Robot Cleaner by
making it return to the Home Station. (p17)
Turbo
Used to activate or deactivate
'Turbo' mode. (p22)
Stop/OK
Pressing the button will stop
the Robot Cleaner, or confi rm a
cleaning schedule or time setting.
My Space
Used to put the Robot Cleaner in
'My Space clean' mode. (p20)
Mute
Used to activate or deactivate
'Mute' mode. (p11)
Diagnosis
Used to run Smart Diagnosis.
Available only when Robot Cleaner
is recharging. (p27)
Mode
Change the cleaning mode.
(p19)
Directional button
This button enables Manual
Operation and selection
of an area in 'My Space
cleaning' mode.
Repeat
This button allows activating
or deactivating 'Repeat
Cleaning' mode. (p22)
Clock
Used to set the current
time indicated on the Robot
Cleaner. (p23)
Schedule
Used to start cleaning at a
scheduled time.
Pressing the button for
3 sec. will cancel the scheduled
cleaning.
Schedule Setting/Cancel
options are available only in
'Charge' mode. (p24)
Tip
11
ENGLISH
DISPLAY STATUS INFORMATION
Once the clean mode is selected (Zigzag or Cell by Cell) it will be remembered even if the
power is OFF.
To cancel the reservation, please press the 'Schedule' button on the remote for 3 seconds
while the Robot Cleaner is recharging.
Lock icon
Indicates whether 'Lock‘ is
activated or not.
Mute icon
This icon indicates
whether the Mute is
ON or OFF.
Battery icon
This icon indicates the
residual battery level,
it fl ickers if the battery
needs recharging.
AM/PM icon
This indicates whether it's
a.m. or p.m. according to
the clock setting.
Turbo icon
This display is ON
if Turbo Mode is
activated.
Homing icon
This icon is displayed
if Robot Cleaner is in
'Homing' mode.
My Space cleaning
Displayed when the
Robot Cleaner runs
My Space clean.
Spot cleaning
This icon appears
when Robot cleaner
starts Spot cleaning.
Time display
This indicates the current and
scheduled time.
Repeat cleaning
Displayed if the
machine is in 'Repeat
Cleaning' mode.
Zigzag cleaning
This icon is displayed to
indicate Robot Cleaner is
working in a Zigzag Clean.
Cell by Cell cleaning
This icon is displayed to indicate
Robot Cleaner is working in a
Cell by Cell cleaning mode.
Schedule icon
Indicates
the status of
Schedule/'One
time', or
'Everyday' setting.
Tip
12
BEFORE YOU START
• Do not use this device in a room where a child is left alone. The child could be injured.
Remove fragile or unnecessary objects from the room to be cleaned.
Especially, remove expensive ceramics and valuables from the floor.
• Close the cover of the dust bin before cleaning.
• Remove any moisture that might be on the floor.
• Remove cables, strips, towels, mats etc. from the floor so they will not get caught by the brush.
• Confirm whether the battery charge is sufficient, and if it is low, recharge it.
• Empty the dust bin before or after each clean, or before it becomes full.
Close the doors of any room that you do not want the Robot Cleaner to enter. During cleaning,
the Robot Cleaner may enter another room and continue cleaning.
When the mop is attached, Robot Cleaner will not be able to go over thresholds of 5  or higher.
If you are not planning to use the mop for cleaning, separate the mop before using Robot Cleaner.
Before starting the device, it's better to remove carpets that are thicker than 20  as they may cause it
to malfunction.
Please close any balcony doors. The wheels may get stuck while cleaning.
1. Open the battery cover by lifting the rear hook of the remote controller.
2. Insert two AAA batteries, checking for +, - nodes while loading.
3. Close the battery cover completely so that the batteries will not fall out.
• Only press one button at a time.
• Do not drop or subject it to forceful impact.
• Do not store it near devices that give off heat, fire or hot air.
Certain fluorescent lamps, such as the three band radiation lamp, can interfere with the activation of the
remote control. Therefore, use it as far away as possible from such lamps.
If the remote control is far from the Robot Cleaner when activated, it may fail to operate properly. Use the
device within 3 of the Robot Cleaner if possible.
Check these items before cleaning
Loading the remote controller battery
Precautions while using the remote control
+
+
13
ENGLISH
OVERVIEW
1.5
1.5
2
1
Install the home station. (p14)
Insert the power cord plug into an outlet and locate the
station against a wall. If power is not supplied to the
home station, the Robot Cleaner will not charge.
2
Turn on the power supply of the Robot
Cleaner. (p15)
Turn ON the power switch on the rear-left of
Robot Cleaner, and press the 'Start/Stop' button
on the top.
If the power supply is not turned on, refer to
page 15.
3
Check the dust bin.
Check the cleanness of the dust bin before start
cleaning and close the cover of the dust bin on the
main unit.
4
Start cleaning. (p16)
Press the START/STOP button once again while the
Robot Cleaner is turned on. You will hear the sound of
cleaning and cleaning will begin.
5
6
Automatic charge. (p17~18)
Use the cleaning mode and auxiliary functions.
(p19~25)
The Robot Cleaner will self-diagnose and automatically
return to the home station to recharge before the
complete discharge of the battery. It takes approximately
three hours to charge the battery.
Use the buttons on Robot cleaner and Remote
Controller to use each cleaning mode and supporting
feature.
Cleaning modes include ZigZag, Cell by Cell, Spot, My
space, and Repeat cleaning; supporting features include
Manual, Scheduled and Microfi ber Mop cleaning.
< Warning > When Robot Cleaner is operated with the cover of the dust bin open,
it can cause an injury or serious damage to the product.
14
HOW TO INSTALL THE HOME STATION
1. Position the home station against a wall on hard level fl ooring to
prevent sliding during docking.
Remove objects within 1.5 to the right and left side and within
2 to the front.
2. Plug the power cord into an outlet.
Wrap the power cord around the fi xed hook on the back side of
the home station or along the wall surface so that the travel path
of the Robot Cleaner will not be obstructed.
3. Fix the home station against the wall so that it does not move.
Please turn on the power switch.
4. When the remote controller is not used, store it on the remote
controller holder on the home station.
1.5
1.5
2
Fixing hook of power cord
Always keep the home station plugged in. If the home station is not plugged in, the
Robot Cleaner will not return to the station to charge automatically.
How to Install the Home Station
< Warning > Do not operate the Robot Cleaner if the Home Station has a damaged cord or plug, if
it is not working properly, or if it has been damaged or dropped. To avoid hazard, the
cord must be replaced by LG Electronics, Inc. or a qualified service person.
Tip
15
ENGLISH
HOW TO TURN THE ROBOT CLEANER POWER SUPPLY ON & OFF
Make sure the Power Switch on the rear-left of the Robot Cleaner.
If the power is OFF, turn the switch ON.
When turning on the power switch, do not press the button
located at the upper section of the Robot Cleaner. Operation of
the button can be delayed.
Turn off the power switch if the Robot Cleaner will not be used
for a long period of time, in order to protect the battery. The
Robotic Cleaner cannot charge if the main switch is in the
"OFF" position.
With the power of Robot Cleaner OFF, press 'Start/Stop' button
for 1 second until a "Ting" sound is heard. In about 10 seconds,
the power will be on and a melody will sound.
If 10 minutes elapse without the Robot Cleaner having being
given an active command after being turned on, the power will
automatically turn OFF.
Press the START/STOP button for two seconds while the
Robot Cleaner is turned on. A melody will sound when the power
is turned off.
• If the power cannot be turned on, do the following.
- Turn on the power switch and wait for more than 3 seconds.
- Press the ‘START/STOP’ button when the power switch is turned on.
- If the power is not turned on or if there is no display but only the “Ting” sound, put
the Robot Cleaner manually on to the home station.
Turning on the main power supply
Turning on from Stand By power.
Turning off the power supply
Tip
16
HOW TO START AND STOP CLEANING
After the Robot Cleaner is turned on, press the START/STOP button
to begin cleaning. A melody will sound and cleaning will begin.
Press the START/STOP button during the cleaning cycle to stop
cleaning.
When the ‘START/STOP’ button is pressed while the power supply
of the Robot Cleaner is turned off, the power will be turned on.
Press the ‘START/STOP’ button one more time to start cleaning.
After the Robot Cleaner is turned on from the Robotic Cleaner, press
the START button on the remote control. A melody will sound and
cleaning will begin.
Press the Stop/OK button during the cleaning cycle to stop cleaning.
The Robot Cleaner cannot be turned on from Stand By, by using
the remote controller when the power of the Robot Cleaner is off.
When the power is off, press the ‘START/STOP’ button on the
upper side of Robot Cleaner to turn the power on and to allow the
remote to be used.
During cleaning, collisions can happen when the sensor cannot detect objects because of their shape (Thin
chairs and table legs, furniture corner). When this happens, the internal impact detecting sensor will react
by using a backward motion.
If the Robot Cleaner is set to start cleaning at a location away from the home station, put the Robot
Cleaner on a fl at oor in order to prevent a malfunction of the obstacle detecting sensor. In addition, start
cleaning from a location where there are no obstacles such as curtains or walls within 30  of the Robot
Cleaner.
For best results:
Briefly scan the area to be cleaned for big and small objects that will cause difficulty for the
Robot Cleaner.
If cleaning is started when the Robot Cleaner is at the home station, the device can rapidly
be returned to the home station as the current home position has been accurately read.
When the mop plate is installed, to prevent a 2
nd
contamination from the contaminated mop,
it will not go over door sills of 5  or higher.
Using the buttons on the Robot Cleaner
Using the remote controller
Tip
17
ENGLISH
HOW TO CHARGE THE BATTERY
The Robot Cleaner returns to the home station at the end of a
cleaning cycle or when its battery is running low.
If 10 minutes elapse without the Robot Cleaner moving or the
battery is too low, the power will automatically be turned OFF.
Do NOT turn OFF the Main Power Switch as the battery will not be
recharged. If the machine is returned manually with the Main Power
Switch OFF, it shows an error message, "Main power switch on the
back of the HOM-BOT is turned off. Please turn the switch on."
In the event that the unit returns to the Home Station due to a
low battery during the cleaning, cleaning will be started, after the
charging, from the nearest place of the area which has not been cleaned before. (Page 18)
If Robot Cleaner is unable to dock to the home station on its fi rst attempt, it will try again until it docks
successfully.
When Robot Cleaner has completed all areas that it can clean, it will return to the home station even when
the battery level is not low.
If using the Robot Cleaner for the fi rst time or when charging the battery during cleaning, you can manually
charge the battery.
Method 1. Attach the Robot Cleaner to the home
station by aligning to the front side of the
home station. A melody sound will be
generated along with an audio message to
start charging.
If a voice message, "Main power switch on
the back of the HOM-BOT is turned off.
Please turn the switch on." is announced
repeatedly, then turn on the Main Power
Switch.
Method 2. When the 'HOME' button of the remote
control or the Robot Cleaner is pressed,
charging will be prompted by automatically
generating a searching signal and returning
the Robot Cleaner to the home station.
If the Robot Cleaner did not start cleaning from the home station or if the Robot Cleaner is manually
charged by pressing the Home button, it may take slightly longer to fi nd the home station.
If the Robot Cleaner is within 10  of the front of the charging terminal while the power supply is turned
on, it will automatically be returned to the home station and charging will begin.
Automatic charging
Manual charging
Take the following precautions when using the home station:
If foreign material is caught in the charging terminal, charging may not proceed smoothly.
Wipe the terminal from time to time with a dry cloth after the power plug is disconnected.(p32)
To prevent electric shock or damage to the home station, do not touch the charging terminal
with any metallic objects.
To avoid fire or electric shock, never disassemble or modify the home station.
• Do not to place the home station or power plug near a heating source.
Tip
18
HOW TO CHARGE THE BATTERY
Check 1:
If the battery is not charging even when the Robot Cleaner is
attached to the home station, check the following items.
- Turn the power switch on the rear-left of the Robot Cleaner
off once and then on again.
- Check the power lamp of the home station.
- Wipe the terminal on the home station with a dry cloth. (p32)
Battery level is indicated on Status Display, as follows.
• If recharging is in progress, the Battery Level Lamp ickers.
• If recharging is complete, only the 'Battery' and 'Clean Mode' icons are displayed to save the energy.
• Upon the need for recharging, only the fi rst level of Battery Level Lamp will be on and fl ickering.
The status indication lamp
while the robot is charged
(In spatial Zigzag mode)
If Robot Cleaner goes back to Home Station, with a low level of battery
while it is the 'Clean Mode' lamp starts to fl icker.
- When the 'Clean Mode' lamp starts to icker after recharging is
complete, Robot Cleaner will then resume cleaning the areas which
were not covered.
- Pressing the 'Start' button on the Remote Controller or 'Stop' button on
main unit whilst it is recharging, with the 'Clean Mode' lamp fl ickering,
will also make Robot Cleaner fi nd and clean uncovered spots.
- Pressing the "Start" button on the remote control or the "Start/Stop"
button on the device after changing the mode will make the Robot
Cleaner start to clean from beginning again.
Remaining Battery Charge Indicator
If the Battery is Not Charging
Flickering
Flickering
In the case of no existing
area to be cleaned
In the case of an existing area
to be cleaned (Flickering)
Power lamp
Charge terminal
Charging is required
Middle
Low
High
  • Page 1 1
  • Page 2 2
  • Page 3 3
  • Page 4 4
  • Page 5 5
  • Page 6 6
  • Page 7 7
  • Page 8 8
  • Page 9 9
  • Page 10 10
  • Page 11 11
  • Page 12 12
  • Page 13 13
  • Page 14 14
  • Page 15 15
  • Page 16 16
  • Page 17 17
  • Page 18 18
  • Page 19 19
  • Page 20 20
  • Page 21 21
  • Page 22 22
  • Page 23 23
  • Page 24 24
  • Page 25 25
  • Page 26 26
  • Page 27 27
  • Page 28 28
  • Page 29 29
  • Page 30 30
  • Page 31 31
  • Page 32 32
  • Page 33 33
  • Page 34 34
  • Page 35 35
  • Page 36 36
  • Page 37 37
  • Page 38 38
  • Page 39 39
  • Page 40 40
  • Page 41 41
  • Page 42 42
  • Page 43 43
  • Page 44 44
  • Page 45 45
  • Page 46 46
  • Page 47 47
  • Page 48 48
  • Page 49 49
  • Page 50 50
  • Page 51 51
  • Page 52 52
  • Page 53 53
  • Page 54 54
  • Page 55 55
  • Page 56 56
  • Page 57 57
  • Page 58 58
  • Page 59 59
  • Page 60 60
  • Page 61 61
  • Page 62 62
  • Page 63 63
  • Page 64 64
  • Page 65 65
  • Page 66 66
  • Page 67 67
  • Page 68 68
  • Page 69 69
  • Page 70 70
  • Page 71 71
  • Page 72 72
  • Page 73 73
  • Page 74 74
  • Page 75 75
  • Page 76 76
  • Page 77 77
  • Page 78 78
  • Page 79 79
  • Page 80 80
  • Page 81 81
  • Page 82 82
  • Page 83 83
  • Page 84 84
  • Page 85 85
  • Page 86 86
  • Page 87 87
  • Page 88 88
  • Page 89 89
  • Page 90 90
  • Page 91 91
  • Page 92 92
  • Page 93 93
  • Page 94 94
  • Page 95 95
  • Page 96 96
  • Page 97 97
  • Page 98 98
  • Page 99 99
  • Page 100 100
  • Page 101 101
  • Page 102 102
  • Page 103 103
  • Page 104 104
  • Page 105 105
  • Page 106 106
  • Page 107 107
  • Page 108 108
  • Page 109 109
  • Page 110 110
  • Page 111 111
  • Page 112 112
  • Page 113 113
  • Page 114 114
  • Page 115 115
  • Page 116 116
  • Page 117 117
  • Page 118 118
  • Page 119 119
  • Page 120 120
  • Page 121 121
  • Page 122 122
  • Page 123 123
  • Page 124 124
  • Page 125 125
  • Page 126 126
  • Page 127 127
  • Page 128 128
  • Page 129 129
  • Page 130 130
  • Page 131 131
  • Page 132 132
  • Page 133 133
  • Page 134 134
  • Page 135 135
  • Page 136 136
  • Page 137 137
  • Page 138 138
  • Page 139 139
  • Page 140 140
  • Page 141 141
  • Page 142 142
  • Page 143 143
  • Page 144 144
  • Page 145 145
  • Page 146 146
  • Page 147 147
  • Page 148 148
  • Page 149 149
  • Page 150 150
  • Page 151 151
  • Page 152 152

LG VR62601LVM Návod na obsluhu

Kategória
Robotické vysávače
Typ
Návod na obsluhu

V iných jazykoch