Indesit 9YPS 645(AN) GH R/HA Užívateľská príručka

Typ
Užívateľská príručka
9YPS 645 (BK) GH/HA
9YPS 645 (WH) GH/HA
9YPS 645 AX/HA
9YPS 645 X GH/HA
9YPS 645 (AV) GH R/HA
9YPS 645 (AN) GH R/HA
9YPS 645 (OW) GH R/HA
English
Operating Instructions
HOB
Contents
Operating Instructions,1
Warnings,3
Assistance,7
Description of the appliance,8
Installation,11
Start-up and use,15
Precautions and tips,15
Maintenance and care,16
Troubleshooting,16


VARNÁ DESKA

Használati útmutató





Használati útmutató,1
Figyelmeztetések,4
Szerviz,7
A készülék leírása,9
Üzembe helyezés,30
Bekapcsolás és használat,34
Óvintézkedések és tanácsok,34
Karbantartás és ápolás,35
Hibaelhárítás,35
Sommario
Instrucţiuni de utilizare,1
Avertizări,5
Asistenţă ,7
Descrierea aparatului,10
Instalarea,36
Pornirea şi folosirea,40
Precauţii şi sfaturi,40
Întreţinerea şi îngrijirea,41
Depanarea,41
Obsah
Pokyny pro použití,1
Upozornění,4
Servisní služba,7
Popis zařízení,9
Instalace,24
Uvedení do činnosti a použití,28
Opatření a rady,28
Údržba a péče,29
Identikace a řešení problémů,29




Инструкции за употреба,1
Предупреждения,3
Техническо обслужване,7
Описание на уреда,8
Инсталиране,17
Пуск и експлоатация,22
Предпазни мерки и препоръки,22
Поддръжка и почистване,23
Отстраняване на неизправности,23




Інструкція по використанню,2
Запобіжні заходи,5
Допомога,7
Опис приладу,10
Установка,42
Ввімкнення і використання,46
Запобіжні заходи та поради,46
Обслуговування та догляд,47
Усунення несправностей,47
3
Warnings
WARNING: The appliance and its
accessible parts become hot during use.
Care should be taken to avoid touching
heating elements. Children less than 8
years of age shall be kept away unless
continuously supervised. This appliance
can be used by children aged from 8 years
and above and persons with reduced
physical, sensory or mental capabilities
or lack of experience and knowledge
if they have been given supervision
or instruction concerning use of the
appliance in a safe way and understand
the hazards involved. Children shall not
play with the appliance. Cleaning and
user maintenance shall not be made by
children without supervision.
WARNING: Unattended cooking on a hob
with fat or oil can be dangerous and may
result in re. NEVER try to extinguish a
re with water, but switch off the appliance
and then cover ame e.g. with a lid or a
re blanket.
WARNING: Danger of re: do not store
items on the cooking surfaces.
Never use steam cleaners or pressure
cleaners on the appliance.
Remove any liquid from the lid before
opening it. Do not close the glass cover (if
present) when the gas burners or electric
hotplates are still hot.
The appliance is not intended to be
operated by means of an external timer
or separate remote control system.
CAUTION: the use of inappropriate hob
guards can cause accidents.

ПРЕДУПРЕЖДЕНИЕ: Уредът и
достъпните му части се нагорещяват
по време на употреба. Трябва да
се избягва контакт с нагревателите.
Деца под 8 години трябва да бъдат
държани настрана, освен ако не са под
непрекъснат надзор. Уредът може да
бъде използван от деца над 8 години и от
хора с ограничени физически, сетивни
или умствени способности или без
опит и познания, ако са наблюдавани,
или са им дадени указания относно
използването на уреда по безопасен
начин, и са запознати с възможните
опасности. Децата не трябва да играят с
уреда. Почистването и поддръжката от
потребителя не трябва да се извършва
от деца без надзор.
ПРЕДУПРЕЖДЕНИЕ: Готвенето без
надзор с мазнина или масло върху
готварски плот може да бъде опасно
и да доведе до пожар. НИКОГА не
опитвайте да гасите пожар с вода, а
изключете уреда и след това покрийте
пламъка, например с капак или
противопожарно одеяло.
ПРЕДУПРЕЖДЕНИЕ: Опасност от
пожар: не поставяйте предмети върху
повърхностите за готвене.
Никога не използвайте водочистачки
или парочистачки върху уреда.
Отстранете течността от капака,
преди да го отворите. Не затваряйте
стъкления капак (ако има такъв), когато
газовите горелки или електрическите
котлони все още са горещи.
Уредът не е предназначен за
управление с външен таймер или
4
отделна система за дистанционно
управление.
ВНИМАНИЕ: използването на
неподходящи готварски плотове може
да доведе до инциденти.

UPOZORNĚNÍ: Toto zařízení a jeho
přístupné části dosahují během použití
velmi vysoké teploty.
Je třeba dávat pozor a zabránit styku
s topnými články.
Udržujte děti mladší 8 let v dostatečné
vzdálenosti, pokud nejsou pod neustálým
dohledem.
Toto zařízení mohou používat děti od
8 let a osoby se sníženými fyzickými,
senzorickými nebo duševními
schopnostmi nebo osoby bez zkušeností
a znalostí, které se nacházejí pod
náležitým dohledem nebo které byly
poučeny ohledně použití zařízení
bezpečným způsobem a které si
uvědomují související nebezpečí. Děti
si nesmí hrát se zařízením. Děti nesmí
provádět operace čištění a údržby bez
dohledu.
UPOZORNĚNÍ: Ponechání sporáku
s ohřívanými tuky a oleji může být
nebezpe-čné a může způsobit požár.
NIKDY není třeba hasit plamen/požár
vo-dou, ale je nutné vypnout zařízení
a zakrýt plamen například víkem nebo
hydrofobní dekou.
VAROVÁNÍ: Nebezpečí požáru,
nenechávejte nic na vaření.
Nikdy nepoužívejte k čištění zařízení
vyso-kotlaký parní čistič.
Před otevřením krytu setřete případné
kapaliny, které se na něm nacházejí.
Neza-vírejte skleněný kryt (je-li součástí)
s ještě teplými plynovými hořáky nebo
elektrickou plotnou.
Přístroj není určen k uvedení do
provozu pomocí externího časovače
nebo samostatného systému dálkového
ovládání.
UPOZORNNÍ: Použití nevhodných
ochran varné desky može zposobit
nehody.

FIGYELEM: A készülék és annak
hozzáférhető részei a használat közben
rendkívüli módon felmelegedhetnek.
Vigyázzon, hogy nehogy hozzáérjen a
fűtőelemekhez.
Ha a gyermekek nincsenek folyamatos
felügyelet alatt, tartsa távol a 8 éven aluli
gyermekeket.
Ezt a készüléket a 8 éves kort betöltött
gyermekek, valamint a testileg,
érzékszervileg vagy szellemileg
korlátozott, nem hozzáértő, illetve a
terméket nem ismerő személyek csak
megfelelő felügyelet mellett, vagy a
készülék biztonságos használatával
kapcsolatos alapvető utasítások és a
kapcsolódó veszélyek ismeretében
használhatják. Vigyázzon, hogy a
gyermekek ne játsszanak a készülékkel.
A tisztítási és karbantartási műveleteket
gyermekek felügyelet nélkül nem
végezhetik.
FIGYELEM: A tűzhelyen felügyelet nélkül
otthagyott zsír vagy olaj veszélyes lehet,
és tüzet okozhat.
SOHA ne próbálja meg vízzel eloltani a
tüzet, hanem zárja el a készüléket, és
5
takarja le a lángot például fedővel vagy
tűzálló takaróval.
FIGYELEM: Tűzveszély! Ne tároljon
semmit a főző felületeken!
A készülék tisztításához soha ne használ-
jon gőztisztítót vagy nagynyomású tisz-
títót.
A fedő kinyitása előtt távolítsa el az
összes folyadékot! Ne csukja be az
üveg fedőt (típustól függően) ha a gáz
égők vagy elektromos főzőmezők még
melegek.
A készüléket nem szabad külső
időmérővel vagy különálló távirányító
rendszerrel használni.
FIGYELEM: A főzőlap nem megfelelő
használata balesetet okozhat.

ATENŢIE: Acest aparat şi părţile sale
accesibile devin foarte calde în timpul
folosirii.
Trebuie ţi atenţi şi nu atingeţi
elementele de încălzire.
Îndepărtaţi copiii sub 8 ani dacă nu sunt
supravegheaţi continuu.
Acest aparat poate  utilizat de copiii de
peste 8 ani şi de persoane cu capacităţi
zice, senzoriale sau mentale reduse sau
fără experienţă şi cunoştinţe dacă se aă
sub o supraveghere corespunzătoare
sau dacă au fost instruiţi cu privire la
folosirea aparatului în mod sigur şi dacă
îşi dau seama de pericolele corelate.
Copiii nu trebuie se joace cu aparatul.
Operaţiunile de curăţare şi de întreţinere
nu trebuie e efectuate de copii fără
supraveghere.
ATENŢIE: Lăsarea unui aragaz
nesupravegheat cu grăsimi şi uleiuri
poate  periculoasă şi poate provoca un
incendiu.
Nu trebuie NICIODA încercaţi
stingeţi o flacără/incendiu cu apă, ci
trebuie stingeţi aparatul şi acoperiţi
acăra, de exemplu cu un capac sau cu
o pătură ignifugă.
ATENŢIE: Risc de incendiu: nu lăsaţi
obiecte pe suprafeţele de gătit.
Nu folosiţi niciodată aparate cu aburi sau
sub presiune pentru a curăţa aparatul.
Eliminaţi eventualele reziduuri de lichid
de pe capac, înainte de a-l deschide. Nu
închideţi capacul din sticlă (dacă este
prezent) cu arzătoarele de gaz sau plita
electrică încă calde.
Aparatul nu trebuie pus în funcţiune prin
intermediul unui temporizator extern sau
al unui sistem separat de comandă la
distanţă.
ATENŢIE: folosirea unor protecţii
necorespunzătoare ale plitei poate
provoca accidente.

УВАГА: Під час роботи цей прилад,
а також його доступні частини
нагріваються до високих температур.
Слід бути особливо обережними, щоб
не торкатися нагрівальних елементів.
Діти віком до 8 років мають знаходитися
на небезпечній відстані від приладу,
якщо неможливо забезпечити постійний
контроль над ними.
Дозволяється користування цим
приладом дітьми віком від 8 років,
а також особами з обмеженими
6
фізичними, сенсорними або розумовими
можливостями або особами без
належного досвіду і знань, якщо вони
перебувають під постійним контролем
або проінструктовані щодо правил з
небезпечного користування приладу
і усвідомлюють ступені ризику. Не
дозволяйте дітям гратися з приладом.
Операції з очищення і догляду не
повинні виконуватися дітьми без
належного контролю.
УВАГА: Небезпечно залишати без
нагляду плити з жиром або олією, тому
що це може призвести до пожежі.
НІ В ЯКОМУ РАЗІ не слід намагатися
погасити полум’я/пожежу водою.
Необхідно вимкнути прилад і накрити
полум’я, наприклад, кришкою або
вогнетривким покривалом.
УВАГА: Небезпека пожежі: не залишайте
речі на варильних поверхнях.
Забороняється використання апаратів
для очищення парою або високим
тиском.
Витріть насухо всі наявні на кришці
рідини, перш ніж відкрити її. Не
закривайте скляну кришку (якщо вона
наявна), якщо газові пальники або
електричні конфорки залишаються
нагрітими.
Не передбачено увімкнення приладу
за допомогою зовнішнього таймеру
або окремої системи дистанційного
керування.
УВАГА: використання невідповідних
захисних пристроїв варильної поверхні
може призвести до нещасних випадків.
7
Assistance
! Never use the services of an unauthorised technician.
Communicating:
type of trouble
appliance model (Mod.)
serial number (S/N)
This information is found on the data plate located on the
appliance and/or on the packaging.

! Никога не използвайте услугите на неоторизиран
техник.
Подгответе следната информация:
тип на възникналия проблем.
модел на уреда (Mod.).
сериен номер (S/N).
Тази информация се намира на табелката с данни
върху уреда.

! Nikdy se neobracejte na neautorizované techniky.
Uveďte:
Druh poruchy;
Model zařízení (Mod.);
Výrobní číslo (S/N).
Tyto informace se nacházejí na štítku s jmenovitými údaji,
umístěném na zařízení.
Szerviz
! Sohase hívjon engedéllyel nem rendelkező szakembert!
Adja meg az alábbiakat:
az anomália típusa;
a készülék modellje (Mod.)
a készülék szériaszáma (S/N)
Az utóbbi információk a készüléken elhelyezett adattáblán
találhatók.

! Nu apelaţi niciodată la personal tehnic neautorizat.

tipul de anomalie;
modelul maşinii (Mod.);
numărul de serie (S/N).
Aceste informaţii se găsesc pe plăcuţa de caracteristici din
frigider, în partea de jos, în stânga.

! Не звертайтеся по допомогу до не уповноваженого
персоналу.
Повідомити:
Тип несправності;
Модель приладу (Mod.)
Серійний номер (S/N)
Ці дані знаходяться на табличці з даними на самому
приладі.
8
1
2
3
5
4
Description of the appliance
Overall view
1. Support Grid for COOKWARE
2. GAS BURNERS
3. Control Knobs for GAS BURNERS
4. Ignition for GAS BURNERS
5. 
GAS BURNERS differ in size and power. Use the
diameter of the cookware to choose the most appropriate
burner to cook with.
Control Knobs for GAS BURNERS adjust the size of the
ame.
 enables a specic burner to
be lit automatically.
 stops the gas ow if the ame is
accidentally extinguished.


1. Носеща скара за 
2. 
3. Контролни превключватели за 

4. Запалване за 
5. 
  се различават по размер и
мощност. Използвайте диаметъра на готварския съд,
за да изберете най-подходящата горелка, с която да
готвите.
Контролните превключватели за 
 регулират големината на пламъка
.
  позволява
определена горелка да се запали автоматично.
 спира потока от
газ, ако пламъкът бъде неволно изгасен.
9


1. Mřížky pro uložení N
2. 
3. Otočné ovladače 
4. Zapalovací svíčka 
5. 
 jsou různých rozměrů a výkonu.
Zvolte si ten, který je nejvhodnější pro průměr použité
nádoby.
• Otočné ovladače pro ovládání
plamene nebo výkonu.
• Zapalovací svíčka   umožňuje
automatické zapálení zvoleného hořáku.
 pro případ náhodného
zhasnutí plamene přeruší výstup plynu.


1. Főzőedénytartó RÁCSOK
2. 
3. Gázégő vezérlő 
4.  gázégők
5. 
 Különböző méretűek és teljesítményűek.
Válassza a használni kívánt edény átmérőjének
leginkább megfelelőt.
Gázégő vezérlő  A teljesítmény
szabályozására szolgálnak.
 gázégők: A kiválasztott gázégő
automatikus meggyújtására szolgál.
: A láng véletlen kialvása
esetén a gázellátás kikapcsolására szolgál.
1
2
3
5
4
10
Descrierea aparatului

1. Grătare de sprijin pentru 
2. 
3. Selectoare de comandă ale 
4. Dispozitiv de aprindere al 
5. 
sunt de diferite dimensiunişi
puteri. Alegeţi-le pe cele adecvate diametruluirecipientului
utilizat.
• Selectoarele de comandă ale 
şi sunt folosite pentrureglarea ăcării.
• Dispozitivul de aprindere al 
permite aprinderea automată a arzătoaruluiprestabilit.
  este utilizat încazul
stingerii accidentale a ăcării, împiedicândscurgerile de
gaz.


1. Підтримуюча Решітка для 
2. 
3. Ручки управління 
4. Запалювання для 
5. 
  відрізняються за розмірами
тапотужністю. Використовуйте для приготування
їжі посудз діаметром у відповідності до розміру
найбільшпідходящого пальника.
   
   
 полум’я
• Запалювання для  дозволяють,
привключенні, запалювати конкретні пальники
автоматично.
  зупиняє потік газу, якщо
полум’явипадково гасне.
1
2
3
5
4
GB
11
Installation
! Before operating your new appliance please read this
instruction booklet carefully. It contains important information
for safe use, installation and care of the appliance.
! Please keep these operating instructions for future reference.
Pass them on to possible new owners of the appliance.
Positioning
! Keep packaging material out of the reach of children. It can
become a choking or suffocation hazard (see Precautions
and tips).
! The appliance must be installed by a qualied professional
according to the instructions provided. Incorrect installation
may cause harm to people and animals or may damage
property.
! This unit may be installed and used only in permanently
ventilated rooms in accordance with current national
regulations. The following requirements must be observed:
The room must be equipped with an air extraction system
that expels any combustion fumes. This may consist of
a hood or an electric fan that automatically starts each
time the appliance is switched on.
In a chimney stack or branched flue.
(exclusively for cooking appliances)
Directly to
the Outside
The room must also allow proper air circulation, as air is
needed for combustion to occur normally. The ow of air
must not be less than 2 m
3
/h per kW of installed power.
The air circulation system may
take air directly from the outside
by means of a pipe with an inner
cross section of at least 100 cm
2
;
the opening must not be vulnerable
to any type of blockages.
The system can also provide the air
needed for combustion indirectly,
i.e. from adjacent rooms tted with
air circulation tubes as described
above. However, these rooms must
not be communal rooms, bedrooms
or rooms that may present a re
hazard.
Liquid petroleum gas sinks to the oor as it is heavier
than air. Therefore, rooms containing LPG cylinders must
also be equipped with vents to allow gas to escape in
the event of a leak. As a result LPG cylinders, whether
partially or completely full, must not be installed or stored
A
Examples of
ventilation holes
for comburant air.
Enlarging the ventilation slot
between window and floor.
Adjacent
Room
Room to be
Vented
in rooms or storage areas that are below ground level
(cellars, etc.). It is advisable to keep only the cylinder
being used in the room, positioned so that it is not subject
to heat produced by external sources (ovens, replaces,
stoves, etc. ) which could raise the temperature of the
cylinder above 50°C.
Fitting the appliance
The following precautions must be taken when installing
the hob:
Kitchen cabinets adjacent to the appliance and taller than
the top of the hob must be at least 600 mm from the edge
of the hob.
Hoods must be installed according to their relative
installation instruction manuals and at a minimum
distance of 650 mm from the hob (see gure).
Place the wall cabinets adjacent to the hood at a minimum
height of 420 mm from the hob (see gure).
If the hob is installed beneath a wall
cabinet, the latter must be situated
at a minimum of 700 mm above
the hob.
Before the installation remove the grids and burners from
the hob and turn it upside down, making sure you don’t
damage the thermocouples and spark plugs.
Apply the seals that come with the appliance along the outer
edges of the hob to prevent any passage of air, humidity
and water (see Figure).
For proper application make sure the surfaces to be sealed
are clean, dry and free of any grease/oil.
The installation cavity should have the dimensions
indicated in the gure.
Fastening hooks are provided, allowing you to fasten
the hob to tops that are between 20 and 40 mm thick.
To ensure the hob is securely fastened to the top, we
recommend you use all the hooks provided.
555 mm
55 mm
475 mm
600mm min.
420mm min.
650mm min.
12
GB

Hooking position Hooking position
for top H=20mm for top H=30mm
Front
Hooking position 
for top H=40mm
! Use the hooks contained in the “accessory pack”.
Where the hob is not installed over a built-in oven, a
wooden panel must be installed as insulation. This must
be placed at a minimum distance of 20 mm from the lower
part of the hob.
Ventilation
To ensure adequate ventilation, the back panel of the cabinet
must be removed. It is advisable to install the oven so that it
rests on two strips of wood, or on a completely at surface
with an opening of at least 45 x 560 mm (see diagrams).
560 mm.
45 mm.
Where a hob is installed above an oven without a forced
ventilation cooling system, adequate ventilation must be
provided inside the cabinet by means of air holes through
which air can pass (see gure).
Electrical connection
Hobs equipped with a three-pole power supply cable are
designed to operate with alternating current at the voltage and
frequency indicated on the data plate (this is located on the
lower part of the appliance). The earth wire in the cable has a
green and yellow cover. If the appliance is to be installed above
a built-in electric oven, the electrical connection of the hob and
the oven must be carried out separately, both for electrical
safety purposes and to make extracting the oven easier.

Install a standardised plug corresponding to the load
indicated on the data plate.
The appliance must be directly connected to the mains
using an omnipolar circuit-breaker with a minimum contact
opening of 3 mm installed between the appliance and the
mains. The circuit-breaker must be suitable for the charge
indicated and must comply with current electrical regulations
(the earthing wire must not be interrupted by the circuit-
breaker). The supply cable must not come into contact with
surfaces with temperatures higher than 50°C.
! The installer must ensure that the correct electrical
connection has been made and that it is compliant with
safety regulations.
Before connecting to the power supply, make sure that:
The appliance is earthed and the plug is compliant with
the law.
The socket can withstand the maximum power of the
appliance, which is indicated on the data plate.
The voltage is in the range between the values indicated
on the data plate.
The socket is compatible with the plug of the appliance.
If the socket is incompatible with the plug, ask an
authorised technician to replace it. Do not use extension
cords or multiple sockets.
! Once the appliance has been installed, the power supply
cable and the electrical socket must be easily accessible.
! The cable must not be bent or compressed.
! The cable must be checked regularly and replaced by
authorised technicians only (see Assistance).
! The manufacturer declines any liability should these safety
measures not be observed.
Gas connection
The appliance should be connected to the main gas supply
or to a gas cylinder in compliance with current national
regulations. Before carrying out the connection, make sure
the cooker is compatible with the gas supply you wish to
use. If this is not the case, follow the instructions indicated
in the paragraph “Adapting to different types of gas.”
When using liquid gas from a cylinder, install a pressure
regulator which complies with current national regulations.
! Check that the pressure of the gas supply is consistent with the
values indicated in Table 1 (“Burner and nozzle specications”).
GB
13
This will ensure the safe operation and longevity of your
appliance while maintaining efcient energy consumption.

! Connection to the gas system must be carried out in such a
way as not to place any strain of any kind on the appliance.
There is an adjustable L-shaped pipe tting on the appliance
supply ramp and this is tted with a seal in order to prevent
leaks. The seal must always be replaced after rotating the
pipe tting (seal provided with appliance). The gas supply
pipe tting is a threaded 1/2 gas cylindrical male attachment.


The gas supply pipe tting is a threaded 1/2 gas cylindrical
male attachment.
These pipes must be installed so that they are never longer
than 2000 mm when fully extended. Once connection has
been carried out, make sure that the exible metal pipe
does not touch any moving parts and is not compressed.
! Only use pipes and seals that comply with current national
regulations.

! When the installation process is complete, check the pipe
ttings for leaks using a soapy solution. Never use a ame.

To adapt the hob to a different type of gas other than default
type (indicated on the rating plate at the base of the hob or
on the packaging), the burner nozzles should be replaced
as follows:
1. Remove the hob grids and slide the burners off their
seats.
2. Unscrew the nozzles using a 7 mm socket spanner, and
replace them with nozzles for the new type of gas (see
table 1 “Burner and nozzle characteristics”).
3. Reassemble the parts following the above procedure in
the reverse order.
4. Once this procedure is nished, replace the old rating
sticker with one indicating the new type of gas used.
Sticker are available from any of our Service Centres.
Adjusting the burners’ primary air
Does not require adjusting.
Setting the burners to minimum
1. Turn the tap to the low ame position;
2. Remove the knob and adjust
the adjustment screw, which is
positioned in or next to the tap pin,
until the ame is small but steady.
3. Having adjusted the ame to the required low setting,
while the burner is alight, quickly change the position
of the knob from minimum to maximum and vice versa
several times, checking that the ame does not go out.
4. Some appliances have a safety device (thermocouple)
tted. If the device fails to work when the burners are set
to the low ame setting, increase this low ame setting
using the adjusting screw.
5. Once the adjustment has been made, replace the
seals on the by-passes using sealing wax or a similar
substance.
! If the appliance is connected to liquid gas, the regulation
screw must be fastened as tightly as possible.
! Once this procedure is nished, replace the old rating
sticker with one indicating the new type of gas used. Stickers
are available from any of our Service Centres.
! Should the gas pressure used be different (or vary slightly)
from the recommended pressure, a suitable pressure
regulator must be tted to the inlet pipe (in order to comply
with current national regulations).
Electrical
connections
DATA PLATE
see data plate
This appliance conforms to the following
European Economic Community directives:
- 2006/95/EEC dated 12/12/06 (Low
Voltage) and subsequent amendments
- 2004/108/EEC dated 15/12/04
(Electromagnetic Compatibility) and
subsequent amendments
- 93/68/EEC dated 22/07/93 and
subsequent amendments.
- 2009/142/EEC dated 30/11/09 (Gas) and
subsequent amendments.
- 2012/19/EC and subsequent
amendments.
14
GB
Table 1 Liquid Gas Natural Gas (G20)
Nominal (mbar)
Minimum (mbar)
Maximum (mbar)
20
17
25
28-30
25
35
Fast (R)
Semi Fast (S)
Auxiliary (A)
Supply pressures
Burner
Diameter
(mm)
Thermal Power
kW (p.c.s.*)
100
75
55
3.10
1.75
1.05
Nomin. Reduc.
0.80
0.45
0.45
By-pass
1/100
(mm)
39
28
28
Nozzle
1/100
Flow*
g/h
(mm) ***(G30)
86
64
50
Nozzle
1/100
Flow*
l/h
(mm)
132(H3)
96(Z)
79(6)
295
167
100
225
127
76
**(G31)
221
125
75
Burner and nozzle specifications
* At 15°C and 1013,25 mbar - dry gas
** Propane P. C.S. = 50.37 MJ/Kg
*** Butane P. C.S. = 49.47 MJ/Kg
Natural P. C.S. = 37.78 MJ/m
3
9YPS 645 GH/HA
9YPS 645 AX/HA
9YPS 645 X GH/HA
9YPS 645 GH R/HA
R
S
S
A
GB
15

! The position of the corresponding gas burner is shown
on every knob.
Gas burners
Each burner can be adjusted to one of the following settings
using the corresponding control knob:
Off
Maximum
Minimum
To light one of the burners, hold a lit match or lighter near
the burner and, at the same time, press down and turn the
corresponding knob anti-clockwise to the maximum setting.
Since the burner is tted with a safety device, the knob
should be pressed for approximately 2-3 seconds to allow
the automatic device keeping the ame alight to heat up.
Models are equipped with an ignition button incorporated
into the control knob. If this is the case, the ignitor is
present, but not the button.To light a burner, simply press
the corresponding knob all the way in and then turn it in the
counter-clockwise direction to the “High” setting, keeping it
pressed in until the burner lights.
! If a ame is accidentally extinguished, turn off the control
knob and wait for at least 1 minute before trying to relight it.
To switch off the burner, turn the knob in a clockwise
direction until it stops (when reaches the “●” position).

To ensure the burners operate efciently:
Use appropriate cookware for each burner (see table)
so that the ames do not extend beyond the bottom of
the cookware.
Always use cookware with a at base and a cover.
When the contents of the pan reach boiling point, turn
the knob to minimum.
Burner
Fast (R)
Semi Fast (S)
Auxiliary (A)
Ø Cookware Diameter (cm)
24 - 26
16 - 20
10 - 14
To identify the type of burner, refer to the designs in the
section entitled, “Burner and Nozzle Specications”.

! This appliance has been designed and manufactured
in compliance with international safety standards. The
following warnings are provided for safety reasons and
must be read carefully.

 
     


“Positioning” the appliance.
 
      
serial number plate.
The appliance was designed for domestic use inside the
home and is not intended for commercial or industrial use.
The appliance must not be installed outdoors, even in
covered areas. It is extremely dangerous to leave the
appliance exposed to rain and storms.
Do not touch the appliance with bare feet or with wet or
damp hands and feet.
         





unreasonable use of the appliance.
Ensure that the power supply cables of other electrical
appliances do not come into contact with the hot parts
of the oven.
The openings used for ventilation and dispersion of heat
must never be covered.
Always make sure the knobs are in the “●”/“” position
when the appliance is not in use.
When unplugging the appliance always pull the plug from
the mains socket, do not pull on the cable.
Never carry out any cleaning or maintenance work
without having detached the plug from the mains.
In case of malfunction, under no circumstances should
you attempt to repair the appliance yourself. Repairs
carried out by inexperienced persons may cause injury
or further malfunctioning of the appliance. Contact a
Service Centre (see Assistance).
Always make sure that pan handles are turned towards
the centre of the hob in order to avoid accidental burns.
Do not close the glass cover (if present) when the gas
burners are still hot.
Do not use unstable or deformed pans.
The appliance should not be operated by people
(including children) with reduced physical, sensory or
mental capacities, by inexperienced individuals or by
anyone who is not familiar with the product. These
individuals should, at the very least, be supervised by
someone who assumes responsibility for their safety or
receive preliminary instructions relating to the operation
of the appliance.
Do not let children play with the appliance.
      
      

Disposal
When disposing of packaging material: observe local
legislation so that the packaging may be reused.
The European Directive 2012/19/EC on Waste
Electrical and Electronic Equipment (WEEE), requires
16
GB
that old household electrical appliances must not
be disposed of in the normal unsorted municipal
waste stream. Old appliances must be collected
separately in order to optimise the recovery and
recycling of the materials they contain and reduce
the impact on human health and the environment.
The crossed out “wheeled bin” symbol on the product
reminds you of your obligation, that when you dispose
of the appliance it must be separately collected.
Consumers should contact their local authority or retailer
for information concerning the correct disposal of their
old appliance.

Switching the appliance off
Disconnect your appliance from the electricity supply before
carrying out any work on it.
Cleaning the appliance
! Do not use abrasive or corrosive detergents such as stain
removers, anti-rust products, powder detergents or sponges with
abrasive surfaces: these may scratch the surface beyond repair.
! Never use steam cleaners or pressure cleaners on the
appliance.
• It is usually enough to wash the hob with a damp sponge
and dry it with absorbent kitchen roll.
The removable parts of the burners should be washed
frequently with warm water and soap and any burnt-on
substances removed.
For hobs which ligth automatically, the terminal part of
the electronic instant lighting devices should be cleaned
frequently and the gas outlet holes should be checked
for blockages.
Stainless steel can be marked by hard water that has
been left on the surface for a long time, or by aggressive
detergents containing phosphorus. After cleaning, rinse
and dry any remaining drops of water.
Gas tap maintenance
Over time, the taps may become jammed or difcult to turn.
If this happens, the tap must be replaced.
!     


It may happen that the appliance does not function properly
or at all. Before calling the service centre for assistance,
check if anything can be done. First, check to see that there
are no interruptions in the gas and electrical supplies, and,
in particular, that the gas valves for the mains are open.
       

Check whether:
The gas holes on the burner are clogged.
All the movable parts that make up the burner are
mounted correctly.
There are draughts near the appliance.

Check to make sure that:
You pressed the knob all the way in.
You keep the knob pressed in long enough to activate
the safety device.
The gas holes are not blocked in the area corresponding
to the safety device.

Check to make sure that:
The gas holes are not blocked.
There are no draughts near the appliance.
The minimum setting has been adjusted properly.

Check to make sure that:
The bottom of the cookware is perfectly at.
The cookware is positioned correctly at the centre of the
burner.
The pan support grids have been positioned correctly.
17
BG

! Моля, прочетете внимателно тази книжка с инструкции
преди работа с новия уред. Тя съдържа важна
информация за безопасната експлоатация, инсталиране
и грижи за уреда.
! Съхранявайте тези инструкции за употреба за бъдещи
справки. Предайте ги и на новите собственици на уреда.

! Дръжте опаковъчния материал далеч от деца. Има
опасност от задавяне или задушаване (вж. „Предпазни
мерки и препоръки“).
! Уредът трябва да бъде инсталиран от квалифициран
специалист съгласно предоставените инструкции.
Неправилното инсталиране може да причини
наранявания на хора и животни или да повреди
имущество.
! Този уред може да се инсталира и използва само в
постоянно проветрявани помещения, съгласно текущите
национални разпоредби. Трябва да се спазят следните
изисквания:
Помещението да е оборудвано със система за
извличане на въздуха, която да отвежда газовете,
отделени при горенето. Тя може да се състои от
абсорбатор или електрически вентилатор, който се
стартира автоматично при всяко включване на уреда.
В комин или система за отвеждане на газове
(специално за готварски уреди)
Директно с
външната среда
Помещението трябва също да позволява правилна
циркулация на въздуха, тъй като въздухът е
необходим за нормалното протичане на процеса на
горене. Въздушният поток не трябва да е под 2 m
3
/h
за kW инсталирана мощност.
Системата за циркулация на
въздуха може да взема въздух
директно от външната среда
чрез тръба с диаметър на
вътрешното сечение не по-малък
от 100 cm
2
; отворът не трябва да
позволява никаква възможност
за блокиране.
Системата може също да
предоставя необходимия за
изгаряне въздух индиректно,
например от съседни стаи,
снабдени с описаните по-горе
тръби за циркулация на въздуха.
A
Примери за вентилационни
отвори за окисляващ въздух.
Увеличаване на разстоянието
между прозореца и пода.
Съседно
помещение
Помещение
за вентилиране
Тези стаи обаче не може да са комунални помещения,
спални или помещения, които може да са потенциално
опасни за възникване на пожар.
Втечненият нефтен газ потъва до пода, тъй като е
по-тежък от въздуха. Затова помещения, в които има
бутилки с втечнен нефтен газ (LPG), трябва да са
оборудвани с отвори, които да позволяват изпускане
на газа в случай на теч. Поради тази причина
бутилки с втечнен петролен газ, били те пълни или
частично запълнени, не трябва да се инсталират или
съхраняват в помещения или площи за съхранение,
които са под земята (мазета и т.н.). Препоръчва се
в помещението да се намира само използваната
бутилка и да е разположена така, че да не е изложена
на въздействието на топлина от външни източници
(фурни, камини, печки и т.н.), които може да повишат
температурата на бутилката над 50°C.

Трябва да се вземат следните предпазни мерки при
инсталиране на готварския плот:
Кухненски шкафове, съседни на уреда и по-високи
от горната част на готварския плот, трябва да са на
разстояние поне 600 мм от ръба на готварския плот.
Абсорбаторите трябва да се инсталират според
съответните им ръководства за инсталиране и на
разстояние минимум 650 мм от готварския плот (вж.
фигурата).
Поставете шкафовете, съседни на абсорбатора, на
минимална височина 420 мм от готварския плот (вж.
фигурата).
Ако готварският плот се
инсталира под стенен шкаф,
последният трябва да е монтиран
на разстояние поне 700 мм над
готварския плот.
Преди инсталиране отстранете носещите скари и горелките
от готварския плот и го завъртете надолу, за да сте сигурни,
че няма да повредите термодвойките и запалителните
свещи. Поставете уплътнителя, който се предоставя с
уреда, под дължината на външните ръбове на готварския
плот, за да предотвратите навлизането на въздух, влага
или вода (вж. фигурата). За правилното му поставяне
се уверете, че повърхностите, които ще се запечатват с
уплътнителя, са чисти, сухи и без твърди/течни мазнини.
600mm min.
420mm min.
650mm min.
18
BG
Отворът за инсталиране трябва да е с размерите,
посочени на фигурата.
Предоставени са скрепителни елементи, които
позволяват закрепването на готварския плот към
кухненски плотове с дебелина между 20 и 40 мм. За
да се уверите, че готварският плот е добре закрепен
към кухненския плот, препоръчваме да използвате
всички предоставени скрепителни елементи.
555 mm
55 mm
475 mm

Позиция на Позиция на
скрепителни елемент скрепителни елемент
за кухненски плот с за кухненски плот с
височина  височина 

Позиция на 
скрепителния елемент
за кухненски плот с
височина 
! Използвайте скрепителните елементи, съдържащи се
в „пакета с аксесоари“.
Когато готварският плот не е инсталиран над вградена
фурна, трябва да се инсталира дървен панел за
изолация. Той трябва да е на разстояние поне 20 мм
от долната част на готварския плот.

За да се осигури достатъчна вентилация, задната стена
на шкафа трябва да се отстрани. Препоръчително е да
се монтира фурната така, че да лежи върху две дървени
летви или върху напълно гладка повърхност с отвор от
поне 45 x 560 мм (вж. схемите).
560 mm.
45 mm.
Когато готварският плот се инсталира над фурна без
охлаждаща система за принудителна вентилация,
трябва да се осигури адекватна вентилация във
вътрешността на шкафа чрез отвори за въздух, през
които да преминава въздух (вж. фигурата).

Готварски плотове, оборудвани с триполюсен захранващ
кабел, са предназначени за работа с променлив
ток с честота и напрежение, каквито са посочени на
табелката с данни (тя се намира в долната част на
уреда). Заземителният проводник в кабела е с покритие
в зелено и жълто. Ако уредът трябва да се инсталира
над вградена електрическа фурна, електрическото
свързване на готварския плот и фурната трябва да се
изпълнят отделно, както с цел електрическа безопасност,
така и с цел по-лесно изваждане на фурната.


Монтирайте стандартизиран щепсел, съответстващ на
електрическото натоварване, посочено върху табелката
с данни.
Уредът трябва да бъде директно свързан с мрежата чрез
многополюсен прекъсвач с минимално отваряне от 3
мм, поставен между уреда и мрежата. Предпазителят
трябва да е подходящ за посоченото натоварване и да
отговаря на нормите за електричество (заземителният
кабел не трябва да се прекъсва от предпазителя).
Захранващият кабел не трябва да влиза в контакт с
повърхности с температура над 50°C.
! Лицето, монтиращо уреда, трябва да се увери, че
е извършено правилно електрическо свързване и че
уредът отговаря на регламентите за безопасност.
Преди да свържете захранването, се уверете, че:
Уредът е заземен, а щепселът отговаря на законовите
разпоредби.
Контактът може да издържи максималната мощност
на уреда, посочена на табелката с данните.
Напрежението е в допустимите граници на
стойностите, посочени на табелката с данните за
уреда.
19
BG
Контактът е съвместим с щепсела на уреда. Ако
контактът е несъвместим с щепсела, се обърнете към
оторизиран техник, за да го замени. Не използвайте
удължители или разклонители.
! След инсталирането на уреда трябва да има лесен
достъп до захранващия кабел и електрическия контакт.
! Кабелът не трябва да бъде прегъван или притискан.
! Кабелът трябва периодично да бъде проверяван и
подменян само от оторизирани техници (вж. Техническо
обслужване“).
! Производителят не носи никаква отговорност, ако тези
мерки за безопасност не са спазени.

Уредът трябва да се свърже към газоразпределителна
мрежа или с газова бутилка, в съответствие с текущите
национални разпоредби. Преди осъществяване на
свързването се уверете, че печката е съвместима с
газоснабдяването, което желаете да използвате. Ако
случаят не е такъв, следвайте инструкциите, посочени
в параграф „Приспособяване към различни видове газ“.
Когато използвате втечнен газ от бутилка, инсталирайте
регулатор на налягане, който отговаря на текущите
национални разпоредби.
! Проверете дали налягането на подавания газ отговаря
на стойностите, посочени в Таблица 1 („Спецификации
на горелки и дюзи“). Това ще осигури безопасната
експлоатация и дълготрайността на уреда, като при това
поддържа ефикасно потребление на енергия.

! Свързването към газова система трябва да се извърши
по такъв начин, че да не причинява какъвто и да е вид
деформация на уреда.
Има регулируема Г-образна планка в рамката за
захранване на уреда и тя е снабдена с уплътнител, за
да се предотвратят течове. Уплътнителят винаги трябва
да се подменя след завъртане на скрепителния елемент
на тръбата (уплътнителят се предоставя с уреда).
Скрепителният елемент на газоснабдяващата тръба е
муфа с външна цилиндрична резба 1/2".
   

Скрепителният елемент на газоснабдяващата тръба е
муфа с външна цилиндрична резба 1/2".
Тръбите трябва да се инсталират така, че да не са по-
дълги от 2000 мм в напълно разтегнато състояние. След
осъществяване на връзката се уверете, че гъвкавата
метална тръба не опира в движещи се части и не е под
налягане.
! Използвайте само тръби и уплътнители, които
съответстват на текущите национални разпоредби.

! Когато завършите процеса на инсталиране, проверете
свързващите елементи на тръбата за течове, като
използвате сапунен разтвор. Никога не използвайте
пламък.

За да приспособите готварския плот към друг вид
газ, различен от стандартния (посочен на табелката с
номинални данни в долната част на готварския плот
или на опаковката), дюзите на горелките трябва да се
сменят както следва:
1. Отстранете скарите на готварския плот и плъзнете
горелките извън местата им.
2. Развийте дюзите с помощта на 7мм глух ключ и ги
заменете с дюзи за новия тип газ (вж. Таблица 1
„Спецификации на горелки и дюзи“).
3. Сглобете отново частите, като следвате горната
процедура в обратен ред.
4. След като завършите процедурата, заменете
стария стикер с номинални стойности с подобен за
използвания нов тип газ. Можете да намерите стикери
във всеки сервизен център.
Регулиране на основния въздух на горелките
Не е необходимо регулиране.
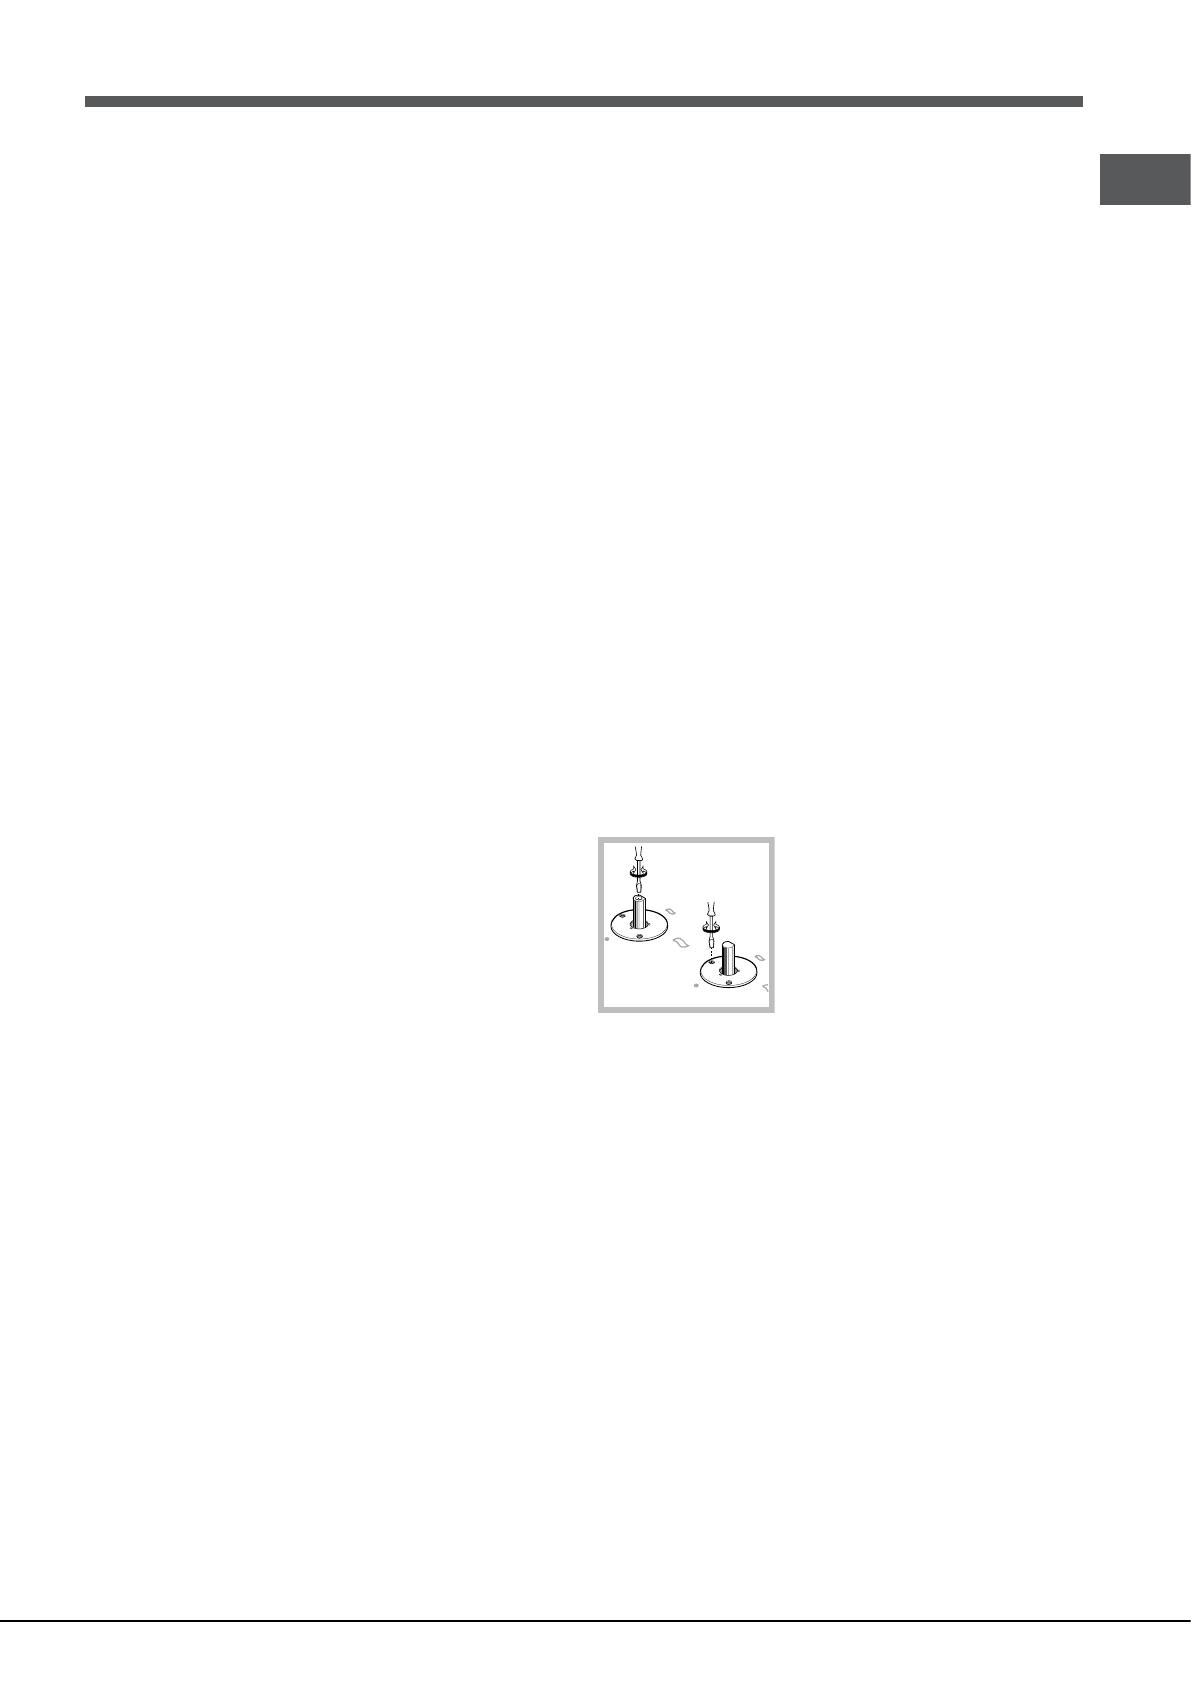
Настройване на горелките на минимален пламък
1. Завъртете крана в позицията за минимален пламък;
2. Отстранете превключвателя
и регулирайте с винта за
регулиране, който се намира в
или до върха на крана, докато
пламъкът стане малък, но
стабилен.
3. След като регулирате пламъка до желаната
настройка за минимален пламък и докато горелката
е в добро състояние, бързо променете позицията
на превключвателя от минимален на максимален
пламък и обратно няколко пъти, за да се уверите, че
пламъкът не изгасва.
4. Някои уреди имат инсталиран механизъм за
безопасност (термодвойка). Ако механизмът не успее
да се задейства, когато горелките се настройват на
минимален пламък, увеличете тази настройка за
минимален пламък с помощта на съседния винт.
5. След като завършите настройките, поставете отново
уплътнителите на байпасните елементи, като
използвате запечатващ восък или подобно вещество.
! Ако уредът е свързан с втечнен газ, винтът за
регулиране трябва да се затегне възможно най-силно.
! След като завършите процедурата, заменете стария
стикер с номинални стойности с подобен за използвания
нов тип газ. Можете да намерите стикери във всеки
сервизен център.
20
BG
! Ако налягането на използваната газ е различно (или
леко варира) от препоръчителното налягане, трябва да
се инсталира подходящ регулатор за газ на входната
тръба (за да се осигури съответствие с текущите
национални разпоредби).
Електрически
свързвания
ТАБЕЛКА С ДАННИ
Вж. табелката с данни
Този уред съответства на следните
директиви на ЕИО:
- 2006/95/ЕИО от 12/12/2006 г. (Ниско
напрежение) и последващи изменения
- 2004/108/ЕИО от 15/12/2004 г.
(Електромагнитна съвместимост) и
последващи изменения
- 93/68/ЕИО от 22/07/1993 г. и
последващи изменения.
- 2009/142/ЕИО от 30/11/2009 г. (Газ) и
последващи изменения.
- 2012/19/ЕО и последващи изменения.
  • Page 1 1
  • Page 2 2
  • Page 3 3
  • Page 4 4
  • Page 5 5
  • Page 6 6
  • Page 7 7
  • Page 8 8
  • Page 9 9
  • Page 10 10
  • Page 11 11
  • Page 12 12
  • Page 13 13
  • Page 14 14
  • Page 15 15
  • Page 16 16
  • Page 17 17
  • Page 18 18
  • Page 19 19
  • Page 20 20
  • Page 21 21
  • Page 22 22
  • Page 23 23
  • Page 24 24
  • Page 25 25
  • Page 26 26
  • Page 27 27
  • Page 28 28
  • Page 29 29
  • Page 30 30
  • Page 31 31
  • Page 32 32
  • Page 33 33
  • Page 34 34
  • Page 35 35
  • Page 36 36
  • Page 37 37
  • Page 38 38
  • Page 39 39
  • Page 40 40
  • Page 41 41
  • Page 42 42
  • Page 43 43
  • Page 44 44
  • Page 45 45
  • Page 46 46
  • Page 47 47
  • Page 48 48

Indesit 9YPS 645(AN) GH R/HA Užívateľská príručka

Typ
Užívateľská príručka