33
34
Детское автокресло HEYNER® MaxiFix AERO нельзя использовать в качестве стульчика
или игрушки. При использовании автокресла не по его прямому назначению существует
опасность получения травмы.
Пожалуйста, выделите достаточно времени для установки детского автокресла в
автомобиле в соответствии с указаниями этой инструкции.
НЕ ИСПОЛЬЗУЙТЕ детское автокресло, если оно повреждено или если отсутствуют какие-
либо его части. Не используйте бывшие в употреблении автокресла, если Вы не уверены в
истории их эксплуатации до Вас. Некоторые детали автокресла могут отсутствовать или
иметь скрытые повреждения.
Убедитесь, что все части детского автокресла размещены так, что при постоянном его
использовании они не потеряются и не будут защемлены дверьми автомобиля или при
регулировке его сидений!
Детское автокресло HEYNER® MaxiProtect ERGO/AERO должно находиться в автомобиле в
закрепленном положении, даже если ребенок не находится в автокресле.
Если детское автокресло не используется, то старайтесь не оставлять его под
воздействием прямых солнечных лучей. Сидение может сильно нагреться. Особенно
подвержен солнечному нагреву замок ремней безопасности. Перед эксплуатацией
удостоверьтесь, что он не горячий.
После аварии требуется заменить автокресло или отправить его вместе с описанием
случившегося производителю для проверки.
Никогда не используйте детское автокресло без оригинальной обивки производителя.
При необходимости замены обивки детского автокресла, используйте только
оригинальные комплектующие компании HEYNER MOBIL AUTOMOTIVE GMBH.
При возникновении вопросов, пожалуйста, обратитесь к продавцу или производителю
детского автокресла.
Никогда не пристегивайте ребенка в атвокресле только двухточечным ремнем
безопасности. Если ребенок пристегнут только двухточечным ремнем , то при аварии он
может получить серьезные травмы.
На сидениях автомобиля, установленных поперек или против хода движения автомобиля,
использование детского автокресла запрещено.
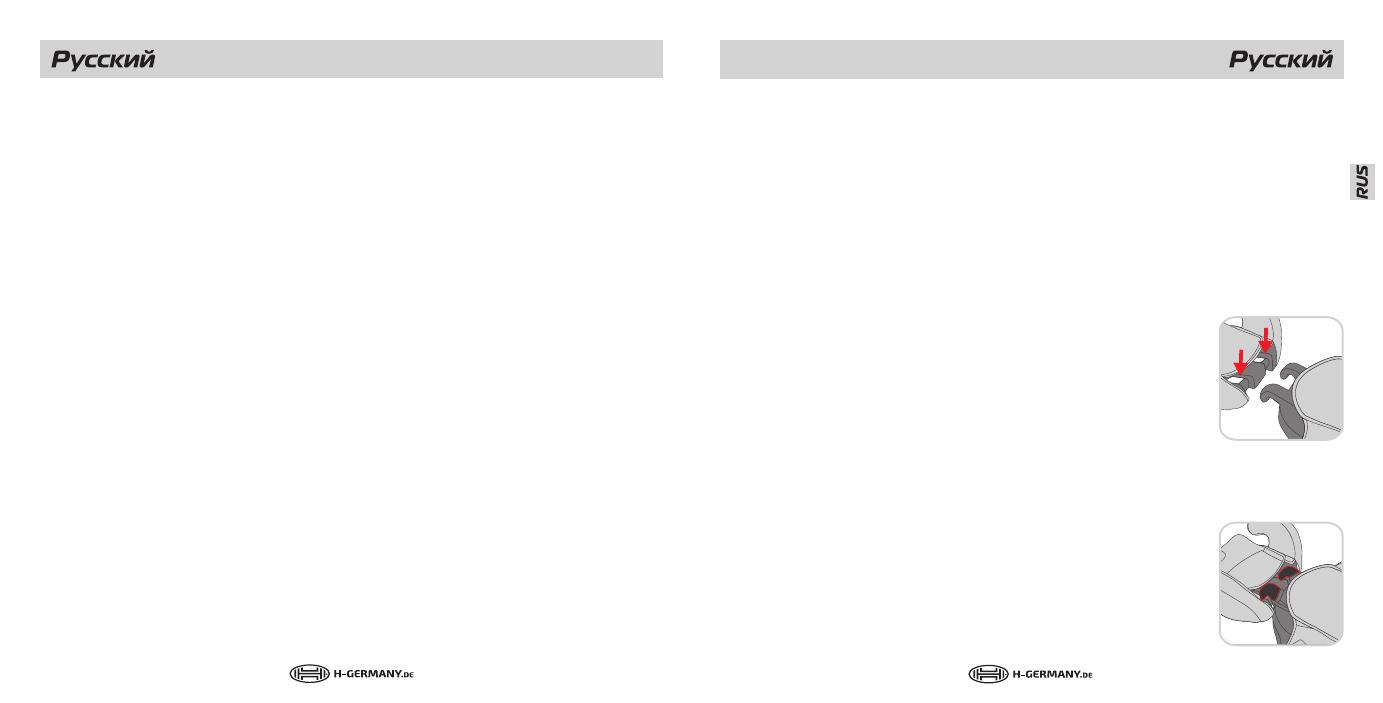
2. Соединение спинки и подушки автокресла
Автокресло состоит из подушки для сидения и спинки сиденья с
подголовником. Только комбинация их этих двух частей обеспечивает
максимальную защиту.
ВНИМАНИЕ: Компоненты автокресла HEYNER® MaxiFix AERO
не использовать отдельно или в сочетании с частями или
подголовниками других производителей или других серий.
Разрешение на использование в этом случае теряется.
Положите спинку и подушку сиденья на ровную поверхность лицевой стороной вверх
так, чтобы спинка лежала за подушкой, а ее соединительные кронштейны (А) находились
над соединительными пазами подушки сиденья (B). Сильно, но
осторожно нажмите на соединительные кронштейны и вдавите их в
соединительные пазы подушки сиденья. Затем, удерживая подушку
сиденья, поднимите спинку до вертикального положения.
Соединительные кронштейны спинки должны войти в пазы подушки
автокресла с
заметным «щелчком». В результате спинка должна зафиксироваться


