

This product may be covered by one or
more of the following United States patents:
US6542302, US6816310, US6906862
000000-2126-372 / 07.2015

/// ZEISS VICTORY V8
Gebrauchshinweise / Garantie
Instructions for use / Guarantee
Mode d’emploi / Garantie
Istruzioni d’impiego / Garanzia
Modo de empleo / Garantía
Bruksanvisning / Garanti
Kayttöohje / Takuu
Pokyny k používání / Záruka
Informacje dotyczące użytkowania / Gwarancja
Használati utasítás / Jótállás
Инструкция по применению / Гарантия
使用上の注意 / 保証
使用提示 / 质保
Gebruiksaanwijzing / Garantie

/// ZEISS VICTORY V8
ZEISS. PIONIER SEIT 1846.


GEBRAUCHSHINWEISE
Die Produkte der Marke ZEISS sind geprägt durch hervorragende optische Leistungen,
präzise Verarbeitung und lange Lebensdauer.
Bitte beachten Sie folgende Gebrauchshinweise, damit Sie Ihr Zielfernrohr optimal nutzen
können und es Ihnen über viele Jahre ein zuverlässiger Begleiter wird.
Informationen für Ihre Sicherheit
Batterie-Entsorgung
Batterien gehören nicht in den Hausmüll!
Bitte bedienen Sie sich bei der Rückgabe verbrauchter Batterien eines in Ihrem Land evtl.
vorhandenen Rücknahmesystems.
Bitte geben Sie nur entladene Batterien ab.
Batterien sind in der Regel dann entladen, wenn das damit betriebene Gerät
• abschaltet und signalisiert „Batterie leer“.
• nach längerem Gebrauch der Batterie nicht mehr einwandfrei funktioniert.
Umwelteinflüsse
• Schauen Sie keinesfalls mit dem Zielfernrohr in die Sonne oder Laserlichtquellen, dies kann zu
schweren Augenverletzungen führen.
• Setzen Sie das Gerät nicht ohne Schutzdeckel längere Zeit der Sonne aus. Das Objektiv und
das Okular können wie ein Brennglas wirken und innen liegende Bauteile, als auch daher
liegende Objekte, zerstören.
• Vermeiden Sie Berührungen der Metalloberfläche nach Sonneneinstrahlung oder Kälte.
Verschluckungsgefahr
Lassen Sie Batterien und die abnehmbaren Außenteile nicht in die Hände von Kindern geraten
(Verschluckungsgefahr).
Funktion
• Vor dem Arbeiten am an der Waffe montierten Zielfernrohr stets überprüfen und gewährleisten,
dass die Schusswaffe entladen ist.
• Zum Schutz vor Verletzungen achten Sie im montierten Zustand auf ausreichend
Augenabstand.
• Bitte vergewissern Sie sich vor der Benutzung, dass Ihr Zielfernrohr einwandfrei funktioniert.
• Prüfen Sie durch Hindurchschauen, ob die Optik ein klares, ungestörtes Bild liefert.
• Bei grober Behandlung ist eine Dejustierung nicht auszuschließen.
• Die richtige Einstellung des Absehens prüfen Sie durch Kontrollschießen.

1
Inhaltsverzeichnis
Bezeichnung der Bauteile 1
Lieferumfang 2
Scharfstellen des Absehens 2
Vergrößerungswechsel 2
Einlegen/Entfernen der Batterie 3
Absehenbeleuchtung 3
Montage Grundeinstellung 4
Das Justieren des Zielfernrohres ZEISS VICTORY V8 zur Waffe 4
Dichtheit 5
Absehen 5
Absehen-Umbau 5
Pflege und Wartung 5
Ersatzteile für ZEISS VICTORY V8 6
Technische Daten 7
Garantie 110
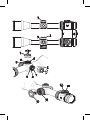
Bezeichnung der Bauteile
1 Schutzkappe Absehenverstellung (Höhe)
2 Schutzkappe Absehenverstellung (Seite)
3 Gummiring Okularfassung
4 Dioptrienausgleich für Absehen
5 Vergrößerungswechsler
6 Verstellknopf Absehenverstellung (Höhe)
7 Verstellknopf Absehenverstellung (Seite)
8 Nullmarkierung des Teilrings
9 Indexmarke
10 Batteriedeckel
11 Verstellknopf Parallaxeausgleich
12 Drehregler Absehenbeleuchtung
13 Ein- und Ausschalter

2
Lieferumfang
ZEISS VICTORY V8 Zielfernrohre mit Absehenbeleuchtung.
Produkt Bestellnummer Lieferumfang
VICTORY V8 1.1-8x30 M 522106
Zielfernrohr
Schutzkappe
Batteriedeckel
Li-Batt. 3V CR 2032
Elevationsdeckel
Optikreinigungstuch
Gebrauchshinweis
Garantie
Qualitätszertifikat
VICTORY V8 1.1-8x30 522107
VICTORY V8 1.8-14x50 M 522116
VICTORY V8 1.8-14x50 522117
VICTORY V8 2.8-20x56 M 522136
VICTORY V8 2.8-20x56 522137
VICTORY V8 4.8-35x60 M 522146
VICTORY V8 4.8-35x60 522147
Scharfstellen des Absehens
Die Scharfeinstellung des Absehens erfolgt durch Drehen des Okulars (4).
Die Zielfernrohre ZEISS VICTORY V8 1.8-14x50 und das ZEISS VICTORY V8 2.8-20x56 sind
mit einem Parallaxeausgleich ausgestattet, der bei 100 m über eine Rastung verfügt. Das ZEISS
VICTORY V8 4,8-35x60 verfügt ebenfalls über einen Parallaxeausgleich, der aber bei 300 m rastet.
Detaillierte Anleitung zum Einstellen des Dioptrienausgleichs und der Parallaxeverstellung:
a. Durch Drehen des Vergrößerungswechslers (5) am Okularstutzen das Zielfernrohr auf die
größte verfügbare Vergrößerung einstellen.
b. Eine Zielscheibe in 100m bzw. 300m Entfernung, je nach Modell, anvisieren und den
Verstellknopf für den Parallaxeausgleich (11) auf die 100m-Rastung drehen. Anschließend
durch Drehen des Verstellknopfes für den Dioptrienausgleich (4) das Absehen scharf stellen.
Jetzt sollte sowohl die Scheibe, als auch das Absehen scharf zu sehen sein.
Hinweis: Diese Vorgang (b) ist einmalig vorzunehmen.
c. Ab jetzt kann durch Drehen am Parallaxeausgleich (11) die optimale Schärfe für jede
Zielentfernung eingestellt und Zielfehler durch Parallaxe vermieden werden.
Hinweis: Zum Schutz vor Verletzungen ist an der Okularfassung ein Gummiring (3) angebracht.
Vergrößerungswechsel
Sie können alle Vergrößerungen zwischen der niedrigsten und höchsten Vergrößerungsstufe

3
stufenlos einstellen. Der Vergrößerungswechsel erfolgt durch Drehen des Wechslers (5) am
Okularstutzen. Die Vergrößerungsstufen sind durch Zahlen und Markierungen gekennzeichnet.
Hinweis: Für den Gebrauch in der Dämmerung bzw. Nacht:
Drehung nach links bis zum Anschlag – höchste Vergrößerung. Drehung nach rechts bis zum
Anschlag – niedrigste Vergrößerung. Wenn der Nocken des Vergrößerungswechslers nach oben
steht, ist die mittlere Vergrößerung eingestellt.
Einlegen/Entfernen der Batterie
Zum Wechseln der Batterie (Typ CR 2032) drehen den Deckel (10) mit einer Linksdrehung (gegen
den Uhrzeigersinn) ab. Die Batterie wird mit dem Pluspol nach oben eingelegt. Anschließend
den Deckel (10) wieder aufschrauben. Dabei auf den richtigen Sitz und korrekten Zustand des
Dichtungsrings achten. Ein beschädigter Dichtring ist auszutauschen.
Hinweis: Nehmen Sie bei Nichtverwendung über einen längeren Zeitraum die Batterie aus dem
Zielfernrohr.
Absehenbeleuchtung
Die Beleuchtung wird durch Drücken des Ein- und Ausschalters (13) eingeschaltet. Durch Drehen
des Drehreglers (12) nach rechts (im Uhrzeigersinn) kann nun die Helligkeit erhöht werden. Durch
eine Drehung nach links (gegen den Uhrzeigersinn) wird die Helligkeit verringert. Die Regelung
erfolgt stufenlos bis zu einem vorgegeben Minimum bzw. Maximum und hat keinen mechanischen
Anschlag. Die Ausschaltung erfolgt durch erneutes Drücken (2–3 Sekunden) des Ein- und
Ausschalters (13). Wenn die Helligkeit den entsprechenden Umgebungseinflüssen angepasst
ist, kann die Beleuchtung ausgeschaltet werden. Die eingestellte Helligkeit ist nun gespeichert,
auch wenn der Ein- und Ausschalter (13) in ausgeschaltetem Zustand verdreht wird. Nach dem
Einschalten hat die Beleuchtung wieder die vorher eingestellte Helligkeit. Wird der Drehregler (12)
im eingeschalteten Zustand drei Stunden nicht betätigt, schaltet sich die Beleuchtung automatisch
aus. Eine schwache Batterie wird durch Blinken des Leuchtabsehens angezeigt.
Das Blinken kann auf Wunsch unterdrückt werden: Im eingeschalteten Zustand den Ein- und
Ausschalter zweimal kurz hintereinander drücken (innerhalb von 2 Sekunden). Durch diesen
Quittiervorgang kann die Absehenbeleuchtung ohne weiteres Blinken bis zum endgültigen
Ausfall genutzt werden. Nach einem Batteriewechsel oder dem Abschalten der Beleuchtung ist
die Warnblinkfunktion neuerlich aktiviert.
Um die Batterie zusätzlich zu schonen und die Laufzeit zu verlängern sind die ZEISS VICTORY V8
Zielfernrohre mit einem Bewegungssensor ausgestattet. Dieser erkennt selbstständig die Position
der Waffe und schaltet den Leuchtpunkt selbständig bei 45° seitlicher Neigung oder 70° Neigung
nach unten oder oben aus. Sobald die Waffe zum Schuss aufgenommen wird, schaltet sich der
Leuchtpunkt in der zuvor eingestellten Helligkeit wieder an.
Diese Funktion kann deaktiviert, als auch aktiviert werden, indem das Zielfernrohr um 180°
auf den Kopf gedreht und der Ein- und Ausschalters (13) für 5 Sekunden gedrückt wird. Zur
Bestätigung erfolgt ein dreimaliges Blinken der Beleuchtung.
Hinweis: Auch bei Winkel-Abschaltung gilt das 3h-Standby, d.h. nach 3h im gekippten Zustand
schaltet das ZF nicht wieder ein.

4
Montage Grundeinstellung
Um den gesamten Bereich der Absehen-Höhenverstellung nutzen zu können, sollte das ZEISS
VICTORY V8 4,8-35x60 mit einer Vorneigung von ca.10 Winkelminuten (ca.30 cm/100 m) zur
Waffe montiert werden. Das Schienenmodell des ZEISS VICTORY V8 4,8-35x60 ist bereits
werksseitig mit einer Vorneigung von 10 Winkelminuten ausgestattet.
Um sicherzustellen, dass Waffe und Zielfernrohr als eine Einheit perfekt zusammenwirken, sollte
das Zielfernrohr immer von einem qualifizierten Büchsenmacher montiert werden. Verletzungen
am Auge, in Folge des Rückstoßes der Waffe, lassen sich durch die ordnungsgemäße Montage
im richtigen Augenabstand vermeiden. Der richtige Augenabstand ist darüber hinaus ein Garant
für das volle Sehfeld
Das Justieren des Zielfernrohres ZEISS VICTORY V8 zur Waffe
Das Justieren der ZEISS VICTORY V8 Zielfernrohre zur Waffe, also die Korrektur bei Abweichungen
der Treffpunktlage, wird durch die Klick-Rastung in der Höhen- und Seitenverstellung des
Absehens erleichtert. Dabei ist in folgender Weise zu verfahren:
a) Nach Abschrauben der Schutzkappen (1 bzw. 2) lässt sich das Absehen durch Drehen der
Verstellknöpfe (6) in der Höhe und (7) in der Seite verstellen. Bei den Zielfernrohren der ZEISS
VICTORY V8 Serie entspricht 1 Klick einer Verstellung von 1 cm auf 100 m.
(Ausnahme: Das ZEISS VICTORY V8 4,8-35x60 hat eine Klickverstellung von 0,5 cm auf 100 m.)
Schießt die Waffe tief, erfordert dies eine Schusskorrektur nach oben (Richtung „H“),
entsprechend einer Drehung im Uhrzeigersinn des Verstellknopfes (6).
Schießt die Waffe hoch, erfordert dies eine Schusskorrektur nach unten, entsprechend einer
Drehung gegen den Uhrzeigersinn des Verstellknopfes (6).
Schießt die Waffe links, erfordert dies eine Schusskorrektur nach rechts (Richtung „R“),
entsprechend einer Drehung im Uhrzeigersinn des Verstellknopfes (7).
Schießt die Waffe rechts, erfordert dies eine Schusskorrektur nach links, entsprechend einer
Drehung gegen den Uhrzeigersinn des Verstellknopfes (7).
b) Nach dem Einschießen den Knopf (6 bzw. 7) nach oben aus der Rastung herausziehen und die
Nullmarkierung des Teilringes (8) auf die Indexmarke (9) stellen. Knopf (6 bzw. 7) nach unten
in die Rastung drücken. Der Index dient dazu, bei späteren Verstellungen des Absehens (für
andere Entfernungen oder andere Laborierungen) die ursprüngliche Stellung wiederzufinden.
c) Nicht vergessen: Schutzkappe (1 bzw. 2) wieder aufschrauben.
Hinweis: Bei der Lieferung der Zielfernrohre der ZEISS VICTORY V8 Serie ist das Absehen auf die
Mitte des Verstellbereiches und die Nullmarkierung der Verstellringe (8) auf die Indexmarke (9)
eingestellt. Von dieser Einstellung aus ist eine Verstellung nach oben und unten bzw. nach rechts
und links über die Hälfte der nachfolgend in der Tabelle angegebenen Verstellbereiche möglich.
Die Schusskorrektur für die Zielfernrohre mit ASV (Absehenschnellverstellung) ist in dem
beiliegenden Gebrauchshinweis Absehen-Schnellverstellung ausführlich beschrieben.
Die Zielfernrohre ZEISS VICTORY V8 sind so konstruiert, dass bei der Betätigung der
Absehenverstellung eine entsprechende Bewegung des Absehens selbst zum Zentrum des Bildes
nicht zu erkennen ist. Das Absehen bleibt bei allen Verstellungen immer im Zentrum des Bildes.

5
Dichtheit
Das Zielfernrohr ist wasserdicht, druckgeprüft gemäß ISO 9022-80 und mit Stickstoff gefüllt.
Die einwandfreie Abdichtung ist auch dann gewährleistet, wenn die Schutzkappe (1 bzw. 2)
der Absehenverstellung nicht aufgeschraubt sind. Achten Sie jedoch immer auf guten Sitz dieser
Schutzkappe (1 bzw. 2) und der darunterliegenden Dichtringe.
Absehen
Ihr Zielfernrohr ist mit dem Absehen Ihrer Wahl ausgerüstet. Bei den Modellen ZEISS VICTORY V8
liegt das Absehen in der zweiten Bildebene. Das Absehen wird beim Vergrößerungswechsel nicht
mit vergrößert, sondern bleibt immer gleich, somit ist bei diesen Zielfernrohren das Deckungsmaß
des Absehens abhängig von der Vergrößerung.
Für eine aktuelle Übersicht verfügbarer Absehen sowie Deckungsmaße besuchen Sie
www.zeiss.de/subtensions oder kontaktieren Sie uns unter:
Carl Zeiss
Sports Optics GmbH
Carl Zeiss Gruppe
Gloelstraße 3 – 5
D-35576 Wetzlar
Absehen-Umbau
Selbstverständlich können die Zielfernrohre ZEISS VICTORY V8 auch nachträglich mit anderen
verfügbaren Absehen ausgerüstet werden. Zum Absehen-Umbau ist das Zielfernrohr an unseren
Kundenservice einzusenden.
Pflege und Wartung
Das Zielfernrohr ist mit der ZEISS LotuTec
®
Beschichtung versehen. Die wirkungsvolle
Schutzschicht für die Linsenoberfächen reduziert das Verschmutzen der Linse spürbar durch eine
besonders glatte Oberfäche und einen damit verbundenen starken Abperleffekt. Alle Arten von
Verunreinigungen haften weniger an und lassen sich schnell, leicht und schlierenfrei entfernen.
Dabei ist die LotuTec
®
Beschichtung widerstandsfähig und abriebfest.
Ihr ZEISS Zielfernrohr bedarf keiner besonderen Wartung. Grobe Schmutzteilchen (z. B. Sand)
auf den Linsen nicht abwischen, sondern wegblasen oder mit einem Haarpinsel entfernen!
Fingerabdrücke können nach einiger Zeit die Linsenoberfläche angreifen. Anhauchen und mit
einem sauberen Optikreinigungstuch/Optikreinigungspapier nachreiben, ist die einfachste Art,
Linsenoberflächen zu reinigen.
Gegen den besonders in den Tropen möglichen Pilzbelag auf der Optik hilft eine trockene
Lagerung und stets gute Belüftung der äußeren Linsenflächen.

6
Ersatzteile für ZEISS VICTORY V8
Falls Sie Ersatzteile für Ihr Zielfernrohr benötigen sollten, wie z. B. Schutzkappen, wenden Sie sich
bitte an Ihren Fachhändler, Ihre Landesvertretung oder unseren Kundenservice.
Für telefonische Kundenserviceanfragen stehen wir Ihnen gerne Montag bis Freitag von 8 bis 18
Uhr (MEZ) zur Verfügung.
Tel.: +49 (0) 64 41-4 67 61
Fax: +49 (0) 64 41-4 83 69

7
Technische Daten
1.1-8x30 1.8-14x50 2.8-20x56 4.8-35x60
Vergrößerung 1,1 8 1,8 13,5 2,8 20 4,8 35
Wirksamer Objektivdurchmesser
mm 10,6 30 18,6 50 27,5 56 48,1 60
Austrittspupillen-Durchmesser
mm 9,9 3,8 10,3 3,7 9,9 2,8 9,9 1,4
Dämmerungszahl
3,4 15,5 5,1 26,0 7,9 33,0 13,6 45,8
Sehfeld m/100m 39,6 5,4 23,0 3,1 15,5 2,1 8,6 1,2
Objektiver Sehwinkel
° 22,2 3 13,1 1,8 8,9 1,2 4,9 0,7
Dioptrien-Verstellbereich
dpt -3,5 / + 2
Augenabstand mm 95
Parallaxfrei m 100 50 - ∞ / 50 - ∞ 50 - ∞ / 50 - ∞ 50 - ∞ / 50 - ∞
Verstellbereich cm/100m 500 / 320 310 / 200 210 / 135 130 / 85
Verstellung pro Klick
cm 1 0,5
Mittelrohrdurchmesser
mm 36
Okularrohrdurchmesser
mm 46
Objektivrohrdurchmesser
mm 36 56 62 67
Vergütung LotuTec
®
Stickstoffüllung
Ja
Wasserdichtigkeit
mbar 400
Funktionstemperatur
°C -25 / +50
Länge mm 303 343 350 402
Gewicht ohne Innenschiene
g 600 680 830 970
Gewicht mit Innenschiene
g 620 700 850 1000
Änderungen in Ausführung und Lieferumfang, die der technischen Weiterentwicklung dienen, sind vorbehalten.

8
INSTRUCTIONS FOR USE
ZEISS products are famous for outstanding optical performance, precision workmanship and
a long service life.
Please observe the following instructions for use in order to obtain the best from your
riflescope and to ensure that it remains your constant companion for many years to come.
Information for your safety
Battery disposal
Batteries do not belong in household rubbish!
Please use a recycling facility in your area to dispose of used batteries.
Please only recycle discharged batteries.
As a rule, batteries are discharged if the device being run
• shuts off and signals “Battery empty”.
• no longer functions properly after extended use of the batteries.
Environmental influences
• Do not under any circumstances look through the riflescope at the sun or laser light sources!
Serious eye injury may otherwise result.
• Never leave the device in the sun for extended periods without the protective lens cap.
The objective lens and eyepiece can function as a burning glass and damage the interior
components.
• Avoid touching the metal surface after exposure to sunlight or cold.
Danger of swallowing
Do not leave the batteries and removable exterior parts within reach of children (danger of
swallowing).
Function
• Before working on the gun-mounted riflescope, always check to ensure that the weapon is not
loaded.
• Be sure to leave sufficient eye relief in the mounted position to prevent injuries.
• Please make sure that the riflescope is functioning properly before use.
• Look through the lens to ensure it provides a clear, undisturbed image.
• It may no longer be properly adjusted due to rough handling.
• Check correct setting of the reticle by test shooting.

9
Table of contents
Description of the components 9
Scope of supply 10
Focusing the reticle 10
Changing the magnification 10
Inserting/removing the battery 11
Reticle illumination 11
Basic mounting setting 11
Adjusting the ZEISS VICTORY V8 riflescope to the weapon 12
Seal integrity 12
Reticle 13
Reticle retrofitting 13
Care and maintenance 13
Replacement parts for the ZEISS VICTORY V8 13
Technical data 14
Guarantee 112
Description of the components
1 Reticle adjustment (elevation)
2 Reticle adjustment protective lens cap (windage)
3 Eyepiece mount rubber ring
4 Dioptre compensation for reticle
5 Magnification changer
6 Adjustment knob for reticle adjustment (elevation)
7 Adjustment knob for reticle adjustment (windage)
8 Zero mark of the graduated ring
9 Index point
10 Battery cover
11 Adjustment knob for parallax compensation
12 Reticle illumination control knob
13 On/off switch

10
Scope of supply
ZEISS VICTORY V8 Riflescope with reticle illumination.
Product Order number Scope of supply
VICTORY V8 1.1-8x30 M 522106
Riflescope
Protective lens cap
Battery cover
Li battery 3V CR 2032
Elevation cover
Lens cleaning cloth
Instructions for use
Warranty
Quality certificate
VICTORY V8 1.1-8x30 522107
VICTORY V8 1.8-14x50 M 522116
VICTORY V8 1.8-14x50 522117
VICTORY V8 2.8-20x56 M 522136
VICTORY V8 2.8-20x56 522137
VICTORY V8 4.8-35x60 M 522146
VICTORY V8 4.8-35x60 522147
Focusing the reticle
The reticle is focused by turning the eyepiece (4).
The ZEISS VICTORY V8 1.8-14x50 and ZEISS VICTORY V8 2.8-20x56 riflescopes are equipped
with a parallax compensation mechanism that has a click stop at 100 m.
The ZEISS VICTORY V8 4.8-35x60 also has parallax compensation; however, the click stop is
at 300 m.
Detailed instructions for adjusting the dioptre compensation and the parallax mechanism:
a. Set the riflescope to the largest available magnification by rotating the magnification changer
(5) on the eyepiece support.
b. Focus on a target 100m or 300m away, depending on the model and rotate the adjustment
knob for the parallax compensation (11) to the click stop. Finally, focus the reticle by rotating
the adjustment knob for the dioptre compensation (4). Both the target and the reticle should
now be in focus.
Note: This process (b) need only be carried out once.
c. From this point, the adjustment knob (11) can be rotated to set the ideal focus for each target
distance, and aiming errors can be avoided with the parallax.
Note: A rubber ring (3) is attached to the eyepiece mount to protect from injuries.
Changing the magnification
All magnifications, from the lowest to highest magnification level, allow infinitely variable
setting. Change of magnification is done by turning the changer (5) on the eyepiece support. The
magnification levels are marked by numbers and markings.

11
Note: When using at dusk or at night:
Turn left as far as possible – maximum magnification
Turn right as far as possible – minimum magnification.
The middle magnification is set when the cam of the magnification changer is pointing upward.
Inserting/removing the battery
To change the battery (model CR 2032), turn the cover (10) to the left (counterclockwise). The
battery is inserted with the positive pole pointed up. Then screw the cover (10) back on. Make
sure it is seated properly and check the condition of the sealing ring. Replace the sealing ring
if it is damaged.
Note: If the riflescope is not used for an extended period of time, remove the battery.
Reticle illumination
Illumination is turned on by pressing the on/off switch (13). Turning the control knob to the
right (clockwise) increases brightness. Turning to the left (counterclockwise) reduces brightness.
Control is infinitely variable up to a preset minimum or maximum and has no mechanical stop.
To switch it of please press again (2-3 seconds) the on/off switch (12). When the brightness
is adjusted to the corresponding surrounding conditions, the illumination can be switched off.
The set brightness is now saved, even if the on/off switch (13) is turned to the off position.
When turned back on, illumination returns to the previously set brightness. If the control knob
is not activated for three hours when in the turned on position, the illumination switches off
automatically. Low battery charge is indicated by the reticle lamp flashing.
The flashing can be suppressed if desired: In the switched state quickly press the on/off switch
twice in succession (within 2 seconds). By using this cancellation process the reticle illumination
can be used until final failure without further flashing. After a battery change or switching off the
illumination, the warning flashing function is reactivated.
To additionally save the battery and to increase the runtime, the ZEISS VICTORY V8 riflescope is
equipped with a movement sensor. This automatically detects the position of the weapon and
switches the illuminated dot off by itself at a 45° side inclination or 70° inclination downwards
or upwards. As soon as the weapon is picked up for shooting, the illuminated dot switches on
again in the previously set brightness.
This function can be deactivated or activated by turning the riflescope by 180° upside down
and holding the on/off switch (13) for 5 seconds. The light blinks three times for confirmation.
Note: Even when switching off at an angle, the 3h standby applies, i.e., after 3h in the tipped
condition, the riflescope does not turn back on.
Basic mounting setting
To be able to use the entire range of the reticle height adjustment, the ZEISS VICTORY V8 4.8-
35x60 must be mounted with an inclination of approx. 10 angular minutes (approx.30 cm/100 m)
to the weapon. The rail mount model of the ZEISS VICTORY V8 4.8-35x60 already includes a
factory set inclination of 10 angular minutes.

12
To ensure that the weapon and riflescope work together perfectly as one unit, the riflescope
should always be mounted by a qualified gunsmith. Injuries to the eye caused by recoil of the
weapon can be avoided by proper mounting with the correct eye relief. The correct eye relief is
also a guarantee for the entire field of vision.
Adjusting the ZEISS VICTORY V8 riflescope to the weapon
Adjusting the ZEISS VICTORY V8 riflescope to the weapon, i.e., correction of deviations for the
point of impact, is simplified by the click-catch in height and side adjustment of the reticle.
Proceed as follows:
a) After unscrewing the protective cap lens (1 or 2), the reticle can be adjusted by turning the
adjusting knob (6) in height and (7) to the side. For ZEISS VICTORY V8 series riflescopes, 1 click
corresponds to an adjustment of 1 cm to 100 m.
(Exception: The ZEISS VICTORY V8 4.8-35x60 has a click adjustment of 0.5 cm to 100 m.)
If the weapon shoots low, it requires a shot correction upward (direction “H”), corresponding
to one clockwise turn of the adjustment knob (6).
If the weapon shoots high, it requires a shot correction downward, corresponding to one
counterclockwise turn of the adjustment knob (6).
If the weapon shoots left, it requires a shot correction to the right (direction “R”),
corresponding to one clockwise turn of the adjustment knob (7).
If the weapon shoots right, it requires a shot correction to the left, corresponding to one
counterclockwise turn of the adjustment knob (7).
b) After shooting, pull the knob (6 or 7) upward out of the catch and set the zero mark of the
sub-ring (8) to the index point (9). Push knob (6 or 7) down in the catch. The index is used to
find the original location again for later adjustments of the reticle (for other distances or other
charges).
c) Don’t forget: Screw the protective lens cap (1 or 2) back on.
Note: On delivery of the ZEISS VICTORY V8 series riflescope, the reticle is set at the center of
the adjustment range and the zero mark of the adjusting ring (8) is set at the index mark (9).
From this setting, adjustment upwards, downwards, right and left is possible for over half of the
adjustment ranges given in the following table.
The shot correction for the riflescope with BDC (bullet drop compensation) is described in detail
in the enclosed Bullet Drop Compensation user instructions.
The ZEISS VICTORY V8 riflescopes are designed so that when activating the reticle adjustment, a
corresponding movement of the reticle itself to the center of the image cannot be detected. The
reticle always remains in the center of the image for all adjustments.
Seal integrity
The riflescope is waterproof, pressure tested to ISO 9022-80 and filled with nitrogen. The integrity
of the seal is also guaranteed if the protective lens caps (1 or 2) of the reticle adjustment are
not screwed on. However, always ensure a good seat of these protective lens caps (1 or. 2) and
the sealing ring under them.

13
Reticle
Your riflescope is equipped with the reticle of your choice. For the ZEISS VICTORY V8 models the
reticle is in the second level. The reticle is not magnified during magnification change, but rather
it always remains the same. Thus for these riflescopes the dimension of change of the reticle is
dependent on the magnification.
For an overview of the reticles and dimensions of coverage currently available, visit
www.zeiss.de/subtensions or contact us at:
Carl Zeiss
Sports Optics GmbH
Carl Zeiss Group
Gloelstraße 3 – 5
D-35576 Wetzlar
Reticle retrofitting
The ZEISS VICTORY V8 riflescope can of course also be retrofitted with other available reticles. For
reticle retrofitting, please send the riflescope to our customer service.
Care and maintenance
Your riflescope has ZEISS LotuTec
®
coating. The effective protective coating for the lens surfaces
noticeably reduces contamination of the lenses through an especially smooth surface and the
resulting water-beading effect. All types of contamination stick less and can be quickly and easily
removed without smearing. LotuTec
®
coating is durable and abrasion-resistant.
Your ZEISS riflescope requires no special maintenance. Do not wipe coarse particles (e. g. sand)
from the lenses. Blow them off, or use a soft brush! Over time, fingerprints can corrode the lens
surface. Breathing on the lens and polishing with a clean optical cleansing cloth/tissue is the
easiest method of cleaning the lens surface.
To avoid a possible fungal coating which is common in the tropics, store the optics in a dry place
and always ensure good aeration of the lens surface.
Replacement parts for the ZEISS VICTORY V8
If you need any replacement parts for your riflescope, e.g. protective lens caps, please contact
your local dealer, your country’s distributor or our customer service team.
Our customer service team is available from Monday to Friday from 8:00 am until 6:00 pm (CET)
should you have any questions.
Tel.: +49 (0) 64 41-4 67 61
Fax: +49 (0) 64 41-4 83 69

14
Technical data
1.1-8x30 1.8-14x50 2.8-20x56 4.8-35x60
Magnification 1,1 8 1,8 13,5 2,8 20 4,8 35
Effective lens diameter
mm 10,6 30 18,6 50 27,5 56 48,1 60
Exit pupil diameter
mm 9,9 3,8 10,3 3,7 9,9 2,8 9,9 1,4
Twilight factor 3,4 15,5 5,1 26,0 7,9 33,0 13,6 45,8
Field of vision m/100m 39,6 5,4 23,0 3,1 15,5 2,1 8,6 1,2
Objective viewing angle
° 22,2 3 13,1 1,8 8,9 1,2 4,9 0,7
Dioptre adjustment range
dpt -3,5 / + 2
Eye relief mm 95
Parallax-free m 100 50 - ∞ / 50 - ∞ 50 - ∞ / 50 - ∞ 50 - ∞ / 50 - ∞
Adjustment range
cm/100m 500 / 320 310 / 200 210 / 135 130 / 85
Adjustment per click
cm 1 0,5
Centre tube diameter
mm 36
Eyepiece tube diameter
mm 46
Lens tube diameter
mm 36 56 62 67
Coating LotuTec
®
Nitrogen filling Yes
Waterproof mbar 400
Operating temperature
°C -25 / +50
Length mm 303 343 350 402
Weight without rall mount
g 600 680 830 970
Weight with rall mount
g 620 700 850 1000
Subject to changes in design and scope of supply due to technical improvements.
Stránka sa načítava ...
Stránka sa načítava ...
Stránka sa načítava ...
Stránka sa načítava ...
Stránka sa načítava ...
Stránka sa načítava ...
Stránka sa načítava ...
Stránka sa načítava ...
Stránka sa načítava ...
Stránka sa načítava ...
Stránka sa načítava ...
Stránka sa načítava ...
Stránka sa načítava ...
Stránka sa načítava ...
Stránka sa načítava ...
Stránka sa načítava ...
Stránka sa načítava ...
Stránka sa načítava ...
Stránka sa načítava ...
Stránka sa načítava ...
Stránka sa načítava ...
Stránka sa načítava ...
Stránka sa načítava ...
Stránka sa načítava ...
Stránka sa načítava ...
Stránka sa načítava ...
Stránka sa načítava ...
Stránka sa načítava ...
Stránka sa načítava ...
Stránka sa načítava ...
Stránka sa načítava ...
Stránka sa načítava ...
Stránka sa načítava ...
Stránka sa načítava ...
Stránka sa načítava ...
Stránka sa načítava ...
Stránka sa načítava ...
Stránka sa načítava ...
Stránka sa načítava ...
Stránka sa načítava ...
Stránka sa načítava ...
Stránka sa načítava ...
Stránka sa načítava ...
Stránka sa načítava ...
Stránka sa načítava ...
Stránka sa načítava ...
Stránka sa načítava ...
Stránka sa načítava ...
Stránka sa načítava ...
Stránka sa načítava ...
Stránka sa načítava ...
Stránka sa načítava ...
Stránka sa načítava ...
Stránka sa načítava ...
Stránka sa načítava ...
Stránka sa načítava ...
Stránka sa načítava ...
Stránka sa načítava ...
Stránka sa načítava ...
Stránka sa načítava ...
Stránka sa načítava ...
Stránka sa načítava ...
Stránka sa načítava ...
Stránka sa načítava ...
Stránka sa načítava ...
Stránka sa načítava ...
Stránka sa načítava ...
Stránka sa načítava ...
Stránka sa načítava ...
Stránka sa načítava ...
Stránka sa načítava ...
Stránka sa načítava ...
Stránka sa načítava ...
Stránka sa načítava ...
Stránka sa načítava ...
Stránka sa načítava ...
Stránka sa načítava ...
Stránka sa načítava ...
Stránka sa načítava ...
Stránka sa načítava ...
Stránka sa načítava ...
Stránka sa načítava ...
Stránka sa načítava ...
Stránka sa načítava ...
Stránka sa načítava ...
Stránka sa načítava ...
Stránka sa načítava ...
Stránka sa načítava ...
Stránka sa načítava ...
Stránka sa načítava ...
Stránka sa načítava ...
Stránka sa načítava ...
Stránka sa načítava ...
Stránka sa načítava ...
Stránka sa načítava ...
Stránka sa načítava ...
Stránka sa načítava ...
Stránka sa načítava ...
Stránka sa načítava ...
Stránka sa načítava ...
Stránka sa načítava ...
Stránka sa načítava ...
Stránka sa načítava ...
Stránka sa načítava ...
Stránka sa načítava ...
Stránka sa načítava ...
Stránka sa načítava ...
Stránka sa načítava ...
Stránka sa načítava ...
Stránka sa načítava ...
Stránka sa načítava ...
Stránka sa načítava ...
Stránka sa načítava ...
Stránka sa načítava ...
Stránka sa načítava ...
Stránka sa načítava ...
Stránka sa načítava ...
Stránka sa načítava ...
Stránka sa načítava ...
Stránka sa načítava ...
Stránka sa načítava ...
Stránka sa načítava ...
Stránka sa načítava ...
Stránka sa načítava ...
Stránka sa načítava ...
Stránka sa načítava ...
Stránka sa načítava ...
-
 1
1
-
 2
2
-
 3
3
-
 4
4
-
 5
5
-
 6
6
-
 7
7
-
 8
8
-
 9
9
-
 10
10
-
 11
11
-
 12
12
-
 13
13
-
 14
14
-
 15
15
-
 16
16
-
 17
17
-
 18
18
-
 19
19
-
 20
20
-
 21
21
-
 22
22
-
 23
23
-
 24
24
-
 25
25
-
 26
26
-
 27
27
-
 28
28
-
 29
29
-
 30
30
-
 31
31
-
 32
32
-
 33
33
-
 34
34
-
 35
35
-
 36
36
-
 37
37
-
 38
38
-
 39
39
-
 40
40
-
 41
41
-
 42
42
-
 43
43
-
 44
44
-
 45
45
-
 46
46
-
 47
47
-
 48
48
-
 49
49
-
 50
50
-
 51
51
-
 52
52
-
 53
53
-
 54
54
-
 55
55
-
 56
56
-
 57
57
-
 58
58
-
 59
59
-
 60
60
-
 61
61
-
 62
62
-
 63
63
-
 64
64
-
 65
65
-
 66
66
-
 67
67
-
 68
68
-
 69
69
-
 70
70
-
 71
71
-
 72
72
-
 73
73
-
 74
74
-
 75
75
-
 76
76
-
 77
77
-
 78
78
-
 79
79
-
 80
80
-
 81
81
-
 82
82
-
 83
83
-
 84
84
-
 85
85
-
 86
86
-
 87
87
-
 88
88
-
 89
89
-
 90
90
-
 91
91
-
 92
92
-
 93
93
-
 94
94
-
 95
95
-
 96
96
-
 97
97
-
 98
98
-
 99
99
-
 100
100
-
 101
101
-
 102
102
-
 103
103
-
 104
104
-
 105
105
-
 106
106
-
 107
107
-
 108
108
-
 109
109
-
 110
110
-
 111
111
-
 112
112
-
 113
113
-
 114
114
-
 115
115
-
 116
116
-
 117
117
-
 118
118
-
 119
119
-
 120
120
-
 121
121
-
 122
122
-
 123
123
-
 124
124
-
 125
125
-
 126
126
-
 127
127
-
 128
128
-
 129
129
-
 130
130
-
 131
131
-
 132
132
-
 133
133
-
 134
134
-
 135
135
-
 136
136
-
 137
137
-
 138
138
-
 139
139
-
 140
140
-
 141
141
-
 142
142
-
 143
143
-
 144
144
-
 145
145
-
 146
146
-
 147
147


V iných jazykoch
- français: Zeiss Victory V8 Mode d'emploi
- italiano: Zeiss Victory V8 Istruzioni per l'uso
- Deutsch: Zeiss Victory V8 Bedienungsanleitung
- polski: Zeiss Victory V8 Instrukcja obsługi
- svenska: Zeiss Victory V8 Bruksanvisningar
- 日本語: Zeiss Victory V8 取扱説明書
Súvisiace články
Ďalšie dokumenty
-
Nikon MONARCH 3 Riflescope Používateľská príručka
-
-
HIKMICRO PANTHER 2.0 Series Thermal Image Scope Užívateľská príručka
-
Danfoss Automatic Balancing Valves Používateľská príručka
-
Danfoss 003Z0635 Užívateľská príručka
-
-
-
Kesseböhmer LINERO MosaiQ Návod na používanie
-
 HIKMICRO PANTHER LRF Používateľská príručka
-
 HIKMICRO PANTHER LRF Používateľská príručka

