Philips HR2094/00 Používateľská príručka

Kategória
Mixéry
Typ
Používateľská príručka

Táto príručka je tiež vhodná pre

HR2094, HR2090
2
3
1
4

 6
 15
 25
 34
 43
 52
 61
 71
 80
 89
 99
 108
 118
 127
 136
 145
6

Congratulations on your purchase and welcome to Philips! To fully benet
from the support that Philips offers, register your product at www.philips.
com/welcome.

Motor unit
Control knob
Blade unit interface
Blade unit
Sealing ring
Blander jar with level indication
Lid
Graduated measuring cup
Filter (Type HR2094 only)

Read this user manual carefully before you use the appliance and save it for
future reference.


- Never immerse the motor unit in water or any other liquid, nor rinse it
under the tap. Use only a moist cloth to clean the motor unit.

- Check if the voltage indicated on the appliance corresponds to the
local mains voltage before you connect the appliance.
- If the mains cord is damaged, you must have it replaced by Philips, a
service centre authorised by Philips or similarly qualied persons in
order to avoid a hazard.
- Do not use the appliance if the plug, the mains cord or other parts are
damaged.
- Do not lift the appliance by the handle of the blender jar, when the
blender jar is xed to the motor unit. The motor unit may fall to the
oor and get damaged.
- Never use the blender jar to switch the appliance on and off.
- Never let the appliance run unattended.
- This appliance is not intended for use by persons (including children)
with reduced physical, sensory or metal capabilities, or lack of
experience and knowledge, unless they have been given supervision or
instruction concerning use of the appliance by a person responsible for
their safety.
- Children should be supervised to ensure that they do not play with the
appliance.
- Do not touch the blades, especially when the appliance is plugged in.
The blades are very sharp.

- Always unplug the appliance before you assemble, disassemble or make
adjustments to any of the parts.

- To prevent failure of the appliance, make sure that no food or liquid
enters the connection point of the blender jar on the motor unit.
- Never use any accessories or parts from other manufacturers or that
Philips does not specically recommend. If you use such accessories or
parts, your guarantee becomes invalid.
- Do not exceed the maximum level indicated on the accessories.


- Never reach into the blender jar with your ngers or an object while
the appliance is running.
- Make sure the blade unit is securely fastened to the blender jar before
you assemble the blender jar onto the motor unit.
- Do not touch the cutting edges of the blender blade unit when you
clean it. They are very sharp and you could easily cut your ngers on
them.
- If the blades get stuck, unplug the appliance before you remove the
ingredients that block the blades.

- Never ll the blender jar with ingredients hotter than 80ºC.
- To prevent spillage, do not put more than 1.5 litres of liquid in the
blender jar, especially when you process at a high speed. Do not put
more than 1.25 litres in the blender jar when you process hot liquids
or ingredients that tend to foam.
- If food sticks to the wall of the blender jar, switch off the appliance and
unplug it. Then use a spatula to remove the food from the wall.
- Never forget to place the sealing ring on the blade unit before you
assemble the blender jar, otherwise leakage will occur.
- Always make sure the lid is properly closed/assembled on the jar and
the measuring cup is inserted properly in the lid before you switch on
the appliance.


- Never use the lter to process ingredients hotter than 80°C.
- Never overload the lter. Do not put more than 135g of dried soy
beans or 150g of fruit in the lter at the same time.
- Always make sure the lid is closed/assembled properly and the
measuring cup is inserted properly in the lid before you switch on the
appliance.
- Cut fruit into smaller pieces before you put it in the lter.
- Soak dried ingredients, such as soy beans, before you put them in the
lter.

This Philips appliance complies with all standards regarding electromagnetic
elds (EMF). If handled properly and according to the instructions in this
user manual, the appliance is safe to use based on scientic evidence
available today.
 7

This feature ensures that you can only switch on the appliance if you have
properly assembled the blender jar on the motor unit. If the blender jar is
correctly assembled, the built-in safety lock will be unlocked.

, Thoroughly clean the parts that will come in contact with food
before you use the appliance for the rst time (see chapter
‘Cleaning’).


Your blender is equipped with a special control knob with an illuminated
ring that lights up when the appliance is running.
You can set the control knob to any speed between MIN and MAX or,
even easier, use one of the three quick-select buttons: Smoothie, Ice and
Pulse.
, If you want to use a speed between MIN and MAX, turn the control
knob to the desired position.
If you have doubts about the correct speed, always select the highest speed
(MAX).
, If you want to use one of the quick-select buttons, rst turn the
control knob to position ON.Then press the desired quick-select
button.
When you turn the control knob to position ON, the lights in the buttons
start to ash.

Use this function to prepare delicious smoothies. When you press the
SMOOTHIE button, the appliance starts mixing the smoothie according to
the appropriate speed prole. To stop the process, press Smoothie button
again.
Smoothies are thick drinks made of frozen or fresh fruit and fruit juices
mixed together, sometimes with ice, ice cream, milk or yoghurt. See chapter
‘Recipes’ for a few examples. Add more liquid to make a thinner smoothie
and add more frozen or fresh fruit to make a thicker smoothie.

The blender is equipped with a special speed prole for crushing ice.
When you press the Ice button, the appliance starts crushing the ice
according to the appropriate speed prole.To stop the ice-crushing
process, press the Ice button again.
The ice will be crushed within a few seconds and the result is tiny, regular
pieces of ice. For instance, if you want to get crushed ice out of 5 ice cubes,
press the Ice button, let the appliance complete 5 crushing cycles and then
switch off the appliance. If you want the ice to be crushed into snow, turn
the control knob to maximum speed or press the Pulse button for a few
seconds. If the result is still too coarse, press the Pulse button again.
8

Press the Pulse button if you want to process ingredients very briey. As
soon as you press the Pulse button the appliance starts running at the
highest speed.When you release the button, the appliance stops running
immediately.The Pulse button can also be used while the appliance is
running at a speed between MIN and MAX.

, The blender is intended for ne pureeing, chopping and blending.
With the blender you can prepare soups, sauces, milk shakes and
batters.You can also use the blender to process vegetables, fruit and
meat.

1 Place the sealing ring on the blade unit.
2 Assemble the blade unit onto the blade unit interface.
3 Screw the blade unit interface onto the bottom of the blender jar
until it is xed properly.
4 Place the blender jar with the blade unit interface attached on the
motor unit (1) and turn the jar until you hear a ‘click’ (2).
You can place the blender jar on the motor unit in two positions: with the
handle pointing to the right or to the left.
5 Put the plug in the wall socket.

1 Put the ingredients in the blender jar.
2
1
 9
2 Place the lid on the blender jar.
Close the lid by pushing it down rmly.
3 Insert the measuring cup into the opening in the lid.
4 Select a speed by turning the control knob or push one of the quick-
select buttons (see section ‘Control knob’).
Do not let the appliance run for more than 3 minutes at a time. If you
have not nished processing after 3 minutes, switch off the appliance and
let it cool down to room temperature before you let it run again.
5 Always switch off the appliance by setting the control knob to OFF
before you open the lid.

1 Unplug the appliance.
2 Remove the lid with the measuring cup from the blender jar.
3 Remove the blender jar with the unit interface attached from the
motor unit.
4 Unscrew the blade unit interface from the bottom of the blander jar.
5 Always clean the removable parts immediately after use.

- Cut meat or solid ingredients into smaller pieces before putting them
in the blender jar.
- Do not process a large quantity of solid ingredients at the same time.
Process these ingredients in a series of small batches instead.
- To make tomato juice, cut the tomatoes in four and drop the pieces
through the opening in the lid onto the rotating blades.

You can use the measuring cup to measure ingredients or to prepare
mayonnaise.
, To prepare mayonnaise, you can punch a hole in the middle of
the bottom of the measuring cup with a knife or another sharp
implement to use the measuring cup as a funnel for adding oil when
preparing mayonnaise. The oil should be added very slowly to obtain
the right consistency. Let the blender operate at a low speed when
preparing mayonnaise.
Note: Once you have punched a hole in the measuring cup, it cannot be used
as a measuring cup anymore.
10

With this lter you can make delicious fresh fruit juices, cocktails or soy
milk (see also ‘Recipes’). The lter prevents pips and skins from ending up in
your drink.
Never overload the lter. Do not put more than 135g of dried soy beans
or 150g of fruit in the lter at the same time.

1 Place the blender jar with the blade unit interface attached on the
motor unit (1) and turn the jar until you hear a ‘click’ (2).
The blender can be placed on the motor unit in two positions.
2 Put the lter in the blender jar.
Make sure that the grooves of the lter t exactly onto the ribs inside the
blender jar.
3 Make sure the appliance is plugged in.

1 Put the lid on the blender jar.
Make sure you place the lid on the blender jar in such a way that the drink
can be poured out through the strainer in the lid.
2 Put the ingredients in the lter.
Cut fruits into smaller pieces and soak dried pulses, such as soy beans,
before putting them in the lter.
3 Pour water or another liquid (milk, juice, etc.) into the blender jar.
4 Insert the measuring cup into the hole in the lid.
5 Select a speed or push one of the buttons (see section ‘Control
knob’.
Let the appliance run for approx. 60 seconds.
Note: When you are processing a large quantity, we advise you not to put all
the ingredients in the lter at the same time. Start processing a small quantity
and let the appliance run for a few seconds. Then switch off the appliance
and add another small quantity, but do not exceed the top of the sieve mesh.
Repeat this procedure until you have processed all the ingredients. Always keep
the lid on the blender jar during processing.

1 Switch off the appliance and remove the blender jar from the motor
unit.
2 Pour out the drink via the pouring lip of the blender jar. Make sure
the lid is placed on the blender jar in such a way that the drink can
be poured out through the strainer in the lid.
Do not remove the lid, the measuring cup and the lter.
, Make sure that you have assembled the lid in the right position so
that the drink is poured out through the lter in the lid.
For optimal results, put the jar with the remaining ingredients back onto the
appliance and let it run for a few more seconds.
3 Always clean the lter immediately after use.
2
1
 11

, Soy milk
For this recipe you need the lter.
Do not process more than 1 batch without interruption. Let the
appliance cool down to room temperature before you continue
processing.
Ingredients:
- 135g dried soy beans
- 1000ml water
, Soak the soy beans for 4 hours before processing them.
, Put the soaked soy beans in the lter. Pour 1000ml of water into the
blender jar and blend for 30 seconds at the highest speed (MAX). If
necessary, e.g. to get a ner result, you can switch off and unplug the
appliance and give the beans as stir. Then continue to blend at the
highest speed (MAX) again.
, Pour the soy milk into a pan.
, Bring the soy milk to the boil, then add sugar to taste and leave to
simmer until all sugar has melted.
, Serve hot or cold.

We advise you to clean the removable parts immediately after use.
Avoid touching the blades. The blades are very sharp.
1 Unplug the appliance.
2 Disassemble all removable parts before cleaning them. Do not forget
to remove the sealing ring from the blade unit.
3 Clean all removable parts in the dishwasher or in warm water with
some washing-up liquid.
All parts except the motor unit are dishwasher proof!
4 Clean the motor unit with a moist cloth.
Do not rinse the motor unit under the tap. Do not use abrasive cleaning
agents, scourers, alcohol etc. to clean the motor unit.

, Store the mains cord by winding it round the reel in the bottom of
the appliance.

- Do not throw away the appliance with the normal household waste
at the end of its life, but hand it in at an ofcial collection point for
recycling. By doing this, you help to preserve the environment.
12

If you need service or information or if you have a problem, please visit
the Philips website at www.philips.com or contact the Philips Consumer
Care Centre in your country (you nd its phone number in the worldwide
guarantee leaet). If there is no Consumer Care Centre in your country, go
to your local Philips dealer.


Ingredients:
- 200g peeled kiwi, cut in pieces of 3x3x3 cm
- 100g banana, cut into 1-cm slices, frozen
- 150ml pineapple juice
- 100g frozen strawberries
, The banana and strawberries should be used straight from the
freezer. Put the ingredients in the blender jar in the order mentioned
above and blend until smooth.

- 2 nectarines, stoned and cut into pieces
- 125g frozen raspberries
- 125g frozen strawberries
- 125ml orange juice
- 125ml apple juice
- 7 ice cubes
, Put the nectarine pieces and all the juice in the blender jar, then add
the frozen fruit. Press the Smoothie button and let the appliance run
for 40 seconds.

Ingredients:
- 150ml warm water
- 1.5 tbsp sugar
- 2 tbsp instant coffee
- 200g vanilla ice cream
- 10 ice cubes
, Dissolve the coffee and sugar in water. Pour all ingredients (except
the ice cubes) into the blender. Blend until smooth. Drop the ice
cubes through the opening in the lid while the motor is running.

- 40ml dark Jamaica rum
- 30ml coconut syrup
- 10ml whipping cream
- 80ml pineapple juice
, Put all ingredients in the blender jar and add 4 big ice cubes. Blend
for about 30 seconds.
 13

If the appliance does not work or does not work properly, rst check
the list below. If the problem is not mentioned in this list, the appliance
probably has a defect. In that case we advise you to take the appliance to
your dealer or to an authorised Philips service centre.
Question Answer
Can I clean all
removable parts in the
dishwasher?
Yes, except the motor unit.
The appliance does not
work. What should I do?
Please check if you have plugged in the appliance. Also check if the blender jar
has been assembled properly.
What does ‘pulse’ mean? When you press the Pulse button, the appliance will run at its highest
speed as long as you keep pressing the button. Using the Pulse button is
recommended if you want to have more control over the processing job, for
instance when you are chopping.
Can I pour boiling hot
liquids into the blender
jar?
No, let the liquids or ingredients cool down to 80 cC/175 cF to avoid
damaging the accessories.
Why does the motor
produce an unpleasant
smell during processing?
It is very common for a new appliance to give off an unpleasant smell or emit
some smoke the rst few times it is used. This phenomenon will stop after
you have used the appliance a number of times. The appliance may also give
off an unpleasant smell or emit some smoke if it has been used too long. In
this case you have to switch the appliance off and let it cool down for 60
minutes.
The appliance stopped
running because the
blade unit is blocked.
What should I do?
Switch the appliance off and use a spatula to dislodge the ingredients that are
blocking the blade unit. We also recommend processing a smaller quantity.
The blender jar leaks.
What should I do?
Switch the appliance off and pour out the ingredients. Then remove the blade
unit interface. Check if the sealing ring has been assembled correctly.
Why does the fruit juice
or soy milk contain a lot
of pulp or skins?
Pour the drink through a sieve. To prevent pulp and skins from ending up in
your drink, leave the measuring cup in the lid, make sure the lid and the lter
are in place and the lid is assembled in the correct position (i.e. with the
strainer directly in front of the pouring lip).
14
15

Поздравления за вашата покупка и добре дошли във Philips! За
да се възползвате изцяло от предлаганата от Philips поддръжка,
регистрирайте продукта си на www.philips.com/welcome.

Задвижващ блок
Ключ за регулиране
Интерфейс на режещия блок
Режещ блок
Уплътнителен пръстен
Кана на пасатора с нивопоказател
Капак
Градуирана мерна чашка
Филтър (само за модел HR2094)

Преди да използвате уреда, прочетете внимателно това ръководство
за експлоатация и го запазете за справка в бъдеще.


- Не потапяйте задвижващия блок във вода или друга течност и не
го изплаквайте под крана на чешмата. Почиствайте задвижващия
блок само с влажна кърпа.

- Преди да свържете уреда към мрежата, проверете дали
посоченото върху уреда напрежение отговаря на напрежението
на местната електрическа мрежа.
- Ако захранващият кабел се повреди, той трябва винаги да се
подменя от Philips, упълномощен сервиз на Philips или подобни
квалифицирани лица, за да се избегне опасност.
- Не използвайте уреда, ако щепселът, захранващият кабел или
други части са повредени.
- Не повдигайте уреда от дръжката на каната на блендера, когато
тя е поставена върху моторния елемент. Така моторният елемент
може да падне на пода и да се повреди.
- Никога не използвайте каната на пасатора за включване и
изключване на уреда.
- Никога не оставяйте уреда да работи без наблюдение.
- Този уред не е предназначен за ползване от хора (включително
деца) с намалени физически усещания или умствени недъзи или
без опит и познания, ако са оставени без наблюдение и не са
инструктирани от страна на отговарящо за тяхната безопасност
лице относно начина на използване на уреда.
- Наглеждайте децата, за да не си играят с уреда.
- Не се допирайте до ножовете, особено когато уредът е включен
в контакта. Ножовете са много остри!


- Винаги изключвайте уреда от контакта, преди да пристъпите към
сглобяване, разглобяване или наместване на някоя от частите.
- За да не възникне повреда, внимавайте храна или течност да
не попадат в точката на свързване между каната на блендера и
моторния елемент.
- Никога не използвайте аксесоари или части от други
производители или такива, които не са специално препоръчвани
от Philips. При използване на такива аксесоари или части вашата
гаранция става невалидна.
- Не превишавайте максималното ниво, показано на
принадлежностите.


- Никога на бъркайте в каната на пасатора с пръсти или някакъв
предмет по време на работа на уреда.
- Убедете се, че режещият блок е здраво затегнат към каната на
пасатора, преди да монтирате каната към задвижващия блок.
- Не докосвайте остриетата на режещия блок на пасатора, когато
го почиствате. Тези остриета са много остри и лесно можете да
порежете пръстите си.
- Ако ножовете заседнат, изключете уреда от контакта, преди да
отстранявате продуктите, блокирали ножовете.

- Никога не сипвайте в каната на пасатора продукти, които са по-
горещи от 80°C.
- За да избегнете изливане, не наливайте повече от 1,5 литра
течност в каната на пасатора, особено когато работите с високи
обороти. Не сипвайте повече от 1,25 литър в каната на пасатора,
когато обработвате горещи течности или продукти, склонни към
разпенване.
- Ако продуктите полепнат по стената на каната, изключете уреда
и извадете щепсела от контакта. След това отстранете с лопатка
продуктите от стената.
- Преди да сглобите каната на пасатора, никога не забравяйте да
сложите уплътнителния пръстен на режещия блок, иначе може да
настъпи протичане.
- Винаги проверявайте дали капакът е добре затворен/сглобен
върху каната и дали мерната чаша е сложена правилно в капака,
преди да включите уреда.


- Никога не използвайте филтъра за обработване на продукти, по-
горещи от 80°С.
- Никога не претоварвайте филтъра. Не слагайте наведнъж повече
от 135 г изсушени соеви зърна или 150 г плодове във филтъра.
- Винаги проверявайте дали капакът е добре затворен/сглобен
и дали мерната чаша е сложена правилно в капака, преди да
включите уреда.
16
- Нарежете плодовете на по-дребни парчета, преди да ги сложите
във филтъра.
- Накисвайте сушените продукти, като например соевите зърна,
преди да ги сложите във филтъра.

Този уред Philips е в съответствие с всички стандарти по отношение
на електромагнитните излъчвания (EMF). Ако се употребява правилно
и съобразно напътствията в Ръководството, уредът е безопасен за
използване според наличните досега научни факти.

Тази функция гарантира, че ще можете да включвате уреда само
когато каната на пасатора е монтирана правилно на задвижващия
блок. Ако каната на пасатора е монтирана правилно, вграденото
заключване ще се отключи.

, Старателно почистете частите, които ще се допират до
храна, преди да използвате уреда за първи път (вж. раздел
“Почистване”).


Вашият пасатор е снабден със специален ключ за управление със
светещ пръстен, който светва, когато уредът работи.
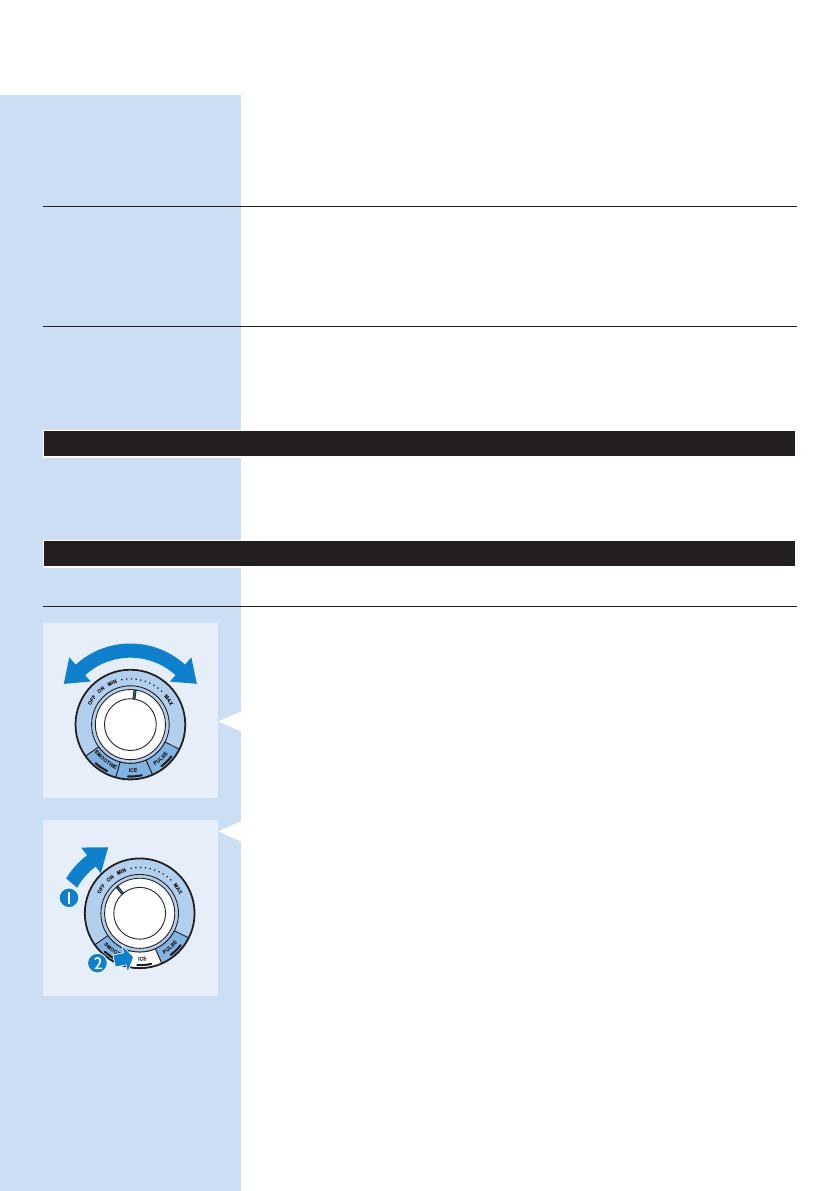
Можете да включите ключа за управление на всяка скорост между
MIN и MAX, или, а още по-лесно е да използвате един от трите
бутона за бързо избиране: Smoothie (шейк), Ice (лед) и Pulse (импулс).
, Ако желаете да използвате скорост между MIN и MAX,
завъртете ключа за регулиране в желаното положение.
Ако се колебаете за правилната скорост, винаги избирайте най-
високата (MAX).
, Ако искате да използвате един от трите бутона за бързо
избиране, завъртете първо ключа за управление в положение ON
(вкл.). След това натиснете желания бутон за бързо избиране.
Когато завъртите ключа за управление в положение ON, светлинните
индикатори на бутоните започват да мигат.

Използвайте този бутон за приготвяне на вкусни шейкове. Когато
натиснете бутона Smoothie, уредът започва да бърка сместа в
съответствие с подходящия скоростен профил. За да спрете процеса,
натиснете отново бутона Smoothie.
Шейковете са гъсти напитки, приготвени от замразени или пресни
плодове и размесени с плодов сок, понякога с лед, сладолед, мляко
или кисело мляко. Вижте няколко примера в глава “Рецепти”. Добавете
още течност, за да направите шейка по-рядък, или добавете още
замразени или пресни плодове, за да го направите по-гъст.
 17

Пасаторът е снабден със специален профил на скоростта за
натрошаване на лед.
Когато натиснете бутона Ice, уредът започва да натрошава лед според
съответния профил за скорост. За да спрете процеса на натрошаване
на лед, натиснете отново бутона Ice.
Ледът ще се раздроби за няколко секунди и в резултат ще се получат
дребни правилни парченца лед. Например ако искате да получите
раздробен лед от 5 кубчета лед, натиснете бутона Ice, оставете уреда
да извърши 5 цикъла на дробене и след това изключете уреда. Ако
искате ледът да бъде разбит на сняг, завъртете ключа за управление
на максимална скорост или натиснете бутона Pulse за няколко секунди.
Ако полученото е все още много едро, натиснете отново бутона
Pulse.

Натискайте бутона за импулсен режим Pulse, ако искате да
обработвате съставките за много кратки периоди. Щом натиснете
бутона Pulse, уредът ще заработи с най-високата си скорост. Когато
освободите бутона, уредът веднага спира. Бутонът Pulse може да бъде
използван и когато уредът работи със скорост между MIN и MAX.

, Пасаторът е предназначен за приготвяне на фини пюрета,
накълцване и пасиране. С пасатора можете да приготвяте супи,
сосове, млечни шейкове и тесто. Можете също да го използвате
за обработване на зеленчуци, плодове и месо.

1 Поставете уплътнителния пръстен на режещия блок.
2 Монтирайте режещия блок върху интерфейса му.
3 Завинтете интерфейса на режещия блок върху дъното на каната
на пасатора така, че да се захване здраво.
18
4 Поставете каната на пасатора на задвижващия блок, както е със
закачен интерфейс на режещия блок (1) и я завъртете, докато се
чуе щракване (2).
Можете да поставите каната на пасатора на задвижващия блок в две
положения: с дръжката насочена надясно или наляво.
5 Включете щепсела в контакта.

1 Сложете продуктите в каната на пасатора.
2 Поставете капака върху каната на пасатора.
Затворете капака, като го натиснете силно надолу.
3 Поставете мерната чаша в отвора на капака.
4 Изберете скорост, като завъртите ключа за регулиране или
натиснете един от бутоните за бърз избор (вж. раздела “Ключ за
регулиране”).
Не допускайте уредът да работи в продължение на повече от 3
минути непрекъснато. Ако след 3 минути работа не сте приключили
обработката, изключете уреда и го оставете да се охлади до стайна
температура, преди да го използвате отново.
5 Винаги изключвайте уреда чрез завъртане на контролния ключ в
положение “OFF”, преди да отворите капака.

1 Изключете уреда от контакта.
2 Свалете капака с мерната чаша от каната на пасатора.
3 Махнете каната на пасатора от задвижващия блок, както е със
закачен интерфейс на режещия блок.
4 Развийте интерфейса на режещия блок от дъното на каната на
пасатора.
5 Винаги почиствайте подвижните части веднага след употреба.

- Нарязвайте месото и твърдите съставки на по-дребни парчета,
преди да ги сложите в каната на пасатора.
- Не обработвайте големи количества твърди продукти наведнъж.
Обработвайте такива продукти на малки порции.
- За да направите доматен сок, нарежете доматите на четири и
пускайте парчетата през отвора в капака върху въртящите се
ножове.
2
1
 19

Можете да ползвате мерната чашка, за да премерите продуктите или
приготвите майонеза.
, За да приготвите майонеза, можете да пробиете с нож или
друг остър предмет отвор в средата на дъното на мерната
чашка, за да я използвате като фуния за добавяне на олио.
Олиото трябва да се добавя много бавно, за да се получи
точната консистентност. Когато приготвяте майонеза, оставяйте
пасаторът да работи на ниска скорост.
Забележка: След като пробиете отвор в мерната чашка, повече няма
да можете да я използвате за премерване.

С този филтър можете да правите вкусни пресни плодови сокове,
коктейли или соево мляко (вж. също “Рецепти”). Филтърът ще
предотврати попадането на семки и кори в напитката ви.
Никога не претоварвайте филтъра. Не слагайте наведнъж повече от
135 г изсушени соеви зърна или 150 г плодове във филтъра.

1 Поставете каната на блендера върху моторния елемент, като тя
е със закачен режещия елемент(1) и я завъртете, докато се чуе
щракване (2).
Пасаторът може да бъде поставен на задвижващия блок в две
положения.
2 Сложете филтъра в каната на пасатора.
Погрижете се жлебовете на филтъра да съвпадат точно с ребрата
вътре в каната на пасатора.
3 Проверете дали щепселът на уреда е включен в контакта.

1 Поставете капака върху каната на пасатора.
Внимавайте да поставяте капака на каната на пасатора така, че
напитката да може да се излива през улея на капака.
2 Поставете съставките във филтъра.
Нарязвайте плодовете на по-дребни парчета и накисвайте сухите
варива, като например соеви зърна, преди да ги сложите във филтъра.
3 Налейте вода или друга течност (мляко, сок и т. н.) в каната на
пасатора.
4 Поставете мерната чаша в отвора на капака.
5 Изберете скорост или натиснете един от бутоните (вж. раздела
“Ключ за регулиране”).
Оставете уреда да работи около 60 секунди.
2
1
20
  • Page 1 1
  • Page 2 2
  • Page 3 3
  • Page 4 4
  • Page 5 5
  • Page 6 6
  • Page 7 7
  • Page 8 8
  • Page 9 9
  • Page 10 10
  • Page 11 11
  • Page 12 12
  • Page 13 13
  • Page 14 14
  • Page 15 15
  • Page 16 16
  • Page 17 17
  • Page 18 18
  • Page 19 19
  • Page 20 20
  • Page 21 21
  • Page 22 22
  • Page 23 23
  • Page 24 24
  • Page 25 25
  • Page 26 26
  • Page 27 27
  • Page 28 28
  • Page 29 29
  • Page 30 30
  • Page 31 31
  • Page 32 32
  • Page 33 33
  • Page 34 34
  • Page 35 35
  • Page 36 36
  • Page 37 37
  • Page 38 38
  • Page 39 39
  • Page 40 40
  • Page 41 41
  • Page 42 42
  • Page 43 43
  • Page 44 44
  • Page 45 45
  • Page 46 46
  • Page 47 47
  • Page 48 48
  • Page 49 49
  • Page 50 50
  • Page 51 51
  • Page 52 52
  • Page 53 53
  • Page 54 54
  • Page 55 55
  • Page 56 56
  • Page 57 57
  • Page 58 58
  • Page 59 59
  • Page 60 60
  • Page 61 61
  • Page 62 62
  • Page 63 63
  • Page 64 64
  • Page 65 65
  • Page 66 66
  • Page 67 67
  • Page 68 68
  • Page 69 69
  • Page 70 70
  • Page 71 71
  • Page 72 72
  • Page 73 73
  • Page 74 74
  • Page 75 75
  • Page 76 76
  • Page 77 77
  • Page 78 78
  • Page 79 79
  • Page 80 80
  • Page 81 81
  • Page 82 82
  • Page 83 83
  • Page 84 84
  • Page 85 85
  • Page 86 86
  • Page 87 87
  • Page 88 88
  • Page 89 89
  • Page 90 90
  • Page 91 91
  • Page 92 92
  • Page 93 93
  • Page 94 94
  • Page 95 95
  • Page 96 96
  • Page 97 97
  • Page 98 98
  • Page 99 99
  • Page 100 100
  • Page 101 101
  • Page 102 102
  • Page 103 103
  • Page 104 104
  • Page 105 105
  • Page 106 106
  • Page 107 107
  • Page 108 108
  • Page 109 109
  • Page 110 110
  • Page 111 111
  • Page 112 112
  • Page 113 113
  • Page 114 114
  • Page 115 115
  • Page 116 116
  • Page 117 117
  • Page 118 118
  • Page 119 119
  • Page 120 120
  • Page 121 121
  • Page 122 122
  • Page 123 123
  • Page 124 124
  • Page 125 125
  • Page 126 126
  • Page 127 127
  • Page 128 128
  • Page 129 129
  • Page 130 130
  • Page 131 131
  • Page 132 132
  • Page 133 133
  • Page 134 134
  • Page 135 135
  • Page 136 136
  • Page 137 137
  • Page 138 138
  • Page 139 139
  • Page 140 140
  • Page 141 141
  • Page 142 142
  • Page 143 143
  • Page 144 144
  • Page 145 145
  • Page 146 146
  • Page 147 147
  • Page 148 148
  • Page 149 149
  • Page 150 150
  • Page 151 151
  • Page 152 152
  • Page 153 153
  • Page 154 154
  • Page 155 155
  • Page 156 156
  • Page 157 157
  • Page 158 158

Philips HR2094/00 Používateľská príručka

Kategória
Mixéry
Typ
Používateľská príručka
Táto príručka je tiež vhodná pre