24 25
5. Si besoin est, ajustez la durée de cuisson et la pression.
Remarque : vous trouverez dans le tableau du Guide de cuisson, page 182, les ajustements de durée et de pression
recommandés.
6. Une fois les ajustements éventuellement requis effectués, appuyez sur la touche START/STOP.
7. Pour que la cuisson sous pression puisse débuter, le multicuiseur doit atteindre un niveau de pression déterminé.
Lorsque la pression augmente dans le multicuiseur, le mot « HEAt » apparaît sur l’écran d’affichage et le compte à
rebours ne débute pas. Le temps requis pour que le niveau de pression approprié soit atteint dans le multicuiseur
varie selon l’humidité ambiante et la température de l’eau. La durée moyenne est d’environ 13 à 15 minutes. Une fois
le niveau de pression requis atteint, « HEAt » disparaît de l’écran d’affichage et le compte à rebours commence.
8. Une fois la durée de cuisson définie écoulée, le multicuiseur émet un signal sonore et le programme de maintien au
chaud KEEP WARM est automatiquement activé. La durée de cuisson disparaît par conséquent de l’écran d’affichage
et est remplacée par une nouvelle minuterie qui compte jusqu’à 4:00 (4 heures) ou jusqu’à ce que vous appuyiez sur
la touche START/STOP. Après 4 heures en mode KEEP WARM, le multicuiseur passe en mode de veille et quatre
tirets (- - - -) apparaissent sur l’écran d’affichage.
Remarque : le multicuiseur ne peut pas fonctionner en mode sous pression sans liquide. Assurez-vous que la cuve de
cuisson amovible contient au moins 240 ml de liquide.
ATTENTION : pendant la cuisson, la pression va s’accumuler dans le multicuiseur. Veillez à utiliser des gants de cuisine ou
des maniques lorsque vous soulevez le couvercle pour protéger vos mains.
ÉVACUATION DE LA VAPEUR EN FIN DE CUISSON
A. Méthode d’évacuation naturelle de la pression : une fois le cycle de cuisson terminé, le multicuiseur évacue
naturellement la pression par le biais de la soupape à flotteur. L’appareil refroidit progressivement sans intervention
de votre part. Attendez au moins 10 minutes après la fin de la cuisson puis, à l’aide d’un ustensile de cuisine, placez
le poussoir de la soupape d’évacuation de la vapeur en position ouverte (voir figure 2). Ne placez aucune partie de la
main ou du corps au-dessus de la soupape d’évacuation, car la vapeur est extrêmement chaude et risque de brûler la
peau. La pression redevient normale lorsqu’aucune vapeur ne s’échappe de la soupape et que le couvercle s’ouvre
sans effort. Vous pouvez maintenant soulever le couvercle en toute sécurité et servir le plat.
B. Utilisez la méthode d’évacuation rapide de la vapeur avec prudence : à l’aide d’un ustensile de cuisine, placez
graduellement le poussoir de la soupape d’évacuation de la vapeur en position ouverte (voir figure 2). La vapeur
s’échappe rapidement de la soupape d’évacuation. Ne placez aucune partie de la main ou du corps au-dessus de la
soupape d’évacuation, car la vapeur est extrêmement chaude et risque de brûler la peau. Utilisez cette méthode avec
prudence si vous préparez un plat à forte teneur en liquide tel qu’un ragoût, un potage, un bouillon, des haricots secs et
autres légumineuses. N’utilisez jamais cette méthode si vous faites cuire du riz, à traiter généralement avec délicatesse.
La pression redevient normale lorsqu’aucune vapeur ne s’échappe de la soupape et le couvercle s’ouvre sans effort.
Vous pouvez maintenant soulever le couvercle en toute sécurité et servir le plat.
ATTENTION:
1. N’ouvrez pas de force le couvercle. S’il ne s’ouvre pas facilement, le multicuiseur est encore sous pression.
2. Pendant la cuisson, la pression va s’accumuler dans le multicuiseur. Veillez à utiliser des gants de cuisine ou des
maniques lorsque vous soulevez le couvercle pour protéger vos mains.
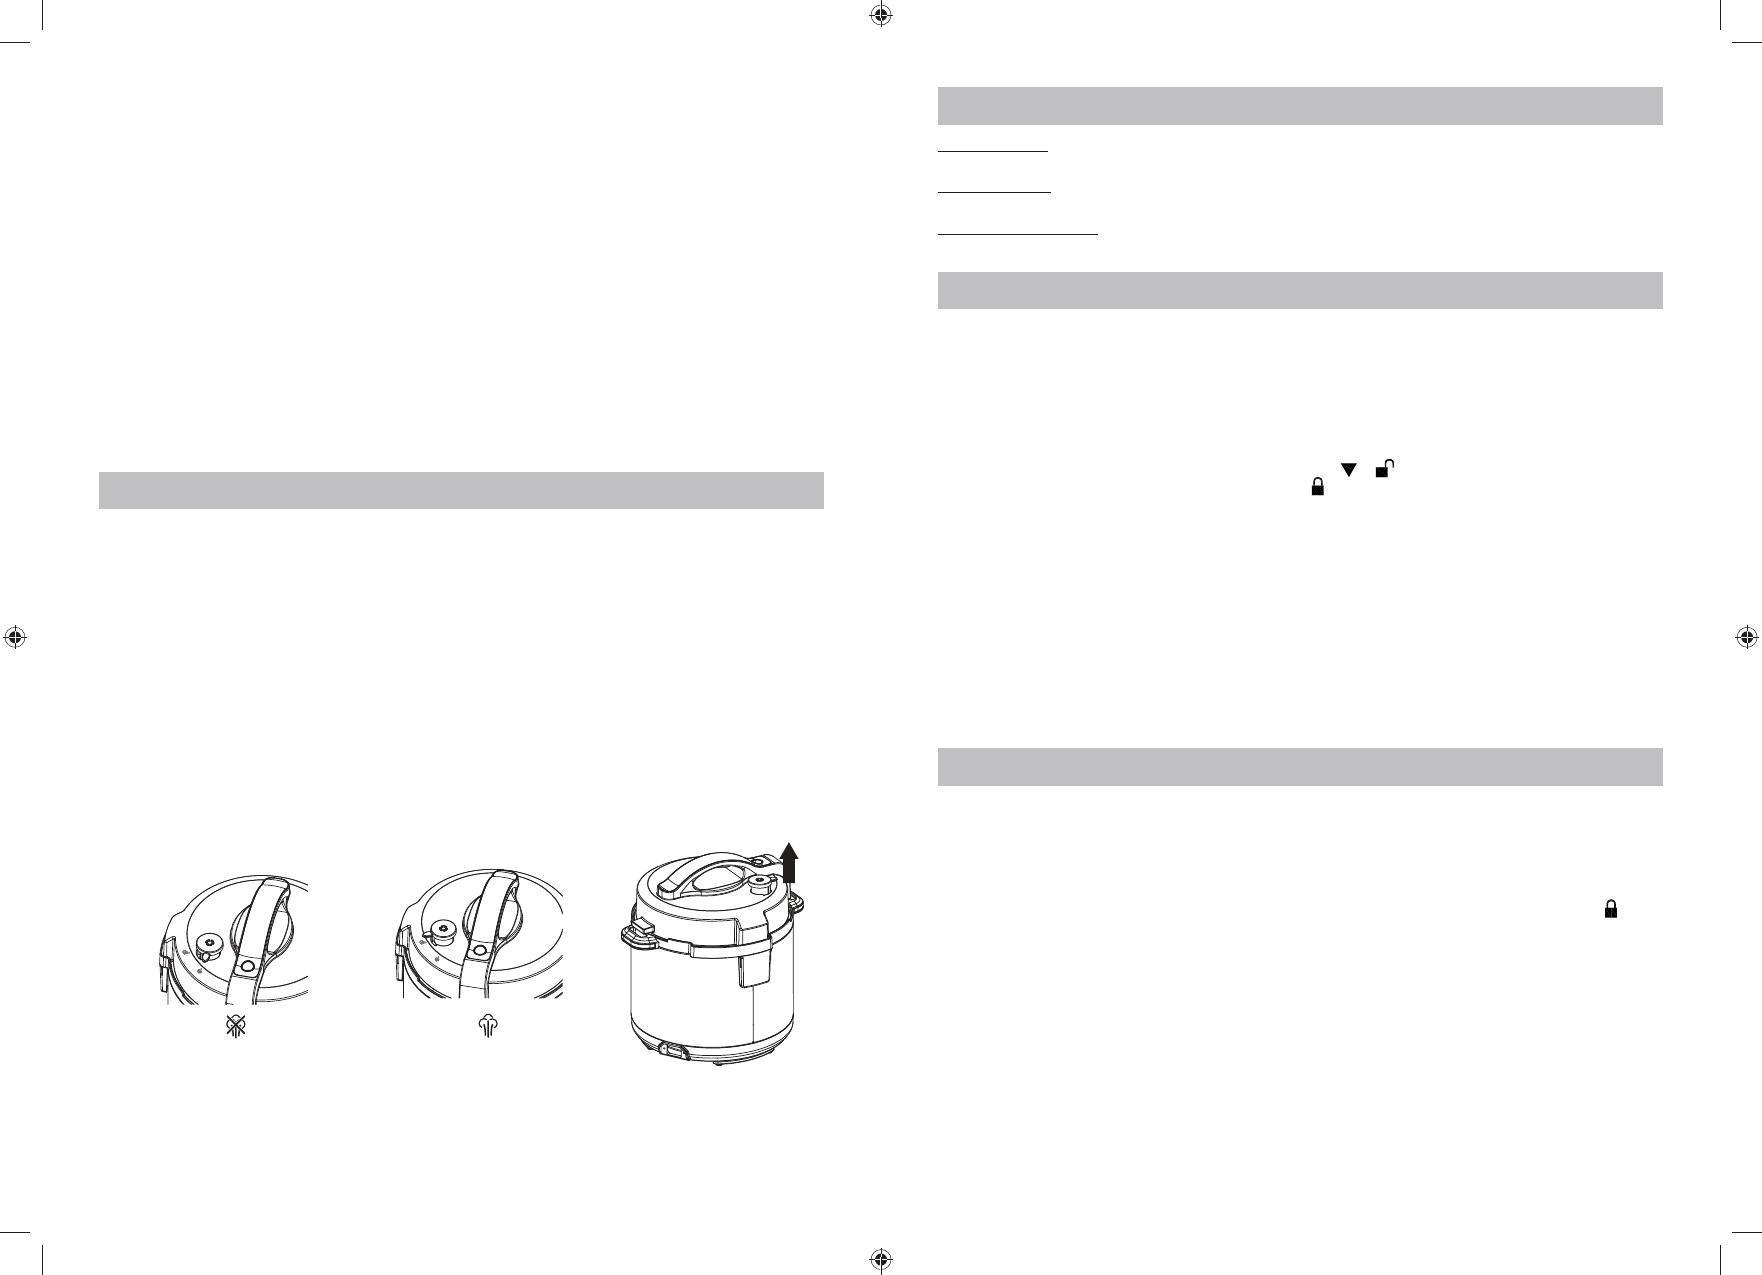
Soupape d’évacuation de la vapeur
Soupape FERMÉE (fermeture hermétique) Soupape OUVERTE
(évacuation)
Soupape ENLEVÉE
Figure 2
FONCTION MIJOTEUSE
Programme LOW : adapté à la cuisson à basse température et aux plats mijotés. La durée recommandée de cuisson en
mode LOW est comprise entre 6 et 8 heures.
Programme HIGH : adapté à une cuisson plus rapide. La durée recommandée de cuisson en mode HIGH est comprise
entre 2 et 4 heures.
Programme KEEP WARM : une fois la cuisson terminée, le multicuiseur passe automatiquement en mode KEEP WARM
pour éviter de trop cuire un plat et le maintenir au chaud jusqu’à ce qu’il soit l’heure de passer à table.
UTILISATION DE LA FONCTION MIJOTEUSE
La fonction SLOW COOK n’utilise pas de pression pendant le processus de cuisson, mais elle peut s’accumuler dans
l’appareil en cours de cuisson. Si vous utilisez cette fonction, assurez-vous que la soupape d’évacuation de la vapeur est
en position ouverte. Cette fonction produit des résultats similaires à ceux d’une mijoteuse standard, à une température plus
basse et pendant plus longtemps. Vous obtenez ainsi des plats savoureux qui fondent dans la bouche.
Placez le multicuiseur sur une surface plane et horizontale. Placez la cuve de cuisson dans la base chauffante. Branchez le
multicuiseur sur une prise murale. Il émet un signal sonore et quatre tirets (- - - -) apparaissent sur l’écran d’affichage.
1. Placez les aliments et le liquide dans la cuve de cuisson amovible.
2. Placez le couvercle sur le multicuiseur et alignez les symboles et . Pour verrouiller le couvercle, tournez-le
dans le sens antihoraire jusqu'à la position VERROUILLÉ .
3. À l’aide du poussoir, faites pivoter la soupape d’évacuation de la vapeur jusqu’à la position ouverte.
Remarque: bien que ce programme n’utilise pas de pression pendant le processus de cuisson, elle peut s’accumuler
dans l’appareil en cours de cuisson. C’est pourquoi il est important que la soupape d’évacuation de la vapeur reste en
position ouverte.
4. Appuyez sur la touche SLOW COOK et ajustez la durée et la température de cuisson, si besoin est.
Remarque: vous trouverez dans le Guide de cuisson, page 182, les ajustements de durée et de pression recommandés.
5. Appuyez sur la touche START/STOP. Le compte à rebours débute.
6. Une fois la durée de cuisson définie écoulée, le multicuiseur émet un signal sonore et le programme de maintien au
chaud KEEP WARM est automatiquement activé. La durée de cuisson disparaît par conséquent de l’écran d’affichage
et est remplacée par une nouvelle minuterie qui compte jusqu’à 4:00 (4 heures) ou jusqu’à ce que vous appuyiez sur
la touche START/STOP. Après 4 heures en mode KEEP WARM, le multicuiseur s’arrête.
UTILISATION DE LA FONCTION VAPEUR
Placez le multicuiseur sur une surface plane et horizontale.Placez la cuve de cuisson dans la base chauffante. Branchez le
multicuiseur sur une prise murale. Il émet un signal sonore et quatre tirets (- - - -) apparaissent sur l’écran d’affichage.
1. Versez 250 ml d’eau au fond de la cuve de cuisson amovible et mettez en place le panier de cuisson. Vérifiez que le
niveau de l’eau est juste inférieur à celui du panier, afin que les aliments n’entrent pas en contact avec l’eau.
2. Placez les aliments dans le panier de cuisson.
3. Posez le couvercle et verrouillez-le en le tournant dans le sens antihoraire jusqu'à la position VERROUILLÉ .
4. À l’aide du poussoir, faites pivoter la soupape d’évacuation de la vapeur sur la position de fermeture hermétique.
5. Appuyez sur la touche STEAM et ajustez la durée et la pression, si besoin est.
6. Une fois les ajustements éventuellement requis effectués, appuyez sur la touche START/STOP.
7. Pour que la cuisson sous pression puisse débuter, le multicuiseur doit atteindre un niveau de pression déterminé.
Lorsque la pression augmente dans le multicuiseur, le mot « HEAt » apparaît sur l’écran d’affichage et le compte à
rebours ne débute pas. Une fois le niveau de pression requis atteint, « HEAt » disparaît de l’écran d’affichage et le
compte à rebours commence.
8. Une fois la durée de cuisson définie écoulée, le multicuiseur émet un signal sonore et le programme KEEP WARM
est automatiquement activé. La durée de cuisson disparaît par conséquent de l’écran d’affichage et est remplacée
par une nouvelle minuterie qui compte jusqu’à 4:00 (4 heures) ou jusqu’à ce que vous appuyiez sur la touche START/
STOP. Après 4 heures en mode KEEP WARM, le multicuiseur s’arrête.
ASTUCE : reportez-vous au tableau de cuisson à la vapeur, page 183.
CSC051X_21MLM1 (EU).indd 24-25CSC051X_21MLM1 (EU).indd 24-25 1/18/21 09:511/18/21 09:51


