Beko BHCB 93640 B Používateľská príručka

Typ
Používateľská príručka

Táto príručka je tiež vhodná pre

BHCB 93640 B - BHCB 93640 BH
EN - DE - ES - RO - FR - NL- KA- PT - SQ - CS - SK - PL - BG - BS - RU - KK
01M-8897303200-0722-10
01M-8897833200-0722-10
User Manual
Cooker Hood
2 / EN Cooker Hood / User Manual
CONTENTS
ENGLISH 3-16
DEUTSCH 17-33
ESPAÑOL 34-50
ROMÂNĂ 51-66
FRANÇAIS 67-82
NEDERLANDS 83-97
KARTULİ 98-117
PORTUGUÊS 118-134
SHQIPTARE 135-149
ČESKY 150-164
SLOVENSKÝ 165-179
POLSKI 180-197
БЪЛГАРСКИ 198-216
BOSANSKI 217-230
РУССКИЙ 231-251
KAZAKH 251-271
Please read this user manual first!
Dear Valued Customer,
Thank you for preferring this Beko appliance. We hope that you get the best results
from your appliance which has been manufactured with high quality and state-of-
the-art technology. For this reason, please read this entire user manual and all other
accompanying documents carefully before using the appliance and keep it as a
reference for future use. If you handover the appliance to someone else, give the user
manual as well. Follow the instructions by paying attention to all the information and
warnings in the user manual.
Remember that this user manual may also apply to other models. Differences between
models are explicitly described in the manual.
Meanings of the Symbols
Following symbols are used in various sections of this user manual:
CImportant information and useful hints about
usage.
AWARNING: Warnings against dangerous situa-
tions concerning the security of life and property.
WARNING: Warning for danger of fire.
BWARNING: Warning for electric shock.
This appliance has been produced in environmentally friendly facilities without harming the nature.
4 / EN Cooker Hood / User Manual
1
Important safety and environmental instructions
1.1 General safety
Important Safety Instructions Read
Carefully And Keep For Future
Reference This section contains
safety instructions that will help
protect from risk of fire, electric
shock, exposure to leak micro-
wave energy, personal injury or
property damage. Failure to follow
these instructions shall void any
warranty.
Beko products comply with the
applicable safety standards;
therefore, in case of any damage
on the appliance or power cable,
it should be repaired or replaced
by the dealer, service center or a
specialist and authorized service
alike to avoid any danger. Faulty
or unqualified repair work may
be dangerous and cause risk to
the user.
This appliance is intended to be
used in household and similar
applications such as:
Staff kitchen areas in shops,
offices and other working en-
vironments;
Farm houses
By clients in hotels, and other
residential type environments;
Bed and Breakfast type envi-
ronments.
Operate the appliance for its
intended purpose only as de-
scribed in this manual.
The manufacturer cannot be held
liable for damages resulting from
improper installation or misuse of
the product.
This appliance can be used by
children aged from 8 years and
above and persons with reduced
physical, sensory or mental ca-
pabilities or lack of experience
and knowledge if they have been
given supervision or instruction
concerning use of the appliance
in a safe way and understand the
hazards involved.
Children shall not be allowed
play with the appliance. Cleaning
and user maintenance shall not
be made by children without su-
pervision.
Cooker Hood / User Manual 5 / EN
1
Important safety and environmental instructions
The minimum distance between
the supporting surface for the
cooking vessels on the hob and
the lowest part of your product
must be at least 65 cm.
If the instructions for installation
for the gas hob specify a greater
distance, this has to be taken
into account.
Make sure that your mains
power supply complies with the
information supplied on the rat-
ing plate of the appliance.
Never use the appliance if the
power cable or the appliance it-
self is damaged.
Prevent damage to the power
cable by not squeezing, bending,
or rubbing it on sharp edges.
Keep the power cable away from
hot surfaces and naked flame.
Use the appliance with a
grounded outlet only.
WARNING: Do not connect the
appliance to the mains until the
installation is fully complete.
Place the appliance in a way so
that the plug is always accessible.
Do not touch the lamps if they
have operated for a long time.
They can burn your hands since
they will be hot.
Follow the regulations set out by
competent authorities on dis-
charge of the exhaust air (this
warning is not applicable for use
without flue).
Operate your appliance after put-
ting a pot, pan etc. on the hob.
Otherwise, high heat may cause
deformation in some parts of
your product.
Turn off the hob before taking the
pot, pan etc. from it.
Do not leave hot oil on the hob.
Pans with hot oil may cause self
combustion.
Pay attention to your curtains
and covers since oil may catch
fire while cooking food such as
fries.
Grease filter must be cleaned
at least monthly. Carbon filter
must be replaced at least every
3 months.
6 / EN Cooker Hood / User Manual
1
Important safety and environmental instructions
Product shall be cleaned ac-
cordance with user manual. If
cleaning was not carried out in
accordance with user manual,
there may be fire risk.
Do not use non-fire-resistant
filtering materials instead of the
current filter.
Only use the original parts or
parts recommended by the man-
ufacturer.
Do not operate the product with-
out the filter and do not remove
the filters while the product is
running.
In the event of be started any
flame, de-energize your product
and cooking appliances.
In the event of be started any
flame, cover the flame and never
use water to extinguish.
Unplug the appliance before
each cleaning and when the ap-
pliance is not in use.
The negative pressure in the envi-
ronment should not exceed 4 Pa
(4x10 bar) while the hood for elec-
tric hob and appliances running on
another type of energy but electric-
ity operate simultaneously.
In the environment where the
appliance is being used, the ex-
haust of devices running on fuel
oil or gas, such as room heater
must be absolutely isolated or
device must be hermetical type.
When connecting the flue, use
pipes with a diameter of 120 or
150 mm. Pipe connection must
be as short as possible and have
as few elbows as possible.
Danger of choking! Keep all the
packaging materials away from
children.
CAUTION: Accessible parts may
become hot when used with cook-
ing appliances.
The product outlet must not be
connected to air channels that
include other smoke.
The ventilation in the room may
be insufficient when the hood for
electric hob is used simultane-
ously with the devices operating
on gas or other fuels (this may
not apply to appliances that only
discharge the air back into the
room).
Cooker Hood / User Manual 7 / EN
1
Important safety and environmental instructions
Objects placed on the product
may fall. Do not place any ob-
jects on the product.
Do not flambe under the your
product.
WARNING: Before installing the
Hood, remove the protective films.
Never leave high naked flames
under the hood when it is in op-
eration
Deep fat fryers must be contin-
uously monitored during use:
overheated oil can burst into
flames.
1.2 Compliance with the WEEE
Directive and Disposing of the Waste
Product:
This product complies with EU WEEE Directive
(2012/19/EU). This product bears a classification
symbol for waste electrical and electronic equip-
ment (WEEE).
This symbol indicates that this product
shall not be disposed with other
household wastes at the end of its ser-
vice life. Used device must be returned
to offical collection point for recycling
of electrical and electronic devices. To find these
collection systems please contact to your local au-
thorities or retailer where the product was pu-
chased. Each household performs important role
in recovering and recycling of old appliance.
Appropriate disposal of used appliance helps pre-
vent potential negative consequences for the envi-
ronment and human health.
1.3 Compliance with RoHS Directive
The product you have purchased complies with EU
RoHS Directive (2011/65/EU). It does not contain
harmful and prohibited materials specified in the
Directive.
1.4 Package Information
Packaging materials of the product are
manufactured from recyclable materials
in accordance with our National
Environment Regulations. Do not dis-
pose of the packaging materials together with the
domestic or other wastes. Take them to the pack-
aging material collection points designated by the
local authorities.
8 / EN Cooker Hood / User Manual
1. Inner chimney
2. Outer chimney
3. Control panel
4. Grease filter
5. Lighting
2.2 Technical data
Model BHCB 93640 B BHCB 93640 BH
Supply voltage & Frequency 220-240V ~ 50 Hz
Lamp power 2 x 3 W
Motor power 210 W
Flow rate – 3. Level 645 m³/h
Insulation class of motor Class F
Insulation class Class I
(Figure 2) BHCB 93640 B
BHCB 93640 BH
(Figure 1)
2 General appearance
2.1 Overview
504
898
53
n643 Max 1023
590
20
380
261
250
80 25
Cooker Hood / User Manual 9 / EN
3.1 Controlling the Appliance
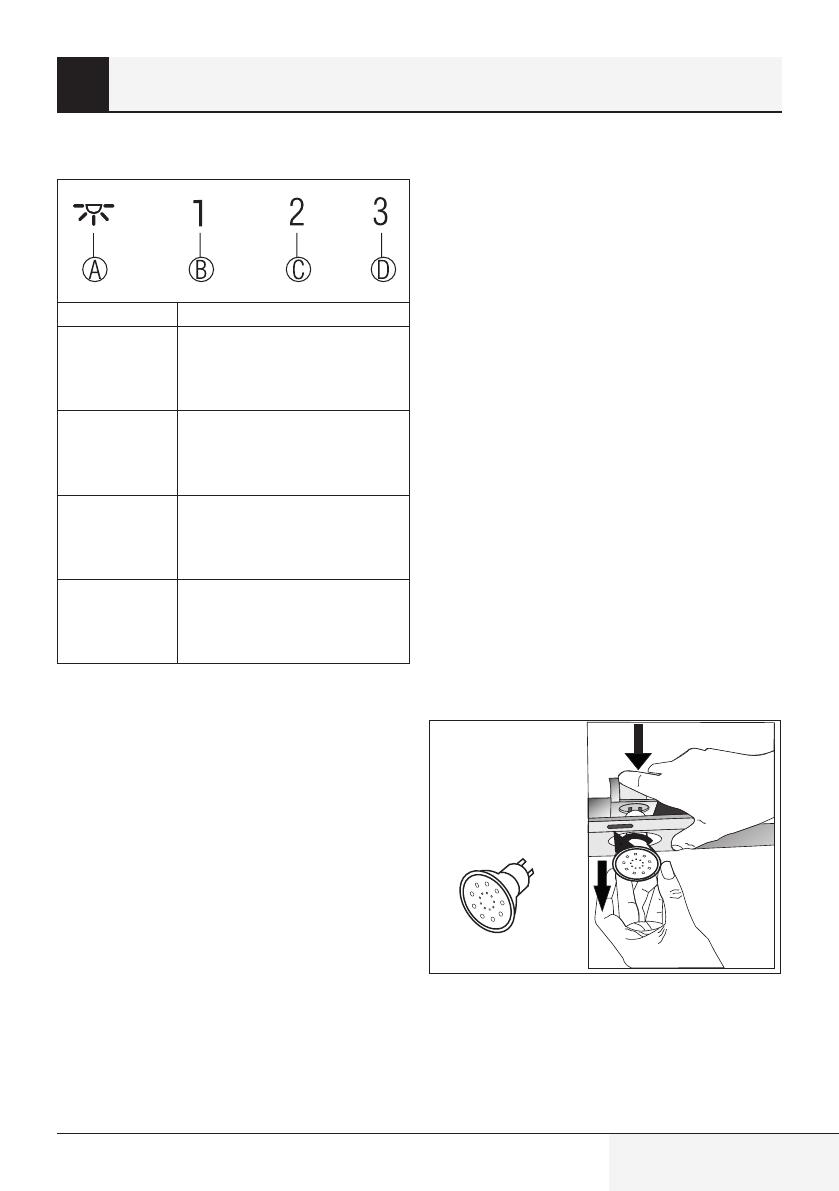
KEY FUNCTION
A : Light On
/ Off
You may illuminate the cooking
area by pressing this button. Re-
press the button to turn off the
lamp.
B : 1. Stage
Button
Operates the appliance on 1st
speed. When you press this button
again to turn off the appliance, the
screen speed stage turns off.
C : 2. Stage
Button
Operates the appliance on 2nd
speed. When you press this button
again to turn off the appliance, the
screen speed stage turns off.
D : 3rd Stage
Button
Operates the appliance on 3rd
speed. When you press this button
again to turn off the appliance, the
screen speed stage turns off.
3.2 Energy efficient usage
When using your appliance, adjust the speed
settings according to vapour and odour intensity,
in order to save energy.
Use low speeds (1-2) under normal conditions,
and high speed (3) for intense odour and vapour.
The lamps on the hood are placed for illuminat-
ing the cooking area.
Using them for environmental lighting shall
cause unnecessary energy expenditure and in-
sufficient lighting.
3.3 Operating the hood
Your appliance contains a motor that has various
speeds.
For better performance, we recommend using low
speeds under normal conditions and high speeds
in cases of strong odours and intense vapour.
3 Operation of the appliance
You can start your appliance by pressing on the
desired speed setting button. (B, C, D)
You may illuminate the cooking area by pressing
the lamp (A).
3.4 Automatic stop
Your appliance has Automatic Stop feature, ena-
bling it to ventilate for a bit more and remove the
unwanted odours and vapour inside the environ-
ment and turn off automatically after the cooking
is done. To enable Automatic Stop feature, press
the any speed stage button (B, C, D) on the control
panel for longer than 2 seconds; the 15-minute
timer function shall be activated. When the au-
tomatic stop feature is active, pressing the same
speed button shall disable the automatic stop
function and the appliance's motor shall stop. This
feature is disables when you switch between dif-
ferent speed stages. If you want the appliance to
stop automatically, you need to enable the auto-
matic stop feature again.
3.5 Replacement of Lamp
MAX 3 W
(Figure 3)
Make the electrical connections of the appliance.
Your appliance uses 3W spot LED lamp. For re-
placing the lamps, push downwards on the holder
from its behind, turn it counter-clockwise, and take
it out downwards. Apply the above operation in re-
10 / EN Cooker Hood / User Manual
verse to install new lamps (Figure 3).
Bulb
Bulb Power 3 W
Holder / Socket GZ 10
Bulb Voltage 220 - 240 V
Size 53 x 50 mm
ILCOS Code DR/F3-220-240-GZ10-50-53
Luminous flux 260 lm
Correlated
colour tempera-
ture
3000 K
This product contains a light source of energy ef-
ficiency class “F”.
3.6 Operation with chimney
connection
Vapour is extracted through the
flue duct, which is fastened to
the connection head on the
hood.
The diameter of the flue duct must be the same
as the connection ring. In horizontal settings, the
pipe has to have a slight upward slope (around
10º) so that the air can exit the room easily.
3.7 Operation without chimney
connection
Air is filtered through the carbon
filter and recirculated in the
room. Carbon filter is used
when it is impossible to use a
flue in the house.
In flueless use, remove the flaps inside the flue
adapter.
Remove the aluminum grease filter. To install the
carbon filter, fit the filter to the tabs by centring
it on the plastic piece on both sides of the fan
body. tighten it by turning right or left.
Replace aluminum grease filter.
3 Operation of the appliance
Cooker Hood / User Manual 11 / EN
CBefore cleaning and maintenance,
unplug the product or turn off the
switch.
4.1 Cleaning of grease filter
Grease filter is used to retain the oil particles in the
air. Grease filter may change colour after repeated
cleaning. This is normal, and you do not have to
replace your filters.
(Figure 4)
Push the grease filter lock forward.
Then pull it slightly down and pull it out (Figure
4). Otherwise, you may bend the filter. Wash and
rinse grease filter with liquid detergent and re-
place grease filter to their seats by carrying out
the steps specified above in reverse order. These
grease filter are used to retain the oil particles
in the air.
CYou may also wash the grease filter
in the washing machine.
ACAUTION: In case of normal use,
clean your grease filter once in a
month.
4.2 Replacement of Carbon Filters
(Figure 5)
The appliance you have purchased is appropri-
ate for use with carbon filters.
Remove the grease filter (Figure 4).
Place the lower part of the carbon filter to the
motor cabinet (Figure 5).
Press on the tab of the carbon filter and push it
forward, and ensure that the tabs of carbon filter
are engaged and locked. (Figure 5).
Attach the grease filter.
A
CAUTION
Carbon filter shall never be
washed.
Replace carbon filters once every
3 months.
You can obtain the carbon filter
from the authorized services.
4 Cleaing and maintenance
12 / EN Cooker Hood / User Manual
AWARNING: Before starting the in-
stallation, read the safety informa-
tion on User Manual.
BWARNING: Failure to install with
screws and stabilizers in accordance
with these instructions may result in
electric shock.
For the installation of the hood, please contact the
nearest Authorized Service.
It is the customer's responsibility to prepare the
location and electrical installation of the hood.
5.1 Position of the Appliance
(Figure 6)
Distance between the cooker and the cooker
hood must be considered prior to assembly. This
distance should be 65 cm (Figure 6).
Distance must be measured from the surface of
grate for gas cookers,
from surface of glass for electric cookers.
5.2 Installation Accessories
17 18
Hood
User manual
EN
BHCB93640B
BHCB93640BH
01M-8897303200-0521-09
01M-8897323200-0521-09
1. Product
2. Inner Chimney
3. Outer Chimney
4. Ø150/120 mm Plastic Flue Adapter
5. Chimney Connection Plate
6. User Manual
7. Assembly Pattern
8. 2x Hanging Plates
9. 2x Ø6mm Plastic Dowel
10. 4x Ø10mm Plastic Dowel
11. 4x 5.5x60 Wall Mount Screw
12. 2x M5x35 Hanging Plate Connection Screw
13. 2x 3.9x22 Chimney Connection Plate Screw
14. 2x M4 Washer
15. Air Baffle
16. Plastic Adapter (Air Diverter)
17. 2x 3.5x9.5 Chimney Connection Plate Screw
18. Chimney Clamp
The information required to make the location suit-
able for the installation of the hood is given below.
5 Installation of appliance
Cooker Hood / User Manual 13 / EN
To install the hood body, drill points C, D, E, F spec-
ified in the installation template with a Ø10mm
drill bit and tap Ø10mm plastic dowels to these
points (Figure 8).
Install 2 pieces of 5.5x60 mounting screws to
points C and D with a clearance of 5 mm between
the screw head and the wall (Figure 8).
(Figure 8)
Install two pieces of hanging plates to the body of
the hood with M5x35 mounting screws (Figure 8).
(Figure 9)
Hold the cooker hood by its body and place it on
the mounting screws on the wall and tighten the
screws (Figure 9).
Install M4 washers to the 5.5x60 suspension
screws. Secure the cooker hood with a 5.5x60
screw to the wall through the mounting hole on
5.3 Wall Mounting
Wall must be flat, straight and have the suffi-
cient bearing capacity.
Depth of drilling holes must comply with the
length of bolts.
The bolts and dowels provided are suitable for
brick walls. For other construction material (e.g.
drywall, plate, porous concrete), suitable fixing
dowels and nuts shall be used.
4x
Ø10mm
F
(Figure 7)
ACAUTION: Before drilling, ensure
that there are no power, gas or wa-
ter pipes in the close proximity of the
drilling locations.
Draw a mid location line from the ceiling perpen-
dicular to the lower edge of the hood.
Fix the assembly scheme on the wall. For points
A and B, take the maximum dimensions of the
hood as reference, and drill points A and B you
have marked with a Ø6mm drill bit, and tap Ø6mm
plastic wall plugs. Install the chimney connection
plate to the wall with 2 pieces of 3.9x22 screws
(Figure 8).
5 Installation of appliance
14 / EN Cooker Hood / User Manual
the interior of the appliance (Figure 9).
5.4 Connecting to Chimney
If you are going to use the Ø 120/150 mm plastic
Chimney adapter, connect one end of the pipe to
this adapter, if you are not going to use it, to the di-
rect output on the product. Connect the other end
of the pipe to your Chimney . Check that these two
connections are tight enough so they will not come
out when the appliance runs on full power. Check
if the flaps inside the Chimney operate when they
are tightened with clamps. Connect the Chimney
connection duct outside the adapter (Figure 11/a).
If the connection duct is fitted inside the adapter,
suction of air shall not occur as the Chimney flap
that prevents the return of air will remain closed
(Figure 11 / b). The length of the pipe connection
as well as the number of elbows must be as min-
imum as possible.
A : Chimney exit pipe
B : Non return flaps
C: Plastic flue
The valves are closed then the appliance is not
operating and prevent possible outside odour and
dust from entering inside.
(Figure 10)
5 Installation of appliance
Ok Not Ok
(a) (b)
(Figure 11)
5.5 Installation of the Hood to the
Chimney
Make the electrical connection of your hood before
starting the installation of the Chimney . Slip the
Chimney plates around the body.
Install the Chimney plate to the Chimney fasten-
ing plate that is secured to the wall from its upper
outer edges (Figure 12).
(Figure 12)
1. Inner Chimney
2. 3.5x9.5 Screw
3. Chimney Connection Plate
Cooker Hood / User Manual 15 / EN
5.6 Installation of Air Baffle (BHCB
93640 BH)
While using with the carbon filter, air baffle is pro-
vided with your appliance with the aim of re-re-
leasing the air which is cleaned with carbon fil-
ter from the perforated located on the Chimney.
Assemble the air baffle as below.
(Figure 13)
There is a tab in the middle of the Chimney con-
nection plate. Place the middle point of this tab on
the line that is drawn perpendicular to the wall.
Align horizontally and mark the holes where the
connection plate will be mounted via a pen (Figure
13/A, B).
Drill the marked points with Ø6mm drill and in-
sert two Ø6mm plastic dowels in the drilled holes
(Figure 13/A, B).
Fix the Chimney connection plate to the wall with
3.9x22 screws (Figure 13/A, B).
For air baffle assembly, install point C, D, E, F with
Ø6mm drill and Ø6mm plastic dowels (Figure 13 ).
1
2
(Figure 14)
1. Air Baffle
2. Plastic Chimney
Attach the plastic Chimney adapter, which is in-
cluded in the package, in the direction of the air
baffle. Lock the Chimney adapter by turning it in
the direction of the arrow (Figure 14).
(Figure 15)
Assemble the air baffle group with 3.9 x 22
screws from point C, D, E, F that you have already
prepared (Figure 13).
Assemble the hood body (Figure 7).
(Figure 16)
1. Aluminium Air Outlet Pipe
Make the air outlet pipe assembly (Figure 16).
C
Since twists and bends in the alu-
minium pipe will lead to reduction
in the air suction power, avoid using
twists and bends as much as pos-
sible.
Install the Chimney plates of the hood (Figure 12)
5 Installation of appliance
16 / EN Cooker Hood / User Manual
6 Troubleshooting
Troubleshooting Root cause Help
Appliance is not working. Check your fuses. Fuse may be blown, inspect and restore it.
Appliance is not working. Check the electrical connection. Mains voltage shall be between 220 and 240 V.
Appliance is not working. Check the electrical connection. Check if other appliance in your kitchen
operate.
Illumination light does
not operate. Check the electrical connection. Mains voltage shall be between 220 and 240 V.
Illumination light does
not operate. Inspect the lamp switch. Lamp switch shall be at “on” position.
Illumination light does
not operate. Inspect the lamps. The lamps of the appliance shall illuminate.
Air inlet of the appliance
is inadequate. Inspect the grease filter. Under normal operating conditions, grease filter
shall be cleaned at least once in a month.
Air inlet of the appliance
is inadequate. Check the air discharge chimney. The air discharge chimney shall be at “on” po-
sition.
Air inlet of the appliance
is inadequate. Inspect the carbon filter. The filters of the appliances with carbon filters
shall be replaced once in every 3 months under
normal conditions.
Bitte lesen Sie zunächst diese Anleitung!
Sehr geehrte Kundin, sehr geehrter Kunde,
Vielen Dank, dass Sie sich für dieses Gerät der Marke Beko entschieden haben. Wir sind
überzeugt, dass Sie mit diesem Gerät, das mit den höchsten Qualitätsanforderungen
und modernster Technologie hergestellt wurde, beste Ergebnisse erzielen werden.
Bitte lesen Sie die gesamte Bedienungsanleitung und alle anderen Begleitdokumente
aufmerksam, bevor Sie das Gerät verwenden; bewahren Sie sie zum künftigen
Nachschlagen sicher auf. Wenn Sie das Gerät an jemanden weitergeben, händigen
Sie ihm bitte auch diese Anleitung aus. Befolgen Sie die Anweisungen, indem Sie alle
Informationen und Warnhinweise in der Bedienungsanleitung beachten.
Bitte denken Sie daran, dass diese Bedienungsanleitung eventuell für mehrere Modelle
geschrieben wurde. Unterschiede zwischen den Modellen werden in der Anleitung klar
und deutlich beschrieben.
Bedeutung der Symbole
Folgende Symbole werden in den verschiedenen Abschnitten dieser Anleitung
verwendet:
CWichtige Informationen und nützliche Hinweise zur
Verwendung.
AWARNUNG: Warnhinweise zu gefährlichen
Situationen im Hinblick auf die Sicherheit von Leib,
Leben und Eigentum.
Warnung vor Brandgefahr.
BWarnung vor Stromschlägen.
Dieses Gerät wurde in umweltfreundlichen, modernen Einrichtungen ohne schädliche Auswirkungen auf
die Natur hergestellt.
18 / DE Dunstabzugshaube / Bedienungsanleitung
1.1 Allgemeine Sicherheit
Wichtige Sicherheitsanweisungen
sorgfältig lesen und zum künftigen
Nachschlagen aufbewahren
Dieser Abschnitt enthält
Sicherheitsanweisungen, die
beim Schutz vor Personen-
und Sachschäden, Bränden,
Stromschlägen und dem
Austreten von Mikrowellenenergie
helfen. Bei Nichtbeachtung dies-
er Anweisungen erlischt die
Gewährleistung.
Beko-Produkte stimmen mit
geltenden Sicherheitsstandards
überein; daher sollten Gerät oder
Netzkabel zur Vermeidung von
Gefahren im Falle von Schäden
durch den Händler, ein Kunden-
center oder einen spezialisierten,
autorisierten Serviceanbieter
repariert oder ersetzt werden.
Fehlerhafte oder unqualifizierte
Reparaturen können Gefahren
und Risiken für den Benutzer
verursachen.
Dieses Gerät ist für den Einsatz
in Haushalten und ähnlichen
Bereichen vorgesehen, wie:
In Betriebsküchen, Läden,
Büros und anderen Arbeit-
sumgebungen;
Bauernhöfen;
Von Gästen in Hotels und an-
deren Wohnumgebungen;
Pensionen und Jugendher-
bergen.
Das Gerät darf nur für seinen in
dieser Anleitung beschriebenen
vorgesehenen Zweck verwendet
werden.
Der Hersteller haftet nicht für
Schäden, die auf unsachgemäße
Installation oder fehlerhaften Ge-
brauch zurückzuführen sind.
Das Gerät darf nur dann von
Kindern ab 8 Jahren und Perso-
nen mit körperlichen oder geis-
tigen Einschränkungen genutzt
werden, wenn diese beaufsichtigt
werden oder gründlich über den
richtigen und sicheren Umgang
mit dem Gerät aufgeklärt wurden
und sich sämtlicher möglicher
Gefahren bewusst sind.
1
Wichtige Sicherheits- und Umweltanweisungen
Dunstabzugshaube / Bedienungsanleitung 19 / DE
Kinder dürfen nicht mit dem
Gerät spielen. Reinigungs- und
Wartungsarbeiten dürfen nicht
unbeaufsichtigt von Kindern aus-
geführt werden.
Der Abstand zwischen der Stütz-
fläche für Kochgeschirr auf dem
Kochfeld und dem niedrigsten
Teil der Abzugshaube muss
mindestens 65 cm betragen.
Falls die Anweisungen zur In-
stallation eines Gasherdes einen
größeren Abstand angeben, ist
dieser einzuhalten.
Stellen Sie sicher, dass Ihre
Stromversorgung mit den Anga-
ben am Typenschild des Gerätes
übereinstimmt.
Benutzen Sie das Gerät niemals,
wenn das Netzkabel oder das
Gerät selbst beschädigt ist.
Vermeiden Sie Schäden am
Netzkabel, indem Sie es nicht
quetschen, knicken oder über
scharfe Kanten ziehen. Halten
Sie das Netzkabel von heißen
Oberflächen und offener Flamme
fern.
Verwenden Sie das Gerät nur mit
einer geerdeten Steckdose.
WARNUNG: Schließen Sie das
Gerät erst nach vollständig ab-
geschlossener Installation an das
Stromnetz an.
Stellen Sie das Gerät so auf,
dass der Netzstecker immer
zugänglich ist.
Berühren Sie die Lampen nicht,
falls sie lange Zeit in Betrieb
waren. Sie könnten sich die Fin-
ger verbrennen, da die Lampen
heiß werden.
Befolgen Sie die von zuständigen
Behörden festgelegten Richt-
linien zum Abführen von Abluft
(diese Warnung ist bei Einsatz
ohne Abzug nicht zutreffend).
Nehmen Sie Ihr Gerät erst in
Betrieb, nachdem Sie ein Koch-
geschirr auf das Kochfeld gestellt
haben. Andernfalls könnte hohe
Hitze zur Verformung von Teilen
Ihres Geräts führen.
Schalten Sie die Kochfelder
ab, bevor Sie das Kochgeschirr
herunternehmen.
Lassen Sie kein heißes Öl auf das
Kochfeld gelangen. Kochgeschirr
mit heißem Öl kann sich selbst
entzünden.
1
Wichtige Sicherheits- und Umweltanweisungen
20 / DE Dunstabzugshaube / Bedienungsanleitung
Achten Sie auf Vorhänge und
Abdeckungen, da Öl beim Zu-
bereiten von Lebensmitteln, wie
Pommes frites, Feuer fangen
kann.
Der Fettfilter muss mindestens
einmal im Monat ersetzt werden.
Der Kohlefilter muss mindestens
alle 3 Monate ersetzt werden.
Das Produkt muss entsprechend
der Bedienungsanleitung gerein-
igt werden. Falls die Reinigung
nicht entsprechend der Bedi-
enungsanleitung durchgeführt
wird, besteht Brandgefahr.
Verwenden Sie kein nicht feuer-
beständiges Filtermaterial an-
stelle des aktuellen Filters.
Verwenden Sie nur Originalteile
und vom Hersteller empfohlene
Teile.
Verwenden Sie das Gerät nicht
ohne Filter. Entfernen Sie die
Filter nicht, während das Gerät
läuft.
Sollte sich etwas entzünden, un-
terbrechen Sie als erstes sofort
die Energieversorgung.
Ersticken Sie ein Feuer mit einer
geeigneten Decke oder ähnlich,
verwenden Sie zum Löschen
niemals Wasser.
Trennen Sie das Gerät vor
jeder Reinigung und bei Nicht-
benutzung von der Stromver-
sorgung.
Der Unterdruck in der Umgebung
darf 4 Pa (4 x 10 bar) nicht über-
schreiten, während die Dunstab-
zugshaube für das elektrische
Kochfeld und Geräte mit einer
anderen Energiequelle als Strom
gleichzeitig laufen.
Falls sich ein mit Heizöl oder
Brenngasen betriebenes Gerät,
z. B. Heizungen, in der Nähe der
Dunstabzugshaube befindet,
muss die Abluft dieses Gerätes
vollständig getrennt abgeführt
werden oder es muss herme-
tisch sein.
Verwenden Sie zum Anschluss
des Abzugs Rohre mit einem
Durchmesser von 120 oder 150
mm. Der Rohranschluss muss
möglichst kurz sein und sollte
möglichst wenige Biegungen
aufweisen.
1
Wichtige Sicherheits- und Umweltanweisungen
  • Page 1 1
  • Page 2 2
  • Page 3 3
  • Page 4 4
  • Page 5 5
  • Page 6 6
  • Page 7 7
  • Page 8 8
  • Page 9 9
  • Page 10 10
  • Page 11 11
  • Page 12 12
  • Page 13 13
  • Page 14 14
  • Page 15 15
  • Page 16 16
  • Page 17 17
  • Page 18 18
  • Page 19 19
  • Page 20 20
  • Page 21 21
  • Page 22 22
  • Page 23 23
  • Page 24 24
  • Page 25 25
  • Page 26 26
  • Page 27 27
  • Page 28 28
  • Page 29 29
  • Page 30 30
  • Page 31 31
  • Page 32 32
  • Page 33 33
  • Page 34 34
  • Page 35 35
  • Page 36 36
  • Page 37 37
  • Page 38 38
  • Page 39 39
  • Page 40 40
  • Page 41 41
  • Page 42 42
  • Page 43 43
  • Page 44 44
  • Page 45 45
  • Page 46 46
  • Page 47 47
  • Page 48 48
  • Page 49 49
  • Page 50 50
  • Page 51 51
  • Page 52 52
  • Page 53 53
  • Page 54 54
  • Page 55 55
  • Page 56 56
  • Page 57 57
  • Page 58 58
  • Page 59 59
  • Page 60 60
  • Page 61 61
  • Page 62 62
  • Page 63 63
  • Page 64 64
  • Page 65 65
  • Page 66 66
  • Page 67 67
  • Page 68 68
  • Page 69 69
  • Page 70 70
  • Page 71 71
  • Page 72 72
  • Page 73 73
  • Page 74 74
  • Page 75 75
  • Page 76 76
  • Page 77 77
  • Page 78 78
  • Page 79 79
  • Page 80 80
  • Page 81 81
  • Page 82 82
  • Page 83 83
  • Page 84 84
  • Page 85 85
  • Page 86 86
  • Page 87 87
  • Page 88 88
  • Page 89 89
  • Page 90 90
  • Page 91 91
  • Page 92 92
  • Page 93 93
  • Page 94 94
  • Page 95 95
  • Page 96 96
  • Page 97 97
  • Page 98 98
  • Page 99 99
  • Page 100 100
  • Page 101 101
  • Page 102 102
  • Page 103 103
  • Page 104 104
  • Page 105 105
  • Page 106 106
  • Page 107 107
  • Page 108 108
  • Page 109 109
  • Page 110 110
  • Page 111 111
  • Page 112 112
  • Page 113 113
  • Page 114 114
  • Page 115 115
  • Page 116 116
  • Page 117 117
  • Page 118 118
  • Page 119 119
  • Page 120 120
  • Page 121 121
  • Page 122 122
  • Page 123 123
  • Page 124 124
  • Page 125 125
  • Page 126 126
  • Page 127 127
  • Page 128 128
  • Page 129 129
  • Page 130 130
  • Page 131 131
  • Page 132 132
  • Page 133 133
  • Page 134 134
  • Page 135 135
  • Page 136 136
  • Page 137 137
  • Page 138 138
  • Page 139 139
  • Page 140 140
  • Page 141 141
  • Page 142 142
  • Page 143 143
  • Page 144 144
  • Page 145 145
  • Page 146 146
  • Page 147 147
  • Page 148 148
  • Page 149 149
  • Page 150 150
  • Page 151 151
  • Page 152 152
  • Page 153 153
  • Page 154 154
  • Page 155 155
  • Page 156 156
  • Page 157 157
  • Page 158 158
  • Page 159 159
  • Page 160 160
  • Page 161 161
  • Page 162 162
  • Page 163 163
  • Page 164 164
  • Page 165 165
  • Page 166 166
  • Page 167 167
  • Page 168 168
  • Page 169 169
  • Page 170 170
  • Page 171 171
  • Page 172 172
  • Page 173 173
  • Page 174 174
  • Page 175 175
  • Page 176 176
  • Page 177 177
  • Page 178 178
  • Page 179 179
  • Page 180 180
  • Page 181 181
  • Page 182 182
  • Page 183 183
  • Page 184 184
  • Page 185 185
  • Page 186 186
  • Page 187 187
  • Page 188 188
  • Page 189 189
  • Page 190 190
  • Page 191 191
  • Page 192 192
  • Page 193 193
  • Page 194 194
  • Page 195 195
  • Page 196 196
  • Page 197 197
  • Page 198 198
  • Page 199 199
  • Page 200 200
  • Page 201 201
  • Page 202 202
  • Page 203 203
  • Page 204 204
  • Page 205 205
  • Page 206 206
  • Page 207 207
  • Page 208 208
  • Page 209 209
  • Page 210 210
  • Page 211 211
  • Page 212 212
  • Page 213 213
  • Page 214 214
  • Page 215 215
  • Page 216 216
  • Page 217 217
  • Page 218 218
  • Page 219 219
  • Page 220 220
  • Page 221 221
  • Page 222 222
  • Page 223 223
  • Page 224 224
  • Page 225 225
  • Page 226 226
  • Page 227 227
  • Page 228 228
  • Page 229 229
  • Page 230 230
  • Page 231 231
  • Page 232 232
  • Page 233 233
  • Page 234 234
  • Page 235 235
  • Page 236 236
  • Page 237 237
  • Page 238 238
  • Page 239 239
  • Page 240 240
  • Page 241 241
  • Page 242 242
  • Page 243 243
  • Page 244 244
  • Page 245 245
  • Page 246 246
  • Page 247 247
  • Page 248 248
  • Page 249 249
  • Page 250 250
  • Page 251 251
  • Page 252 252
  • Page 253 253
  • Page 254 254
  • Page 255 255
  • Page 256 256
  • Page 257 257
  • Page 258 258
  • Page 259 259
  • Page 260 260
  • Page 261 261
  • Page 262 262
  • Page 263 263
  • Page 264 264
  • Page 265 265
  • Page 266 266
  • Page 267 267
  • Page 268 268
  • Page 269 269
  • Page 270 270
  • Page 271 271
  • Page 272 272

Beko BHCB 93640 B Používateľská príručka

Typ
Používateľská príručka
Táto príručka je tiež vhodná pre