Whirlpool SPIS412L Užívateľská príručka

Typ
Užívateľská príručka
Instructions for use
Gebrauchsanweisung
Directives d’utilisation
Gebruiksaanwijzing
Instrucciones de uso
Instruções de utilização
Libretto di istruzioni
Οδηγίε χρήση
Bruksanvisning
Bruksanvisning
Brugsanvisninger
Käyttöohjeet
Instrukcja użytkownika
Návod k obsluze
Návod na používanie
Használati útmutató
  
  
Instruciuni de utilizare
  
- 3 -
ENGLISH Instructions for use Page 4
DEUTSCH Bedienungsanleitung Seite 15
FRANÇAIS Consignes d’utilisation Page 26
NEDERLANDS Gebruiksaanwijzing Pagina 37
ESPAÑOL Instrucciones de uso Página 48
PORTUGUÊS Instruções de utilização Página 59
ITALIANO Istruzioni per l’uso Pagina 70
ΕΛΛΗΝΙΚΑ Οδηγίες χρήσης Σελίδα 81
SVENSKA Bruksanvisning Sidan 92
NORSK Brukerveiledning Side 103
DANSK Brugsanvisninger Side 114
SUOMI Käyttöohje Sivu125
POLSKI Instrukcja użytkownika Strona 136
ČESKY Návod kobsluze Strana 147
SLOVENSKÝ Návod na používanie Strana 158
MAGYAR Használati útmutató 169. oldal
 Инструкция по эксплуатации Стр. 180
 Инструкции за използване Страница 191
ROMÂNĂ Instrucţiuni de utilizare Pagina 202
 Інструкції з використання стор.213
SPIW409A2WF
SPIW412A2WF
SPIW409/2
SPIW412/2
SPIW418/2
SPIW422/2
SPIW409L
SPIW412L
SPIS409L
SPIS412L
SPIW418L
- 4 -
IMPORTANT TO BE READ AND OBSERVED
Download the complete instruction manual on docs.whirlpool.eu or call the phone
number shown on the warranty booklet.
Before using the appliance, read these safety instructions. Keep them nearby for future
reference.
These instructions and the appliance itself provide important safety warnings, to be
observed at all times. The manufacturer declines any liability for failure to observe these
safety instructions, for inappropriate use of the appliance or incorrect setting of controls.
Very young children (0-3 years) should be kept away from the appliance. Young
children (3-8 years) should be kept away from the appliance unless continuously
supervised. Children from 8 years old and above and persons with reduced physical,
sensory or mental capabilities or lack of experience and knowledge can use this
appliance only if they are supervised or have been given instructions on safe use and
understand the hazards involved. Children must not play with the appliance. Cleaning
and user maintenance must not be carried out by children without supervision.
PERMITTED USE
CAUTION: the appliance is not intended to be operated by means of an external
switching device, such as a timer, or separate remote controlled system.
This appliance is intended to be used in household and similar applications such as:
hotels and working oces.
This appliance is not for professional use.
Always turn o the air conditioner by remote control rst. Do not use the power
supply circuit breaker or pull o the plug to turn it o. Disconnect the air conditioner
from the power supply if it is to be left unused for a long period of time or during a
thunder/lightning storm.
Never insert obstacle in the air outlet-risk of injury. Keep ventilation openings clear of
any obstruction.
Do not place any other electrical products or household belongings under indoor
unit or outdoor unit. Condensation dripping from the unit might get them wet, and may
cause damage or malfunction of your property.
INSTALLATION
The appliance must be handled and installed by two or more persons - risk of injury.
Use protective gloves to unpack and install - risk of cuts.
Installation, including electrical connections, and repairs must be carried out by a
qualied technician according to national wiring rules. Do not repair or replace any
part of the appliance unless specically stated in the user manual. Keep children away
from the installation site. After unpacking the appliance, make sure that it has not
been damaged during transport. In the event of problems, contact the dealer or your
nearest After-sales Service. Once installed, packaging waste (plastic, styrofoam parts
etc.) must be stored out of reach of children - risk of suocation. The appliance must be
disconnected from all remote power supply before any installation operation - risk of
electric shock. During installation, make sure the appliance does not damage the power
cable - risk of re or electric shock. Only activate the appliance when the installation has
been completed.
SAFETY INSTRUCTIONS
- 5 -
When moving or relocating the air conditioner, consult experienced service
technicians for disconnection and reinstallation of the unit.
The appliance shall not be installed in the laundry.
Appliance shall be installed, operated and stored in a room with a oor area larger
than 10m
2
. Mount the indoor unit at least 2.5m above oor or grade level.
The installation of pipe-work shall be kept in a room with a oor area larger than
10m
2
in compliance with national gas regulations.
ELECTRICAL WARNINGS
The power supply must be of rated voltage with special circuitry for the appliance.
The diameter of the power cord must comply with requirements.
A multi-pole switch shall be installed in the xed wiring in accordance with the wiring
rules and the appliance must be earthed in conformity with national electrical safety
standards.
An all-pole disconnection switch having a contact separation of at least 3mm in all
poles should be connected in xed wiring in accordance national with wiring rules, and
the appliance must be earthed in conformity with national electrical safety standards.
Do not use extension leads, multiple sockets or adapters. The electrical components
must not be accessible to the user after installation. Do not use the appliance when you
are wet or barefoot. Do not operate this appliance if it has a damaged power cable or
plug, if it is not working properly, or if it has been damaged or dropped.
If the supply cord is damaged, it must be replaced with an identical one by the
manufacturer, its service agent or similarly qualied persons in order to avoid a hazard -
risk of electric shock.
A residual current device (RCD) having rated residual operation current not exceeding
30mA shall be incorporated in xed wiring according to national law.
The temperature of refrigerant circuit will be high, please keep the interconnection
cable away from the copper tube.
Ensure safe grounding and a grounding wire connected with the special grounding
system of the building, installed by professionals. The appliance must be tted with
electrical leakage protection switch and an auxiliary circuit breaker with sucient
capacity. The circuit breaker must also have a magnetic and a thermal tripping function
to ensure protection in case of short-circuit and overload.
Model 9K & 12K 18K 24K
Required capacity of circuit breaker 16A 20A 25A
For the connection of power cord and cable connection between indoor and outdoor
units, please see the wiring diagram on the appliance.
CLEANING AND MAINTENANCE
WARNING: Ensure that the appliance is switched o and disconnected from the
power supply before performing any maintenance operation; never use steam cleaning
equipment - risk of electric shock.
SAFETY INSTRUCTIONS
- 6 -
DISPOSAL OF PACKAGING MATERIALS
The packaging material is 100% recyclable and is marked with the recycle symbol ( ). The various parts of the
packaging must therefore be disposed of responsibly and in full compliance with local authority regulations
governing waste disposal.
DISPOSAL OF HOUSEHOLD APPLIANCES
This appliance is manufactured with recyclable or reusable materials. Dispose of it in accordance with local waste
disposal regulations. For further information on the treatment, recovery and recycling of household electrical
appliances, contact your local authority, the collection service for household waste or the store where you purchased
the appliance. This appliance is marked in compliance with European Directive 2012/19/EU, Waste Electrical and
Electronic Equipment (WEEE). By ensuring this product is disposed of correctly, you will help prevent negative
consequences for the environment and human health.
The (
) symbol on the product or on the accompanying documentation indicates that it should not be treated as
domestic waste but must be taken to an appropriate collection center for the recycling of electrical and electronic
equipment.
DECLARATIONS OF CONFORMITY
This product contains Fluorinated Greenhouse Gases covered by the Kyoto Protocol, the refrigerant gas being in a
hermetically sealed system. (R410a, GWP 2088). The maximum refrigerant charge amount is 2.5 kg. Please refer to the
rating label for detailed information.
SAFETY INSTRUCTIONS
- 7 -
Product description
Indoor unit
Outdoor unit
Front panel
Air Intake
Display Panel
Emergency Panel
Air Outlet
Vertical Adjustment
Louver
Horizontal
Adjustment Louver
Air Filter
Remote Controller
Air Intake
Drain Hose
Air Outlet
Pipes and Power
Connection Cord
Note: Condensate water drains
at COOLING or DRY operation.
The gures in this manual are based on the external view of a standard model.
Consequently, the shape may dier from that of the air conditioner you have selected.
- 8 -
User Interface
64 127
5
Temperature indicator (1)
Displays set temperature.
It shows “FC” as a reminder to clean the lter.
Running indicator (2)
It lights up during operation.
It ashes during outside unit defrosting.
6
th
Sence indicator (3)
It lights up when 6
th
sense is on.
It goes o when 6
th
sense ends.
Filter monitor indicator (4)
It ashes when the lter needs to be cleaned.
Filter monitor indicator ashes after 720 hours of usage as reminder to clean the lter.
After lter cleaning, press the lter reset button located on the indoor unit behind the front panel in order to
interrupt the ashing of the lter monitor indicator.
Humidity indicator (5)
It lights up when showing the humility level.
It goes o when showing the temperature.
Timer indicator (6)
It lights up during the set time.
It goes o when timer operation ends.
Sleep indicator (7)
It lights up once sleep mode is set, “Running indicator will ash for 10 times then the whole display will light
o.
For air conditioners without Wi-Fi control, we recommend the Wpro SmartClim: a smart device to control via Wi-Fi
the main settings of your appliance from your smartphone.
This accessory is not included inside the product packaging. Please contact our After-Sales Service for more details
and purchase.
- 9 -
Remote controller
Insert the batteries into RC
1. Insert a pin and gently press down on the battery
cover and push in the direction of the arrow to
remove, as shown.
2. Insert 2 AAA batteries (1.5V) into the compartment.
Ensure that “+” and “-” polarity is correctly positioned.
3. Close the battery cover on the remote control.
Remote Control presetting
Each time the batteries are replaced in the remote
controller, the remote controller pre-set at Heat Pump
mode. The heat pump AC remote controller can be used
to control the cool only AC models.
Use RC to control the appliance
To operate the appliance by remote control, point the
remote control at the receiving device on the indoor
unit, to ensure receiving sensibility.
To send a message from remote control, the symbol
will ash for 1 second. On receipt of the message,
the appliance will emit a beep.
Signal receptor
The remote control will operate the air conditioner at a
distance of up to 7m.
Each time the batteries are replaced in the remote
control, the remote control is pre-set at Heat Pump
mode.
Note: please follow the intruction which matches to the remote controller you receive for Air Conditioner operation.
Function description of buttons (P1-04)
1. ON/OFF BUTTON
Starts or Stops the appliance by
pressing this button.
3. FAN BUTTON
Used to select fan speed in sequence
auto, high, medium or low.
4-5. TEMPERATURE BUTTON
Used to select the room
temperature.
Used to set the time in timer mode.
6. 6
th
SENSE BUTTON
Sets or cancels 6
th
sense operation.
7. SWING BUTTON
Stops or starts horizontal adjustment
louver swinging and sets the desired
up/down airow direction.
10-11. HUMIDITY BUTTON
Used to set desired humidity level,
they areonly available under 6
th
SENSE mode.
16. SUPER SILENT BUTTON
Used to start or stop the super
silent operation to have a low noise
environment.
2. MODE BUTTON
Used to select the operation mode
in sequence Cooling, hearing or
fan.
8. SLEEP BUTTON
Used to select the sleep mode in
sequence of sleep 1, sleep 2, sleep
3 sleep 4 and sleep o.
9. AROUND U BUTTON
Used to set or cancel Around U
function.
12. JET BUTTON
Used to start or stop the fast
cooling or heating.
13. DIM BUTTON
Used to turn on or turn o display
light on indoor unit.
14. POWER SAVE BUTTON
Used to start or stop the power
save operation.
15. TIMER BUTTON
Used to set the time for turn on or
turn o the appliance.
Symbols on RC display
Active RC by pressing UNLOCK button
Cooling indicator Auto fan speed Sleep indicator 1
Press the button, the backlight
will be lighted up and function
buttons will be activated for
use. Press again to lock remote
controller. If no operation on
remote controller for 10s, the
remote controller will be locked
automatically.
PRESS
Humidity plus indicator High fan speed Sleep indicator 2
Humidity minus indicator
Medium fan speed Sleep indicator 3
Fan only indicator Low fan speed Sleep indicator 4
Heating indicator
Super silent indicator Display set temperature
Around U indicator 6
th
SENSE indicator
ON
OF F
Display set timer
Jet indicator Power save indicator Signal transmission
- 10 -
Remote controller
Function description of buttons (J1-3A)
1. ON/OFF BUTTON
Starts or Stops the appliance by pressing this button.
2. MODE BUTTON
Used to select the operation mode in sequence of
Cooling, dry, fan only or heating.
3. FAN BUTTON
Used to select fan speed in sequence auto, high,
medium or low.
4-5. TEMPERATURE BUTTON
Used to select the room temperature. Used to set
time in timer mode and real time clock.
6. 6
TH
SENSE BUTTON
Sets or cancels 6
th
sense operation.
7. SWING BUTTON
Stops or starts horizontal adjustment louver swinging
and sets the desired up/down airow direction.
8. SLEEP BUTTON
Sets or cancels Sleep Mode operation in sequence
of sleep 1, sleep 2, sleep 3, sleep 4 or sleep o.
9. AROUND U BUTTON
Used to set or cancel Around U function.
10. TIMER ON/CLOCK BUTTON
Used to set the current time.
Used to set or cancel the timer on operation.
11. TIMER OFF BUTTON
Used to set or cancel the timer o operation.
12. JET BUTTON
Used to start or stop the fast cooling or heating mode.
rq
e
t
d
f
i
o
g
s
u
w
y
a
h
13. DIM BUTTON
Used to turn on or turn o display light on indoor
unit.
14. POWER SAVE BUTTON
Used to start or stop the power save operation.
15. SUPER SILENT BUTTON
Used to start or stop the super silent operation to
have a low noise environment.
Symbols on RC display
Cooling indicator Sleep 1 indicator Auto fan speed Jet indicator
Dry indicator Sleep 2 indicator High fan speed Signal transmission
Fan only indicator Sleep 3 indicator Medium fan speed
ON
OF F
Display set timer
Heating indicator Sleep 4 indicator Low fan speed Display current time
6
th
Sense indicator Around U indicator Super silent indicator Display set temperature
Power save indicator
PROTECTION
Operating condition
The protective device maybe trip
and stop the appliance in the cases
listed below.
Heating
Outdoor air temperature
is over 24°C
Outdoor air temperature
is below -7°C
Room temperature is
over 27°C
Cooling
Outdoor air temperature
is over 43°C
Room temperature is
below 21°C
Dehumidifying
Room temperature is
below 18°C
If the air conditioner runs in
COOLING or DRY mode with door
or window opened for a long time
when relative humidity is above 80%,
dew may drip down from the outlet.
Features of protection device
Wait at least 3 minutes before
restarting the unit after operation
stops or changing mode during
operation. After connecting to
power supply and turning on the
appliance immediately, a delay of 20
seconds may occur before it starts to
operate. If all operation has stopped,
press ON/OFF button again to
restart. Timer should be set again if
it has been cancelled.
Features of COOLING mode
Anti-freezing
When the temperature of the indoor
heat exchanger drops to 0° or
below, compressor will stop working
to protect the appliance.
Features of HEATING mode
Preheating
In order to prevent cool air blowing,
2-5 minutes are necessary to
preheat the indoor unit at HEATING
operation start. The indoor fan will
not work during preheating.
Defrosting
In HEATING operation the appliance
will defrost (de-ice) automatically
to raise eciency. This procedure
usually lasts 6-10 minutes. During
defrosting, fan stops running and
running indicator ashes.
After defrosting is completeed,
it returns to HEATING mode
automatically.
- 11 -
Maintenance
Clean front panel of Indoor Unit
1. Disconnect from the power supply
Turn o the appliance rst before disconnecting from power supply.
2. Remove the front panel
Open the front panel as shown by the arrow (Fig. A).
Pull the slots at the side of the front panel with force to take out the front
panel (Fig. B).
3. Clean the front panel
Wipe it with a soft and dry cloth. Use lukewarm water (below 40°C) to clean
if the appliance is very dirty. After cleaning let it dry.
4. Ret and close the front panel
Ret and close the front panel by pushing it downward.
Note:
Do not use substances such as gasoline or polishing powder to clean
the appliance.
Do not sprinkle water onto the indoor unit Dangerous! Electric shock!
Clean Air lter
It is necessary to clean the air lter after using it for about 200 hours. Clean
the air lter every two weeks if the air conditioner operates in an extremely
dusty environment.
1. Disconnect from the power supply
Turn o the appliance rst before disconnecting from power supply.
2. Take out air lter (Fig. C).
1. Open the front panel. 2. Press the handle of the lter gently. 3. Slide out
the lter.
3. Cleaning the air lter (Fig. D)
If the lter is very dirty, clean it with a solution of lukewarm water and
neutral detergent.
After cleaning let it dry.
4. Ret the lter, press the lter reset button (Fig.E) at right side by using
a cylinder pin and close the front panel.
Note:
To avoid injury, do not touch the ns of indoor unit with your ngers
after removing the lter.
Do not attempt to clean the inside of the air conditioner by yourself.
Do not clean the lter in washing machine.
EMERGENCY OPERATION
Under emergency situation or when remote
control is missing, you can control the unit
by pressing the on/o swith located on the
indoor unit.
Turn on the appliance: when the unit is o,
press this button, it will start up and operate
in 6
th
SENSE mode.
Turn o the appliance: when the unit is on,
press this button, the unit will stop working.
Note: Do not press this button for a long
time as it will cause malfunction.
Auto-Restart Function
If you want to set auto-restart, switch on the power supply, press the ON/OFF button on the indoor unit and hold for
over 5 seconds, auto-restart is set with buzz sound.
If the auto-restart has been set, press the ON/OFF button on the indoor unit and hold for over 5 seconds, auto-restart
function will be cancelled with a buzz sound and air conditioner is on standby mode.
Disposal of the batteries
To protect natural resources and to promote material reuse, please separate batteries from other types of waste and
recycle them through your local, free battery return system.
Fig. A
Fig. B
Filter Reset button
Fig. E
Fig. C
Fig. D
on/o switch
on/o switch
- 12 -
Installation instruction
Installation diagram
Distance from wall
should be over 50mm
Indoor unit
Outdoor unit
Distance from ceiling
should be over 200mm
Distance from the wall
should be over 50mm
Distance from oor
should be over 2500mm
Air intake distance from
the wall should be over
250mm
Air intake distance from
the wall should be over
250mm
Air outlet distance from the
wall should be over 500mm
Over 250mm
NOTE: The gure is only a simple presentation of the
unit, it may not match the external appearance of the
product you purchased. Installation must be performed
in accordance with the national wiring standard by
authurized service people only.
To get detail installation information, please go to:
docs.whirlpool.eu
Distance from the wall
should be over 50mm
When install interconnection cord, make sure that the color of wires and the terminal No. of outdoor unit shall be
same as those in indoor unit.
Cable Specications
Capacity (Btu/h) Power cord Power connecting cord
Type
Normal cross -
sectional area
Type
Normal cross -
sectional area
7K, 9K, 12K H07RN-F 1.0mm
2
X3 H07RN-F 1.0mm
2
X5
18K H07RN-F 1.5mm
2
X3 H07RN-F 1.5mm
2
X5
24 K H07RN-F 2.5mm
2
X3 H07RN-F 2.5mm
2
X5
- 13 -
Troubleshooting
Operation problems are often due to minor causes, please check and refer
to the following chart before contacting the service. This may save time and
unnecessary expenses.
Trouble Analysis
Does not run
Is the protection device or fuse blown?
Please wait for 3 minutes and start again, protection
device may be preventing unit to work.
Are the remote control batteries low?
Is the plug not properly plugged?
No cooling or
heating air
Is the air lter dirty?
Are the intakes and outlets of the air conditioner blocked?
Is the temperature set properly?
Are doors or windows open?
Ineective control
Has there been a strong interference (from excessive
static electricity discharge, power supply voltage
abnormality)? Note that operation will be abnormal, in
this case unplug from the power supply and re-plug after
2-3 seconds.
Does not operate
immediately
3 minute delay will occur when changing mode during
operation.
Peculiar smell
This smell may come from another source such as
furniture, cigarette etc, which is sucked in the unit and
blown out with the air.
A sound of running
water
Normal behaviour caused by the ow of refrigerant in the
air conditioner.
Defrosting sound in heating mode.
Cracking sound
The sound may be generated by the expansion or
contraction of the front panel due to temperature
changes.
Mist sprays from
the outlet
Mist is present in the room with low temperature? Normal
behaviour due to cool air discharged from indoor unit
during COOLING or DRY operation mode.
Running indicator
ashes but indoor
fan stops
The unit is shifting from heating mode to defrost. The
indicator will light o and return to heating mode.
Note: If the problems still have, turn o the appliance and disconnect from
power supply, then contact the nearest Whirlpool Authorized Service Center. Do
not attempt to move, repair, disassemble, or modify the appliance by yourself.
- 14 -
AFTER SALES SERVICE
Before contacting the Customer Care Centre:
1. Try to solve the problem yourself based on the
descriptions given in the Troubleshooting”.
2. Turn the appliance o and restart it to see if the fault
persists.
If after carrying out the above checks, the fault
persists, contact the Customer Care Centre.
Please give:
a short description of the fault;
the exact model of the air conditioner;
the service number (this is the number found below
the word Service on service sticker which is located on
the side or on the bottom of the indoor unit).
The service number can also be found in the warranty
booklet;
your full address;
your telephone number.
If repair work has to be carried out, contact the
Customer Care Centre (Use of original spare parts and a
proper repair is guarenteed).
You will need to present the original invoice.
Failure to comply with these instructions could
compromise the safety and quality of your product.
Note: if you want the full manual for your appliance, please help to download it from websit throught below
link: docs.whirlpool.eu using QR code
- 15 -
DIESE MÜSSEN DURCHGELESEN UND BEACHTET WERDEN
Laden Sie die komplette Bedienungsanleitung auf docs.whirlpool.eu runter oder rufen
Sie die Telefonnummer auf dem Garantieheft an.
Diese Sicherheitsanweisungen vor dem Gebrauch durchlesen. Diese Anweisungen zum
Nachschlagen leicht zugänglich aufbewahren.
In diesen Anweisungen sowie auf dem Gerät selbst werden wichtige
Sicherheitshinweise angegeben, die durchgelesen und stets beachtet werden
müssen. Der Hersteller übernimmt keine Haftung für die Nichtbeachtung dieser
Sicherheitshinweise, für unsachgemäße Verwendung des Geräts oder falsche
Bedienungseinstellung.
Babys und Kleinkinder (0-3 Jahre) müssen vom Gerät fern gehalten werden. Jüngere
Kinder (3-8 Jahre) müssen vom Gerät fern gehalten werden, es sei denn, sie werden
ständig beaufsichtigt. Dieses Gerät darf von Kindern ab 8 Jahren sowie Personen mit
herabgesetzten physischen, sensorischen oder geistigen Fähigkeiten und Mangel an
Erfahrung und Kenntnissen nur unter Aufsicht oder nach ausreichender Einweisung
durch eine für ihre Sicherheit verantwortliche Person verwendet werden. Kinder dürfen
nicht mit dem Gerät spielen. Die Reinigung und Pege des Gerätes darf von Kindern
nicht ohne Aufsicht durchgeführt werden.
ZUGELASSENE VERWENDUNG
VORSICHT! Das Gerät ist nicht für den Betrieb mit einem externen Schalter, wie Timer,
oder separatem Fernbedienungssystem konstruiert.
Dieses Gerät ist für Haushaltsanwendungen und ähnliche Anwendungen konzipiert,
zum Beispiel: Hotels und Büros.
Dieses Gerät eignet sich nicht für den professionellen Einsatz.
Schalten Sie das Klimagerät immer erst mit der Fernbedienung aus. Schalten Sie
dazu nicht den Leitungsschutzschalter aus und ziehen Sie nicht den Stecker aus der
Steckdose. Trennen Sie das Klimagerät vor einem längeren Nichtgebrauch und bei
Gewitter vom Stromnetz.
Stellen Sie keine Gegenstände auf die Außeneinheit - Verletzungsgefahr. Die
Lüftungsönungen dürfen nicht behindert werden.
Stellen bzw. legen Sie keinesfalls andere elektrische Produkte oder
Haushaltsgegenstände unter das Innengerät oder unter das Außengerät.
Kondenswasser, das aus dem Gerät tropft, kann dieses nass machen und Schäden oder
Fehlfunktionen an Ihrem Eigentum verursachen.
INSTALLATION
Zum Transport und zur Installation des Gerätes sind zwei oder mehrere Personen
erforderlich - Verletzungsgefahr. Schutzhandschuhe zum Auspacken und zur Installation
verwenden - Risiko von Schnittverletzungen.
Die Installation, einschließlich elektrischer Anschlüsse und Reparaturen
müssen von einem qualizierten Techniker entsprechend den vor Ort geltenden
Sicherheitsvorschriften durchgeführt werden. Das Gerät nicht selbst reparieren und
tauschen keine Teile austauschen, wenn dies von der Bedienungsanleitung nicht
ausdrücklich vorgesehen ist. Kinder vom Installationsort fern halten. Prüfen Sie das
Gerät nach dem Auspacken auf Transportschäden. Bei auftretenden Problemen wenden
SICHERHEITSHINWEISE
- 16 -
Sie sich bitte an Ihren Händler oder den Kundenservice. Nach der Installation müssen
Verpackungsabfälle (Kunststo, Styroporteile usw.) außerhalb der Reichweite von
Kindern aufbewahrt werden - Erstickungsgefahr. Das Gerät vor Installationsarbeiten von
der netzfernen Stromversorgung trennen - Stromschlaggefahr. Während der Installation
sicherstellen, das Netzkabel nicht mit dem Gerät selbst zu beschädigen - Brand- oder
Stromschlaggefahr. Das Gerät erst starten, wenn die Installationsarbeiten abgeschlossen
sind.
Beim Umzug oder bei einer Neupositionierung der Klimaanlage müssen für die
Trennung und Neuinstallation der Anlage erfahrene Servicetechniker dazu gezogen
werden.
Das Gerät darf nicht in Räumen installiert werden, die zum Waschen und Trocknen
von Wäsche genutzt werden.
Das Gerät muss in einem Raum installiert, betrieben und gelagert werden, der eine
Bodenäche von über 10 m
2
aufweist. Bringen Sie die Inneneinheit in mindestens 2,5 m
Höhe über dem Fußbodenniveau an.
Die Installation der Leitungen muss in einem Raum erfolgen, der eine Bodenäche
von über 10 m
2
aufweist. Die Leitungen müssen den nationalen Gasvorschriften
entsprechen.
HINWEISE ZUR ELEKTRIK
Die Netzspannung muss der Nennspannung des Geräts entsprechen, und für
den Geräteanschluss ist ein separater Stromkreis einzurichten. Der Querschnitt des
Netzanschlusskabels muss diese Anforderungen erfüllen.
Ein mehrpoliger Schalter muss gemäß den Sicherheitsvorschriften in das ortsfeste
Anschlusskabel eingesetzt werden und das Gerät muss gemäß den nationalen
elektrischen Sicherheitsbestimmungen geerdet sein.
In das ortsfeste Anschlusskabel muss ein allpolig trennender Hauptschalter mit
einem Kontaktabstand von mindestens 3
mm eingesetzt sein entsprechend den vor Ort geltenden Sicherheitsvorschriften und
das Gerät muss gemäß den nationalen elektrischen Sicherheitsbestimmungen geerdet
sein.
Verwenden Sie keine Verlängerungskabel, Mehrfachstecker oder Adapter. Nach der
Installation dürfen Strom führende Teile für den Benutzer nicht mehr zugänglich sein.
Das Gerät nicht in nassem Zustand oder barfuß verwenden. Das Gerät nicht verwenden,
wenn das Netzkabel oder der Stecker beschädigt sind, wenn es nicht einwandfrei
funktioniert, wenn es heruntergefallen ist oder in irgendeiner Weise beschädigt wurde.
Wenn das Netzkabel beschädigt ist, muss es aus Sicherheitsgründen vom Hersteller,
von seinem Kundendienstvertreter oder einer ähnlich qualizierten Fachkraft mit einem
identischen Kabel ersetzt werden - Stromschlaggefahr.
In der Festverdrahtung muss gemäß der nationalen Gesetzgebung eine
Reststromvorrichtung (RCD) vorhanden sein, die so eingestellt ist, dass ein Reststrom 30
mA nicht überschreitet.
Die Temperatur des Kältemittelkreislaufs ist hoch, bitte halten Sie das
Verbindungskabel vom Kupferrohr fern.
Es muss sichergestellt werden, dass eine sichere Erdung mit einem Erdungskabel
vorhanden ist, die von einem Fachbetrieb an eine spezielle Erdungsanlage des
SICHERHEITSHINWEISE
- 17 -
Gebäudes angeschlossen wurde. Das Gerät ist über einen Fehlerstrom-Schutzschalter
und einen eigenen Leitungsschutzschalter mit ausreichendem Ausschaltvermögen
anzuschließen. Der Leitungsschutzschalter muss über eine thermisch-magnetische
Auslösung verfügen, um einen Schutz gegen Kurzschluss und Überlastung zu
gewährleisten.
Modell 9K & 12K 18K 24K
Ausschaltvermögen des
Leitungsschutzschalters
16A 20A 25A
Für den Anschluss des Netzanschlusskabels und der Kabelverbindung zwischen
Innen- und Außengeräten, siehe Stromlaufplan des Gerätes.
REINIGUNG UND PFLEGE
WARNUNG: Vor dem Durchführen von Wartungsarbeiten ist sicherzustellen, dass das
Gerät ausgeschaltet und von der Stromversorgung getrennt ist; Verwenden Sie keine
Dampfreinigungsgeräte - Stromschlaggefahr.
ENTSORGUNG VON VERPACKUNGSMATERIALIEN
Das Verpackungsmaterial ist zu 100% wiederverwertbar und trägt das Recycling-Symbol ( ). Werfen Sie das
Verpackungsmaterial deshalb nicht einfach weg, sondern entsorgen Sie es gemäß den geltenden örtlichen
Vorschriften.
ENTSORGUNG VON HAUSHALTSGERÄTEN
Dieses Gerät wurde aus recycelbaren oder wiederverwendbaren Werkstoen hergestellt. Entsorgen Sie das Gerät im
Einklang mit den lokalen Vorschriften zur Abfallbeseitigung. Genauere Informationen zu Behandlung, Entsorgung
und Recycling von elektrischen Haushaltsgeräten sind bei der örtlichen Behörde, der Müllabfuhr oder dem Händler
erhältlich, bei dem das Gerät gekauft wurde. Dieses Gerät ist gemäß der Europäischen Richtlinie 2012/19/EU für
Elektro- und Elektronik-Altgeräte (WEEE) gekennzeichnet. Durch Ihren Beitrag zur korrekten Entsorgung dieses
Produkts schützen Sie die Umwelt und die Gesundheit Ihrer Mitmenschen.
Das Symbol (
) auf dem Gerät bzw. auf dem beiliegenden Informationsmaterial weist darauf hin, dass dieses
Gerät kein normaler Haushaltsabfall ist, sondern in einer Sammelstelle für Elektro- und Elektronik-Altgeräte entsorgt
werden muss.
KONFORMITÄTSERKLÄRUNG
Dieses Produkt enthält vom Kyoto-Protokoll abgedeckte, uorierte Treibhausgase; das Kühlmittelgas bendet sich
in einem hermetisch abgedichteten System. (R410a, GWP 2088). Die maximale Befüllmenge mit Kältemittel beträgt
2,5kg. Weitere Informationen nden Sie auf dem Typenschild.
SICHERHEITSHINWEISE
- 18 -
Beschreibung des Geräts
Inneneinheit
Außeneinheit
Frontblende
Lufteintritt
Display
Notbedienungspanel
Luftauslass
Vertikale
Luftleitlamelle
Horizontale
Luftleitlamelle
Luftlter
Fernbedienung
Lufteintritt
Ablaufschlauch
Luftauslass
Leitungen und
Stromkabel
Hinweis: In den Betriebsarten
KÜHLEN und ENTFEUCHTEN
ießt Kondenswasser aus.
Die Abbildungen der Bedienungsanleitung zeigen ein Gerät in Standardausführung,.
das sich in Größe und Design von Ihrem Gerät unterscheiden kann.
- 19 -
Benutzerschnittstelle
64 127
5
Temperaturanzeige(1)
Zeigt die Solltemperatur an.
Falls die Angabe „FC“ erscheint, muss der Filter gereinigt werden.
Betriebsanzeige (2)
Leuchtet, wenn das Gerät in Betrieb ist.
Blinkt während des Abtauvorgangs der Außeneinheit.
6
th
Sense Anzeige (3)
Leuchtet auf, wenn 6
th
Sense eingeschaltet ist.
Erlischt, wenn 6
th
Sense endet.
Filterkontrolle-Anzeige (4)
Blinkt, wenn der Filter gereinigt werden muss.
Die Filteranzeige blinkt nach 720 Betriebsstunden zur Erinnerung, dass Sie den Filter reinigen müssen.
Drücken Sie nach der Filterreinigung die Reset-Taste des Filters an der Inneneinheit hinter der
Frontabdeckung, um das Blinken der Filteranzeige zu beenden.
Feuchtigkeits-Anzeige (5)
Leuchtet auf bei der Anzeige der Feuchtigkeitsstufe.
Erlischt bei der Anzeige der Temperatur.
TIMER-Anzeige (6)
Leuchtet während der eingestellten Zeit.
Erlischt, wenn der Timer-Betrieb endet.
Anzeige für Schlaf-Modus (7)
Sie leuchtet auf, sobald der Schlaf-Modus eingestellt ist. Die Betriebs-Anzeige blinkt 10 Mal, dann erlischt die
gesamte Anzeige.
Für Klimageräte ohne Wi-Fi-Steuerung empfehlen wir Wpro SmartClim: ein intelligentes Gerät, um über Wi-Fi die
Haupteinstellungen Ihres Geräts von Ihrem Smartphone aus zu steuern.
Dieses Zubehör ist nicht in der Produktverpackung enthalten. Bitte kontaktieren Sie unseren Kundendienst für
weitere Details und den Erwerb.
- 20 -
Fernbedienung
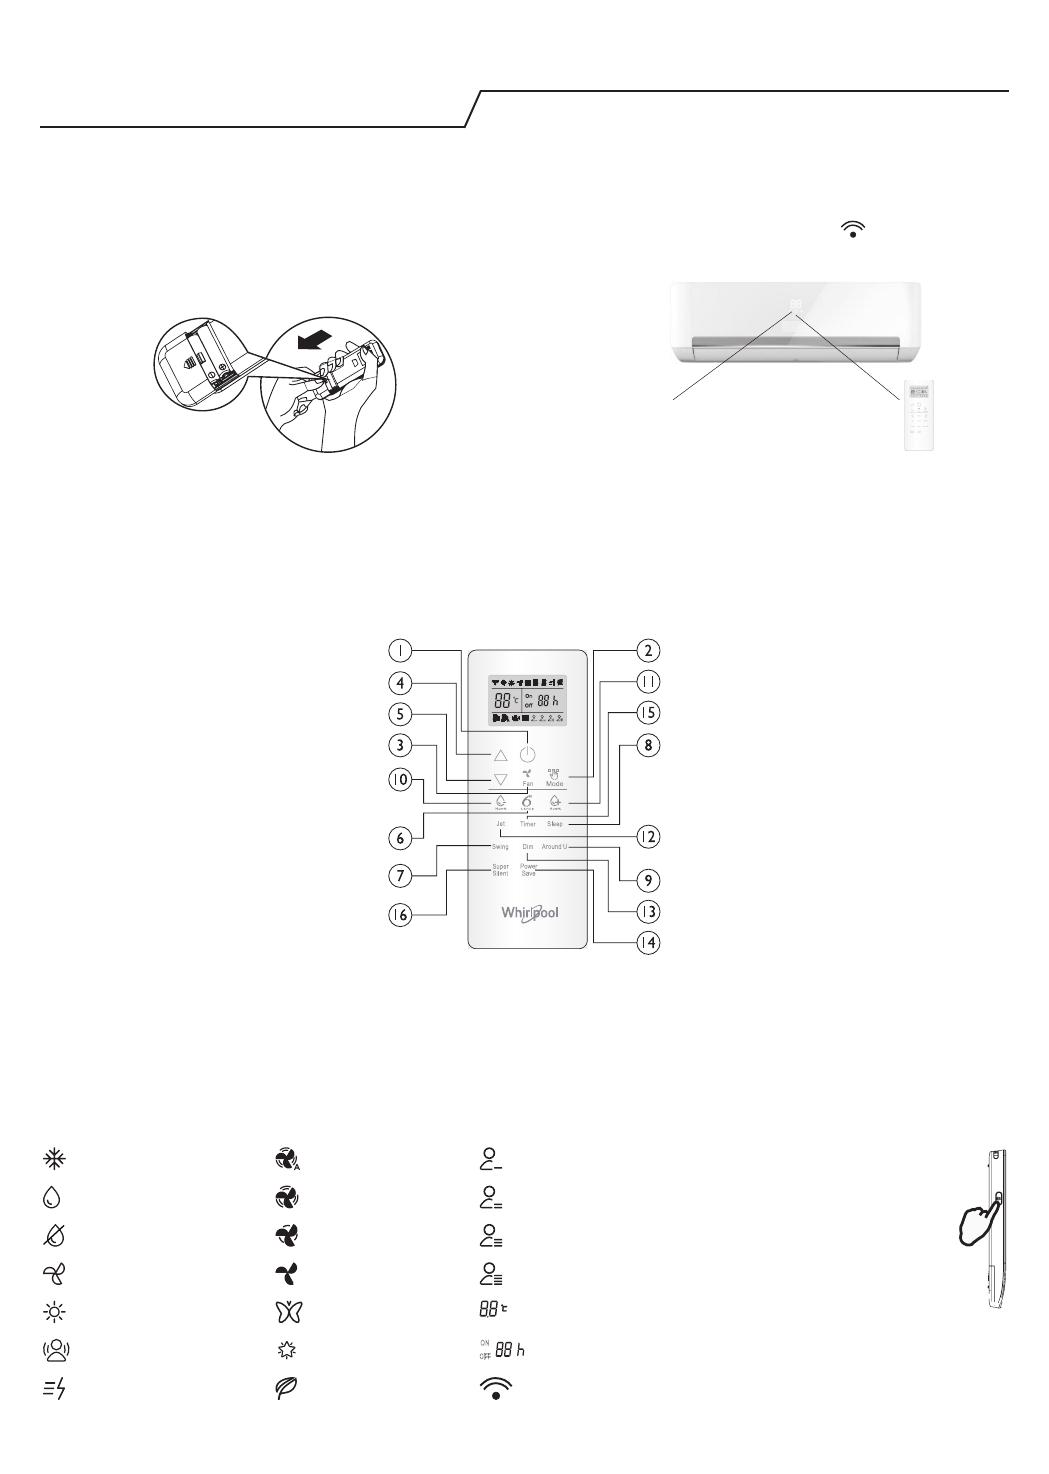
Einlegen der Batterien in die Fernbedienung
1. Drücken Sie mit einem spitzen Gegenstand in
die Vertiefung der Batteriefach-Abdeckung und
schieben Sie die Abdeckung in Pfeilrichtung, um sie
abzunehmen (siehe Bild).
2. Legen Sie zwei 1,5-V-Batterien vom Typ AAA in das
Fach ein. Achten Sie darauf, dass die Batteriepole +
und - polrichtig eingelegt sind.
3. Schließen Sie die Batteriefach-Abdeckung der
Fernbedienung wieder.
Voreinstellung der Fernbedienung
Jedes Mal, wenn die Batterien der Fernbedienung
ausgetauscht werden, wird die Fernbedingung
automatisch auf den Modus Wärmepumpe
voreingestellt. Die Fernbedienung der AC-Wärmepumpe
kann zur Steuerung von AC-Modellen verwendet
werden, die für den reinen Kühlbetrieb ausgelegt sind.
Verwenden der Fernbedienung zur Steuerung des Gerätes
Richten Sie die Fernbedienung zur Bedienung des
Geräts auf das Empfangsteil der Inneneinheit aus,
damit eine gute Signalqualität gewährleistet ist.
Während der Befehlsübertragung durch die
Fernbedienung blinkt das Symbol Sekunde lang.
Den Empfang des Befehls bestätigt das Gerät durch
einen Hinweiston.
Signalempfänger
Mit der Fernbedienung können Sie das Klimagerät aus
einem Abstand von bis zu 7 m bedienen.
Nach einem Batteriewechsel schaltet die
Fernbedienung standardmäßig in den Heizen-Modus
(Wärmepumpe).
Hinweis: Bitte befolgen Sie die Anweisungen für die Fernbedienung, die Sie für den Betrieb des Klimageräts erhalten.
Beschreibung der Funktionen der Tasten (P1-04)
1. ON/OFF TASTE (Ein/Aus)
Startet oder stoppt das Gerät durch
Drücken dieser Taste.
3. TASTE FAN (Lüfter)
Dient zur Wahl der Ventilatordrehzahl
in der Reihenfolge Automatik, Hoch,
Mittel und Niedrig.
4-5. TASTE TEMPERATURE (Temperatur)
Dient zur Wahl der Raumtemperatur.
Dient zur Einstellung des Timer-Modus.
6. 6
th
SENSE TASTE
Ein- oder Ausschalten der
Betriebsart 6
th
Sense.
7. TASTE SWING (Schwenken)
Startet und stoppt die
Schwenkbewegung („Swing“) der
horizontalen Luftleitlamelle und
stellt die vertikale Luftverteilung ein.
10-11. TASTE HUMIDITY (Feuchtigkeit)
Dient der Einstellung der
gewünschten Feuchtigkeitsstufe,
nur verfügbar im Modus 6
th
SENSE.
16. TASTE SUPER SILENT (Superleise)
Startet und stoppt die „Super Silent“-
Funktion für eine leise Umgebung.
2. TASTE MODE (Betriebsart)
Dient zur Wahl des Betriebsmodus
in Reihenfolge Cooling (Kühlen),
Heating (Heizen) oder Fan (Lüfter).
8. TASTE SLEEP (Nachtbetrieb)
Stellt den Nacht-Modus („Sleep“) ein
in der Reihenfolge sleep 1, sleep 2,
sleep 3 sleep 4 und sleep o.
9. TASTE AROUND U” (Wohlfühl-
Funktion)
Aktiviert bzw. deaktiviert die
Wohlfühl-Funktion („Around U“).
12. TASTE JET (Schnell-Kühlen und
Schnell-Heizen)
Startet und stoppt das schnelle
Kühlen und schnelle Heizen.
13. TASTE DIM (Displaybeleuchtung)
Schaltet die Displaybeleuchtung
der Inneneinheit ein und aus.
14. POWER SAVE TASTE (Energiesparen)
Dient zum Ein- oder Ausschalten
des Energiesparbetriebs.
15. TIMER TASTE (Zeitschalttaste)
Dient zur Einstellung der Zeit zum
Ein- oder Ausschalten des Geräts.
Symbole auf der Anzeige der Fernbedienung
Die Fernbedienung mit der FREIGABE-
Taste aktivieren
Anzeige Kühlen Lüfterdrehzahl-
Automatik
Anzeige für Schlaf-
Modus 1
Nach dem Drücken dieser
Taste ist das Display beleuchtet
und die Funktionstasten der
Fernbedienung sind aktiviert.
Durch erneutes Drücken
wird die Fernbedienung
wieder gesperrt. Wenn Sie
innerhalb von 10 Sekunden
keine Taste drücken, wird
die Fernbedienung wieder
automatisch gesperrt.
PRESS
Anzeige Feuchtigkeit
Plus
Lüfterdrehzahl-
höchste Stufe
Anzeige für Schlaf-
Modus 2
Kontrollleuchte
Feuchtigkeit Minus
Lüfterdrehzahl-
mittlere Stufe
Anzeige für Schlaf-
Modus 3
Anzeige FAN ONLY für
Lüfterbetrieb
Lüfterdrehzahl-
niedrige Stufe
Anzeige für Schlaf-
Modus 4
Anzeige HEATING für
Heizen
Anzeige Super Silent
(Superleise)
Display
Temperatureinstellung
Anzeige Wohlfühl-
Funktion („Around U“)
6
th
SENSE-Anzeige
ON
OF F
Display
Timereinstellung
Anzeige JET (Schnell-
Kühlen/-Heizen)
Anzeige "Power Save"
(Energiesparen)
Signalübertragung
  • Page 1 1
  • Page 2 2
  • Page 3 3
  • Page 4 4
  • Page 5 5
  • Page 6 6
  • Page 7 7
  • Page 8 8
  • Page 9 9
  • Page 10 10
  • Page 11 11
  • Page 12 12
  • Page 13 13
  • Page 14 14
  • Page 15 15
  • Page 16 16
  • Page 17 17
  • Page 18 18
  • Page 19 19
  • Page 20 20
  • Page 21 21
  • Page 22 22
  • Page 23 23
  • Page 24 24
  • Page 25 25
  • Page 26 26
  • Page 27 27
  • Page 28 28
  • Page 29 29
  • Page 30 30
  • Page 31 31
  • Page 32 32
  • Page 33 33
  • Page 34 34
  • Page 35 35
  • Page 36 36
  • Page 37 37
  • Page 38 38
  • Page 39 39
  • Page 40 40
  • Page 41 41
  • Page 42 42
  • Page 43 43
  • Page 44 44
  • Page 45 45
  • Page 46 46
  • Page 47 47
  • Page 48 48
  • Page 49 49
  • Page 50 50
  • Page 51 51
  • Page 52 52
  • Page 53 53
  • Page 54 54
  • Page 55 55
  • Page 56 56
  • Page 57 57
  • Page 58 58
  • Page 59 59
  • Page 60 60
  • Page 61 61
  • Page 62 62
  • Page 63 63
  • Page 64 64
  • Page 65 65
  • Page 66 66
  • Page 67 67
  • Page 68 68
  • Page 69 69
  • Page 70 70
  • Page 71 71
  • Page 72 72
  • Page 73 73
  • Page 74 74
  • Page 75 75
  • Page 76 76
  • Page 77 77
  • Page 78 78
  • Page 79 79
  • Page 80 80
  • Page 81 81
  • Page 82 82
  • Page 83 83
  • Page 84 84
  • Page 85 85
  • Page 86 86
  • Page 87 87
  • Page 88 88
  • Page 89 89
  • Page 90 90
  • Page 91 91
  • Page 92 92
  • Page 93 93
  • Page 94 94
  • Page 95 95
  • Page 96 96
  • Page 97 97
  • Page 98 98
  • Page 99 99
  • Page 100 100
  • Page 101 101
  • Page 102 102
  • Page 103 103
  • Page 104 104
  • Page 105 105
  • Page 106 106
  • Page 107 107
  • Page 108 108
  • Page 109 109
  • Page 110 110
  • Page 111 111
  • Page 112 112
  • Page 113 113
  • Page 114 114
  • Page 115 115
  • Page 116 116
  • Page 117 117
  • Page 118 118
  • Page 119 119
  • Page 120 120
  • Page 121 121
  • Page 122 122
  • Page 123 123
  • Page 124 124
  • Page 125 125
  • Page 126 126
  • Page 127 127
  • Page 128 128
  • Page 129 129
  • Page 130 130
  • Page 131 131
  • Page 132 132
  • Page 133 133
  • Page 134 134
  • Page 135 135
  • Page 136 136
  • Page 137 137
  • Page 138 138
  • Page 139 139
  • Page 140 140
  • Page 141 141
  • Page 142 142
  • Page 143 143
  • Page 144 144
  • Page 145 145
  • Page 146 146
  • Page 147 147
  • Page 148 148
  • Page 149 149
  • Page 150 150
  • Page 151 151
  • Page 152 152
  • Page 153 153
  • Page 154 154
  • Page 155 155
  • Page 156 156
  • Page 157 157
  • Page 158 158
  • Page 159 159
  • Page 160 160
  • Page 161 161
  • Page 162 162
  • Page 163 163
  • Page 164 164
  • Page 165 165
  • Page 166 166
  • Page 167 167
  • Page 168 168
  • Page 169 169
  • Page 170 170
  • Page 171 171
  • Page 172 172
  • Page 173 173
  • Page 174 174
  • Page 175 175
  • Page 176 176
  • Page 177 177
  • Page 178 178
  • Page 179 179
  • Page 180 180
  • Page 181 181
  • Page 182 182
  • Page 183 183
  • Page 184 184
  • Page 185 185
  • Page 186 186
  • Page 187 187
  • Page 188 188
  • Page 189 189
  • Page 190 190
  • Page 191 191
  • Page 192 192
  • Page 193 193
  • Page 194 194
  • Page 195 195
  • Page 196 196
  • Page 197 197
  • Page 198 198
  • Page 199 199
  • Page 200 200
  • Page 201 201
  • Page 202 202
  • Page 203 203
  • Page 204 204
  • Page 205 205
  • Page 206 206
  • Page 207 207
  • Page 208 208
  • Page 209 209
  • Page 210 210
  • Page 211 211
  • Page 212 212
  • Page 213 213
  • Page 214 214
  • Page 215 215
  • Page 216 216
  • Page 217 217
  • Page 218 218
  • Page 219 219
  • Page 220 220
  • Page 221 221
  • Page 222 222
  • Page 223 223
  • Page 224 224

Whirlpool SPIS412L Užívateľská príručka

Typ
Užívateľská príručka