
BG2038, BG2036, BG2028, BG2026, BG2025, BG2024


1
2
9
10
12
3
5
6
7
8
11
BG2024
BG2025
BG2026
BG2028
BG2036
BG2038
13
4


English
Introduction
Congratulations on your purchase and welcome to Philips! To fully benefit
from the support that Philips offers, register your product at
www.philips.com/welcome.
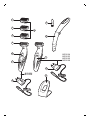
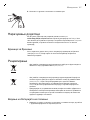
General description (Fig. 1)
1 Trimming comb 1 (3mm/0.11 inch)
2 Trimming comb 2 (5mm/0.19 inch) (BG2038/BG2036/BG2028/BG2026
only)
3 Trimming comb 3 (7mm/0.27 inch) (BG2038/BG2036/BG2028/BG2026
only)
4 Hair length indication (1, 2 or 3)
5 Shaving unit
6 On/off button
7 Battery status indicator
8 Supply unit (adapter, type HQ8500, BG2038/ BG2036 only)
9 Cleaning brush (BG2038/BG2036/BG2028/BG2026 only)
10 Back shaving attachment (BG2038/BG2036 only)
11 Battery status indicator
12 Supply unit (adapter, type HQ850, BG2028/BG2026/BG2025/BG2024
only)
13 Charging stand
Important safety information
Read this important information carefully before you use the appliance and
its accessories and save it for future reference. The accessories supplied
may vary for different products.
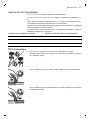
Danger
-
Keep the supply unit dry.
Warning
-
The supply unit contains a transformer. Do not
cut off the supply unit to replace it with another
plug, as this causes a hazardous situation.
-
Only charge the appliance with the supply unit
provided.
6
English

-
This appliance can be used by children aged
from 8 years and above and persons with
reduced physical, sensory or mental capabilities
or lack of experience and knowledge if they
have been given supervision or instruction
concerning use of the appliance in a safe way
and understand the hazards involved. Children
shall not play with the appliance. Cleaning and
user maintenance shall not be made by children
without supervision.
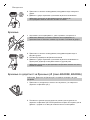
-
Always unplug the appliance before you clean it
under the tap.
-
Always check the appliance before you use it.
Do not use the appliance if it is damaged, as this
may cause injury. Always replace a damaged
part with one of the original type.
-
Do not open the appliance to replace the
rechargeable battery.
Caution
-
Never immerse the charging stand in water and
do not rinse it under the tap.
-
Never use water hotter than 80°C to rinse the
appliance.
-
Only use this appliance for its intended purpose
as shown in the user manual.
-
For hygienic reasons, the appliance should only
be used by one person.
-
Never use compressed air, scouring pads,
abrasive cleaning agents or aggressive liquids
such as petrol or acetone to clean the appliance.
7
English

-
Do not use the supply unit in or near wall
sockets that contain or have contained an
electric air freshener to prevent irreparable
damage to the supply unit.
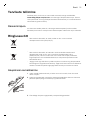
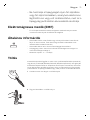
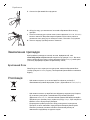
Electromagnetic fields (EMF)
-
This Philips appliance complies with all applicable standards and
regulations regarding exposure to electromagnetic fields.
General
-
This appliance is waterproof. It is suitable for use in the bath or shower
and for cleaning under the tap. For safety reasons, the appliance can
therefore only be used without cord.
-
The appliance is suitable for mains voltages ranging from 100 to 240
volts.
-
The supply unit transforms 100-240 volts to a safe low voltage of less
than 24 volts.
-
Maximum noise level: Lc = 75 dB(A).
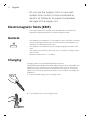
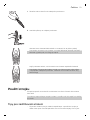
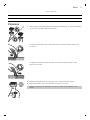
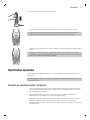
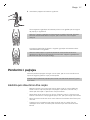
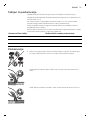
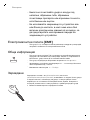
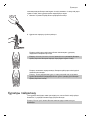
Charging
Charging takes 1 hour (BG2038/BG2036) or 8 hours
(BG2028/BG2026/BG2025/BG2024) depending on the model. When the
appliance is fully charged, it has an operating time of up to 50 minutes.
When the battery status indicator flashes red, the battery is running low
(approx. 10 minutes of operating time left) and you need to recharge the
appliance.
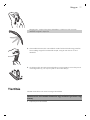
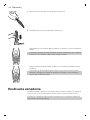
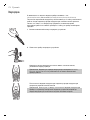
1 Insert the small plug into the charging stand.
2 Put the appliance in the charging stand.
8
English

The battery status indicator flashes green to indicate that the appliance is
charging.
Note: The battery status indicator of BG2028, BG2026, BG2025 and
BG2024 looks different, but works in the same way.
When the appliance is fully charged, the battery status indicator lights up
green continuously.
Note: If the fully charged appliance is still in the plugged-in charging
stand after 30 minutes, the battery status indicator goes out to save
energy.
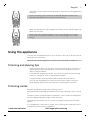
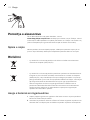
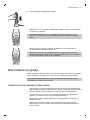
Using the appliance
You can use the appliance wet or dry to shave or trim hair on all parts of the
body below the neckline.
Note: Do not use this appliance to shave or trim facial hair or scalp hair.
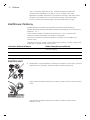
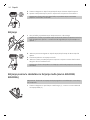
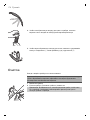
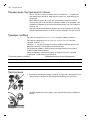
Trimming and shaving tips
-
Take your time when you first start to shave sensitive areas. You have to
acquire practice with the appliance. Your skin also needs some time to
adjust to the procedure.
-
If the hairs are longer than 10 mm, you can trim them first with trimming
comb 1 to a length of 3 mm to make shaving easier.
-
You get the best trimming results when the skin and hair are dry.
-
You can use the appliance to shave in the shower or bath. To ensure
easier gliding, apply some shaving foam or shower gel to your skin.
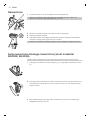
Trimming combs
BG2025 and BG2024 come with trimming comb 1.
BG2038, BG2036, BG2028 and BG2026 come with trimming combs 1, 2 and
3.
The back of each comb has been numbered 1, 2 and 3 (see the table below
for the corresponding hair lengths after trimming).
A trimming comb allows you to cut hair to a specific length (see the table
below).
If your appliance comes with 3 combs, start trimming with trimming comb 3
to acquire practice with this appliance.
Comb size indication
Hair length after trimming
9
English

1 3mm/0.11 inch
2 5mm/0.19 inch
3 7mm/0.27 inch
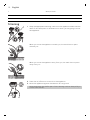
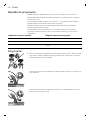
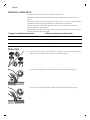
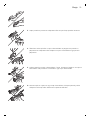
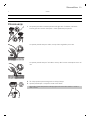
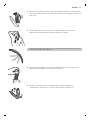
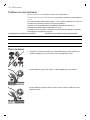
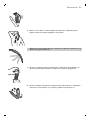
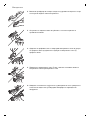
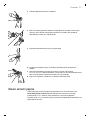
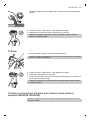
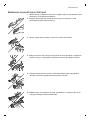
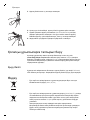
Trimming
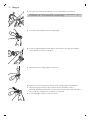
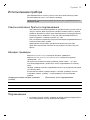
1 Snap the appropriate trimming comb onto the appliance. Make sure the
teeth of the comb point in the direction in which you are going to move
the appliance.
When you move the appliance towards you, the teeth have to point
towards you.
When you move the appliance away from you, the teeth have to point
away from you.
2 Press the on/off button to switch on the appliance.
3 Move the appliance against the direction of hair growth.
Note: Make sure that the flat part of the trimming comb is always fully in
contact with the skin.
10
English

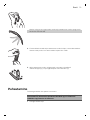
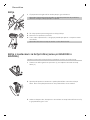
Shaving
1 If a trimming comb is still attached, remove it.
Note: You can either push the trimming comb off the appliance or pull it
off, depending on how the comb is placed on the appliance.
2 Press the on/off button once to switch on the appliance.
3 Place the shaving unit on the skin.
4 Move the appliance against the direction of hair growth with one hand,
while you stretch the skin with the other hand.
Note: Make sure that the shaving unit is always fully in contact with the
skin.
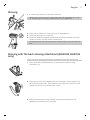
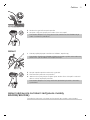
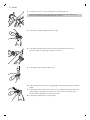
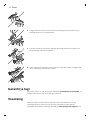
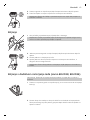
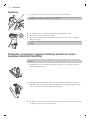
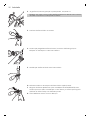
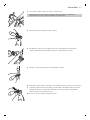
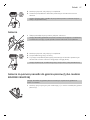
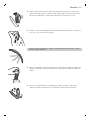
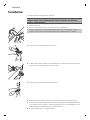
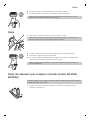
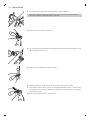
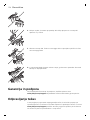
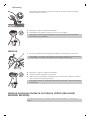
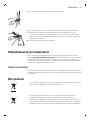
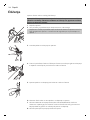
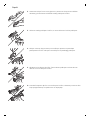
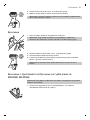
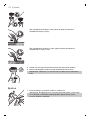
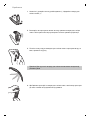
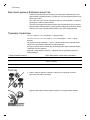
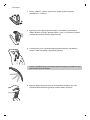
Shaving with the back shaving attachment (BG2038, BG2036
only)
Note: The back shaving attachment is suitable for both wet and dry use.
2
1
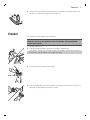
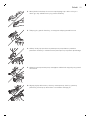
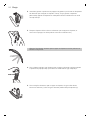
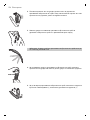
1 Press and hold the release button (1) and open the back shaving
attachment (2).
2 Place the bottom of the appliance in the lower part of the holder of the
back shaving attachment. Then press the top against the top part of the
holder until it locks into position with a click.
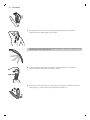
3 Shave your back by moving the back shaving attachment with the
appliance up and down by its handle.
11
English

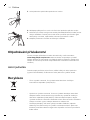
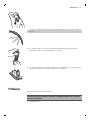
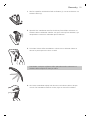
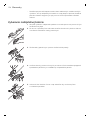
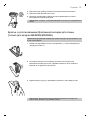
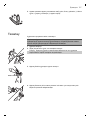
Note: For your convenience, the back shaving attachment can be folded
to different angles.
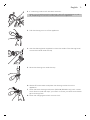
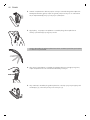
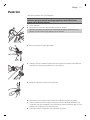
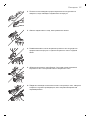
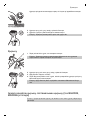
4 To remove the appliance from the back shaving attachment, pull the top
of the appliance towards you until it unlocks from the holder.
2
1
5 To close the back shaving attachment, press and hold the release button
(1) and push the handle against the holder (2).
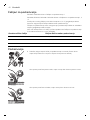
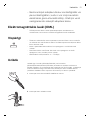
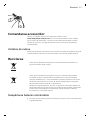
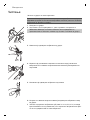
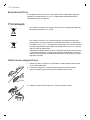
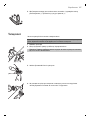
Cleaning
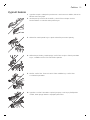
Clean the appliance after every use.
Caution: Never use compressed air, scouring pads, abrasive cleaning
agents or aggressive liquids such as petrol or acetone to clean the
appliance.
1 Switch off the appliance.
12
English

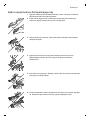
2 If a trimming comb is still attached, remove it.
Note: You can either push the trimming comb off the appliance or pull it
off, depending on how the comb is placed on the appliance.
3 Pull the shaving unit out of the appliance.
4 Use the cleaning brush supplied to clean the inside of the shaving head
or rinse the inside under the tap.
5 Rinse the shaving unit under the tap.
6 Shake off excess water and place the shaving unit back into the
appliance.
7 Clean the back shaving attachment (BG2038/BG2036 only) with a moist
cloth. Rinse it under the tap if you used it to shave your back with shower
gel or shaving foam.
8 Clean the charging stand with a moist cloth.
13
English

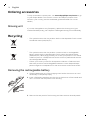
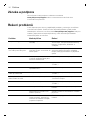
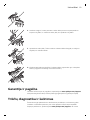
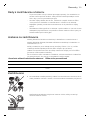
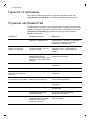
Ordering accessories
To buy accessories or spare parts, visit www.shop.philips.com/service or go
to your Philips dealer. You can also contact the Philips Consumer Care
Centre in your country (see the worldwide guarantee leaflet for contact
details).
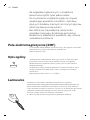
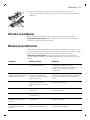
Shaving unit
If you use the appliance very frequently, replace the shaving unit (type
number BG2000) every year. Replace a damaged shaving unit immediately.
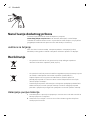
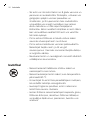
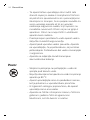
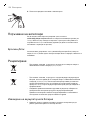
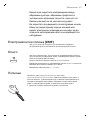
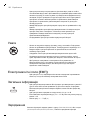
Recycling
-
This symbol means that this product shall not be disposed of with normal
household waste (2012/19/EU).
-
This symbol means that this product contains a built-in rechargeable
battery which shall not be disposed of with normal household waste
(2006/66/EC). We strongly advise you to take your product to an official
collection point or a Philips service centre to have a professional remove
the rechargeable battery.
-
Follow your country’s rules for the separate collection of electrical and
electronic products and rechargeable batteries. Correct disposal helps
prevent negative consequences for the environment and human health.
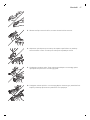
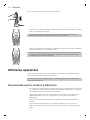
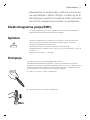
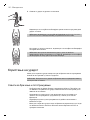
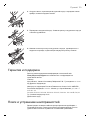
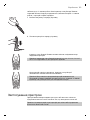
Removing the rechargeable battery
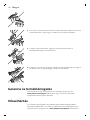
1 Take the appliance out of the charging stand and let the motor run until
the battery is completely empty.
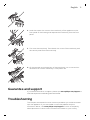
2 Insert a flathead screwdriver into the slot at the bottom of the handle and
turn it to unlock the rear panel of the housing.
3 Remove the rear panel of the housing and then remove the side panels.
14
English

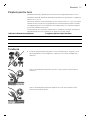
4 Undo the screws that connect the inner body of the appliance to the
front panel of the housing and separate the inner body from the front
panel.
5 Turn over the inner body. Then detach the cover of the inner body with
the control panel from the inner body.
6 Lift the printed-circuit board out of the inner body, turn it over and cut
the wires that connect the battery to the power unit.
Guarantee and support
If you need information or support, please visit www.philips.com/support or
read the separate worldwide guarantee leaflet.
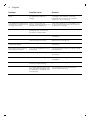
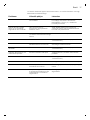
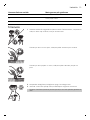
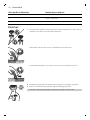
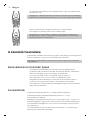
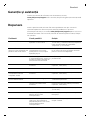
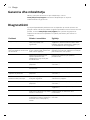
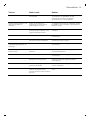
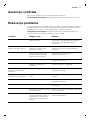
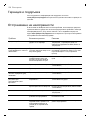
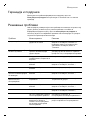
Troubleshooting
This chapter summarizes the most common problems you could encounter
with the appliance. If you are unable to solve the problem with the
information below, visit www.philips.com/support for a list of frequently
asked questions or contact the Consumer Care Center in your country.
15
English

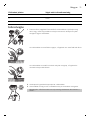
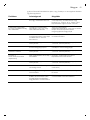
Problem Possible cause Solution
The appliance does not
work.
The battery is empty and/or
the appliance does not
charge.
Recharge the battery (see chapter
‘Charging’) and check if you have
followed all instructions in chapters
‘Important’ and ‘Charging’.
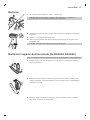
The appliance makes more
noise and/or vibrates more
strongly than usual.
One or more parts are
broken, perhaps because you
dropped the appliance.
Take the appliance to your dealer or to
an authorized Philips service center for
examination or repair.
If this appliance is used
professionally, it will reach
the end of its life earlier
Do not use the appliance professionally.
The shaving unit is dirty. Clean the shaving unit (see chapter
‘Cleaning’).
The shaving unit is worn. Replace the shaving unit.
The operating time on a full
charge decreases.
The shaving unit is dirty. Clean the shaving unit (see chapter
‘Cleaning’).
Reduced trimming and/or
shaving performance
You use the appliance in the
wrong way.
Follow the instructions in chapter ‘Using
the appliance’.
The shaving unit is dirty. Clean the shaving unit (see chapter
‘Cleaning’).
The battery is running low. Recharge the battery (see chapter
‘Charging’).
You have not attached the
trimming comb properly.
Remove the trimming comb and reattach
it.
If you are trimming very curly
hair, the trimming comb may
not be able to straighten the
hair properly.
Try straightening the hair with your
hands during trimming.
16
English

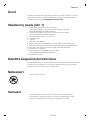
Čeština
Úvod
Společnost Philips Vám gratuluje ke koupi a vítá Vás! Chcete-li využívat
všech výhod podpory nabízené společností Philips, zaregistrujte svůj
výrobek na stránkách www.philips.com/welcome.
Všeobecný popis (obr. 1)
1 zastřihovací hřeben 1 (3 mm/0,11 palce)
2 zastřihovací hřeben 2 (5 mm/0,19 palce) (pouze modely
BG2038/BG2036/BG2028/BG2026)
3 zastřihovací hřeben 3 (7 mm/0,27 palce) (pouze modely
BG2038/BG2036/BG2028/BG2026)
4 označení délky holení (1, 2 nebo 3)
5 holicí jednotka
6 vypínač
7 ukazatel stavu baterie
8 zdroje (adaptér, typ HQ8500, pouze modely BG2038/ BG2036)
9 čisticí kartáček (pouze modely BG2038/BG2036/BG2028/BG2026)
10 nástavec na holení zad (pouze modely BG2038/BG2036)
11 ukazatel stavu baterie
12 zdroj (adaptér, typ HQ850, pouze modely
BG2028/BG2026/BG2025/BG2024)
13 nabíjecí podstavec
Důležité bezpečnostní informace
Před použitím přístroje a jeho příslušenství si pečlivě přečtěte tuto příručku
s důležitými informacemi a uschovejte ji pro budoucí použití. Dodané
příslušenství se může pro různé výrobky lišit.
Nebezpečí
-
Zdroj udržujte v suchu.
Varování
-
Zdroj obsahuje transformátor. U zdroje nikdy neodřezávejte a
nenahrazujte zástrčku. Mohlo by tak dojít k nebezpečné situaci.
-
Zastřihovač nabíjejte pouze pomocí dodávaného zdroje.
17
Čeština

-
Tento přístroj mohou používat děti od 8 let věku a osoby s omezenými
fyzickými, smyslovými nebo duševními schopnostmi nebo nedostatkem
zkušeností a znalostí, pokud jsou pod dohledem nebo byly poučeny
o bezpečném používání přístroje a pokud chápou související rizika. Děti si
s přístrojem nesmí hrát. Děti nesmí provádět čištění a uživatelskou údržbu
bez dozoru.
-
Před čištěním pod tekoucí vodou přístroj vždy odpojte od sítě.
-
Před použitím přístroj vždy zkontrolujte. Přístroj nepoužívejte, je-li
poškozený, aby nedošlo ke zranění. Poškozenou součástku vyměňujte
vždy za původní typ.
-
Neotvírejte přístroj, ani se nepokoušejte vyměnit akumulátor.
Upozornění
-
Dobíjecí stojan nesmíte nikdy ponořit do vody ani ho mýt pod tekoucí
vodou.
-
Pro oplachování přístroje nikdy nepoužívejte vodu teplejší než 80 °C.
-
Přístroj používejte pouze k účelu, ke kterému je určen, jak je vyobrazeno
v uživatelské příručce.
-
Z hygienických důvodů by měla přístroj používat pouze jedna osoba.
-
K čištění přístroje nikdy nepoužívejte stlačený vzduch, kovové žínky,
abrazivní ani agresivní čisticí prostředky, jako je například benzín nebo
aceton.
-
Nepoužívejte zdroj v zásuvce, ve které je nebo byl zapojen elektrický
osvěžovač vzduchu, ani v její blízkosti. Předejdete tak nenapravitelnému
poškození zdroje.
Elektromagnetická pole (EMP)
-
Tento přístroj Philips odpovídá všem platným normám a předpisům
týkajícím se vystavení účinkům elektromagnetických polí.
Obecné informace
-
Tento přístroje je voděodolný. Je vhodný pro použití ve vaně nebo sprše
a pro čištění pod tekoucí vodou. Přístroj lze proto z bezpečnostních
důvodů používat pouze bez napájecího kabelu.
-
Přístroj lze připojit do sítě o napětí v rozmezí 100 až 240 V.
-
Zdroj transformuje 100 V až 240 V na bezpečné nízké napětí nižší než
24 V.
-
Maximální hladina hluku: Lc = 75 dB(A).
Nabíjení
V závislosti na modelu trvá nabíjení 1 hodinu (BG2038/BG2036), nebo 8
hodin (BG2028/BG2026/BG2025/BG2024). Při plném nabití pracuje strojek
bez připojení k síti zhruba 50 minut. Když ukazatel stavu baterie bliká
červeně, je baterie téměř vybitá (zbývá přibližně 10 minut provozu) a strojek
je třeba dobít.
18
Čeština

1 Zasuňte malou zástrčku do nabíjecího podstavce.
2 Umístěte přístroj na nabíjecí podstavec.
Ukazatel stavu baterie bliká zeleně na znamení, že se přístroj nabíjí.
Poznámka: Ukazatel stavu baterie u modelů BG2028, BG2026, BG2025 a
BG2024 vypadá jinak, ale funguje stejně.
Když je baterie nabitá, svítí ukazatel stavu baterie nepřetržitě zeleně.
Poznámka: Pokud je plně nabitý strojek i po 30 minutách stále vložen
v zapojeném nabíjecím podstavci, ukazatel stavu baterie zhasne, aby
šetřil energii.
Použití strojku
Strojek lze použít na mokré či suché holení na všech částech těla od linie
krku dolů.
Poznámka: Nepoužívejte strojek k holení či zastřihování chloupků na obličeji
ani vlasů.
Tipy pro zastřihování a holení
-
Při prvním holení citlivých oblastí nespěchejte. V používání strojku je
třeba získat praxi. Rovněž pokožka si musí na holení nějaký čas zvykat.
19
Čeština

-
Jsou-li chloupky delší než 10 mm, můžete je nejprve zastřihnout
zastřihovacím hřebenem 1 na délku 3 mm a usnadnit tak holení.
-
Nejlepších výsledků dosáhnete, když budou chloupky i pokožka suché.
-
Strojkem se můžete holit i ve vaně nebo ve sprše. Aby strojek lépe
klouzal, naneste na pokožku pěnu na holení nebo sprchový gel.
Zastřihovací hřebeny
Modely BG2025 a BG2024 se dodávají se zastřihovacími hřebeny 1.
Modely BG2038, BG2036, BG2028 a BG2026 se dodávají se zastřihovacími
hřebeny 1, 2 a 3.
Zadní strana každého z hřebenů je očíslována 1, 2 a 3 (v tabulce níže
naleznete odpovídající délku chloupků po zastřižení).
Zastřihovací hřeben umožňuje zastřižení chloupků na různé délky (viz
tabulku níže).
Pokud jste zakoupili strojek s třemi dodanými hřebeny, začněte zastřihování
hřebenem 3, abyste získali určitou praxi.
Označení velikosti hřebenu
Délka chloupků po zastřihnutí
1 3 mm/0,11 palce
2 5 mm/0,19 palce
3 7 mm/0,27 palce
Zastřihování
1 Zaklapněte na strojek příslušný zastřihovací hřeben. Zkontrolujte, zda zub
hřebene míří tím směrem, kterým budete strojkem pohybovat.
Když budete strojkem pohybovat směrem k sobě, zub musí mířit směrem
k vám.
Když budete strojkem pohybovat směrem od sebe, zub musí mířit
směrem od vás.
20
Čeština
Stránka sa načítava ...
Stránka sa načítava ...
Stránka sa načítava ...
Stránka sa načítava ...
Stránka sa načítava ...
Stránka sa načítava ...
Stránka sa načítava ...
Stránka sa načítava ...
Stránka sa načítava ...
Stránka sa načítava ...
Stránka sa načítava ...
Stránka sa načítava ...
Stránka sa načítava ...
Stránka sa načítava ...
Stránka sa načítava ...
Stránka sa načítava ...
Stránka sa načítava ...
Stránka sa načítava ...
Stránka sa načítava ...
Stránka sa načítava ...
Stránka sa načítava ...
Stránka sa načítava ...
Stránka sa načítava ...
Stránka sa načítava ...
Stránka sa načítava ...
Stránka sa načítava ...
Stránka sa načítava ...
Stránka sa načítava ...
Stránka sa načítava ...
Stránka sa načítava ...
Stránka sa načítava ...
Stránka sa načítava ...
Stránka sa načítava ...
Stránka sa načítava ...
Stránka sa načítava ...
Stránka sa načítava ...
Stránka sa načítava ...
Stránka sa načítava ...
Stránka sa načítava ...
Stránka sa načítava ...
Stránka sa načítava ...
Stránka sa načítava ...
Stránka sa načítava ...
Stránka sa načítava ...
Stránka sa načítava ...
Stránka sa načítava ...
Stránka sa načítava ...
Stránka sa načítava ...
Stránka sa načítava ...
Stránka sa načítava ...
Stránka sa načítava ...
Stránka sa načítava ...
Stránka sa načítava ...
Stránka sa načítava ...
Stránka sa načítava ...
Stránka sa načítava ...
Stránka sa načítava ...
Stránka sa načítava ...
Stránka sa načítava ...
Stránka sa načítava ...
Stránka sa načítava ...
Stránka sa načítava ...
Stránka sa načítava ...
Stránka sa načítava ...
Stránka sa načítava ...
Stránka sa načítava ...
Stránka sa načítava ...
Stránka sa načítava ...
Stránka sa načítava ...
Stránka sa načítava ...
Stránka sa načítava ...
Stránka sa načítava ...
Stránka sa načítava ...
Stránka sa načítava ...
Stránka sa načítava ...
Stránka sa načítava ...
Stránka sa načítava ...
Stránka sa načítava ...
Stránka sa načítava ...
Stránka sa načítava ...
Stránka sa načítava ...
Stránka sa načítava ...
Stránka sa načítava ...
Stránka sa načítava ...
Stránka sa načítava ...
Stránka sa načítava ...
Stránka sa načítava ...
Stránka sa načítava ...
Stránka sa načítava ...
Stránka sa načítava ...
Stránka sa načítava ...
Stránka sa načítava ...
Stránka sa načítava ...
Stránka sa načítava ...
Stránka sa načítava ...
Stránka sa načítava ...
Stránka sa načítava ...
Stránka sa načítava ...
Stránka sa načítava ...
Stránka sa načítava ...
Stránka sa načítava ...
Stránka sa načítava ...
Stránka sa načítava ...
Stránka sa načítava ...
Stránka sa načítava ...
Stránka sa načítava ...
Stránka sa načítava ...
Stránka sa načítava ...
Stránka sa načítava ...
Stránka sa načítava ...
Stránka sa načítava ...
Stránka sa načítava ...
Stránka sa načítava ...
Stránka sa načítava ...
Stránka sa načítava ...
Stránka sa načítava ...
Stránka sa načítava ...
Stránka sa načítava ...
Stránka sa načítava ...
Stránka sa načítava ...
Stránka sa načítava ...
Stránka sa načítava ...
Stránka sa načítava ...
Stránka sa načítava ...
Stránka sa načítava ...
Stránka sa načítava ...
Stránka sa načítava ...
Stránka sa načítava ...
Stránka sa načítava ...
Stránka sa načítava ...
Stránka sa načítava ...
Stránka sa načítava ...
Stránka sa načítava ...
Stránka sa načítava ...
Stránka sa načítava ...
Stránka sa načítava ...
Stránka sa načítava ...
Stránka sa načítava ...
Stránka sa načítava ...
Stránka sa načítava ...
Stránka sa načítava ...
Stránka sa načítava ...
Stránka sa načítava ...
Stránka sa načítava ...
Stránka sa načítava ...
Stránka sa načítava ...
Stránka sa načítava ...
Stránka sa načítava ...
Stránka sa načítava ...
Stránka sa načítava ...
Stránka sa načítava ...
Stránka sa načítava ...
Stránka sa načítava ...
Stránka sa načítava ...
Stránka sa načítava ...
Stránka sa načítava ...
Stránka sa načítava ...
Stránka sa načítava ...
Stránka sa načítava ...
Stránka sa načítava ...
Stránka sa načítava ...
Stránka sa načítava ...
Stránka sa načítava ...
Stránka sa načítava ...
Stránka sa načítava ...
Stránka sa načítava ...
Stránka sa načítava ...
Stránka sa načítava ...
Stránka sa načítava ...
Stránka sa načítava ...
Stránka sa načítava ...
Stránka sa načítava ...
Stránka sa načítava ...
Stránka sa načítava ...
Stránka sa načítava ...
Stránka sa načítava ...
Stránka sa načítava ...
Stránka sa načítava ...
Stránka sa načítava ...
Stránka sa načítava ...
Stránka sa načítava ...
Stránka sa načítava ...
Stránka sa načítava ...
Stránka sa načítava ...
-
 1
1
-
 2
2
-
 3
3
-
 4
4
-
 5
5
-
 6
6
-
 7
7
-
 8
8
-
 9
9
-
 10
10
-
 11
11
-
 12
12
-
 13
13
-
 14
14
-
 15
15
-
 16
16
-
 17
17
-
 18
18
-
 19
19
-
 20
20
-
 21
21
-
 22
22
-
 23
23
-
 24
24
-
 25
25
-
 26
26
-
 27
27
-
 28
28
-
 29
29
-
 30
30
-
 31
31
-
 32
32
-
 33
33
-
 34
34
-
 35
35
-
 36
36
-
 37
37
-
 38
38
-
 39
39
-
 40
40
-
 41
41
-
 42
42
-
 43
43
-
 44
44
-
 45
45
-
 46
46
-
 47
47
-
 48
48
-
 49
49
-
 50
50
-
 51
51
-
 52
52
-
 53
53
-
 54
54
-
 55
55
-
 56
56
-
 57
57
-
 58
58
-
 59
59
-
 60
60
-
 61
61
-
 62
62
-
 63
63
-
 64
64
-
 65
65
-
 66
66
-
 67
67
-
 68
68
-
 69
69
-
 70
70
-
 71
71
-
 72
72
-
 73
73
-
 74
74
-
 75
75
-
 76
76
-
 77
77
-
 78
78
-
 79
79
-
 80
80
-
 81
81
-
 82
82
-
 83
83
-
 84
84
-
 85
85
-
 86
86
-
 87
87
-
 88
88
-
 89
89
-
 90
90
-
 91
91
-
 92
92
-
 93
93
-
 94
94
-
 95
95
-
 96
96
-
 97
97
-
 98
98
-
 99
99
-
 100
100
-
 101
101
-
 102
102
-
 103
103
-
 104
104
-
 105
105
-
 106
106
-
 107
107
-
 108
108
-
 109
109
-
 110
110
-
 111
111
-
 112
112
-
 113
113
-
 114
114
-
 115
115
-
 116
116
-
 117
117
-
 118
118
-
 119
119
-
 120
120
-
 121
121
-
 122
122
-
 123
123
-
 124
124
-
 125
125
-
 126
126
-
 127
127
-
 128
128
-
 129
129
-
 130
130
-
 131
131
-
 132
132
-
 133
133
-
 134
134
-
 135
135
-
 136
136
-
 137
137
-
 138
138
-
 139
139
-
 140
140
-
 141
141
-
 142
142
-
 143
143
-
 144
144
-
 145
145
-
 146
146
-
 147
147
-
 148
148
-
 149
149
-
 150
150
-
 151
151
-
 152
152
-
 153
153
-
 154
154
-
 155
155
-
 156
156
-
 157
157
-
 158
158
-
 159
159
-
 160
160
-
 161
161
-
 162
162
-
 163
163
-
 164
164
-
 165
165
-
 166
166
-
 167
167
-
 168
168
-
 169
169
-
 170
170
-
 171
171
-
 172
172
-
 173
173
-
 174
174
-
 175
175
-
 176
176
-
 177
177
-
 178
178
-
 179
179
-
 180
180
-
 181
181
-
 182
182
-
 183
183
-
 184
184
-
 185
185
-
 186
186
-
 187
187
-
 188
188
-
 189
189
-
 190
190
-
 191
191
-
 192
192
-
 193
193
-
 194
194
-
 195
195
-
 196
196
-
 197
197
-
 198
198
-
 199
199
-
 200
200
-
 201
201
-
 202
202
-
 203
203
-
 204
204


Philips BG2025/15 Používateľská príručka
- Typ
- Používateľská príručka
V iných jazykoch
Súvisiace články
-
Norelco Series 3000 Waterproof Body Groomer BG2024/15 Používateľská príručka
-
Philips COP2002/01 Product Datasheet
-
Philips BRL176/00 Používateľská príručka
-
-
-
-
-
Philips QS6161 Používateľská príručka
-
Philips CP0286/01 Product Datasheet
-