Logitech PRO Užívateľská príručka

Typ
Užívateľská príručka
PRO RACING WHEEL
for PlayStation®5 consoles, PlayStation®4 consoles and PC
SETUP GUIDE
PRO RACING WHEEL
for PlayStation®5 consoles, PlayStation®4 consoles and PC
SETUP GUIDE
ENGLISH . . . . . . . . . . .3
DEUTSCH. . . . . . . . . .26
FRANÇAIS . . . . . . . . . 49
ITALIANO . . . . . . . . . . 72
ESPAÑOL . . . . . . . . . .95
PORTUGUÊS . . . . . . . .118
NEDERLANDS . . . . . . .141
SVENSKA . . . . . . . . . 164
DANSK . . . . . . . . . . .187
NORSK . . . . . . . . . . 210
SUOMI . . . . . . . . . . 233
ΕΛΛΗΝΙΚΆ . . . . . . . . . 256
ПО-РУССКИ . . . . . . . . 279
PO POLSKU . . . . . . . 302
MAGYAR . . . . . . . . . 325
348 . . . . . . . . . . . .  
ČESKÁ VERZE . . . . . . .371
SLOVENČINA . . . . . . . 394
УКРАЇНСЬКА . . . . . . . . .417
EESTI . . . . . . . . . . . 440
LATVISKI . . . . . . . . . 463
LIETUVIŲ . . . . . . . . . 486
БЪЛГАРСКИ . . . . . . . . 509
HRVATSKI. . . . . . . . . 532
SRPSKI . . . . . . . . . . 555
SLOVENŠČINA . . . . . . 578
ROMÂNĂ . . . . . . . . . 601
TÜRE . . . . . . . . . 624
647 . . . . . . . . . . . 
670 . . . . . . . . . . . 
3 ENGLISH
1
2
3
CONNECTIVITY
1 USB connection to PC / console
2 Peripheral ports*
3 Power connector
* NOTE:
Not a standard USB connection. Only Logitech
racing peripherals will function in these ports.
Other USB peripherals will not function and should
not be connected.
Please ensure that the power connector is fully
inserted; otherwise, your PRO Wheel may not
function correctly. As you insert the connector,
you might feel a small click, but you can push past
this until the connector is fully inserted. Do not use
excessive force to insert the connector.
4 ENGLISH
INSTALLATION
1 DESK
1a. Place the wheel base on your desk and ensure the feet
atthe bottom are aligned against the edge.
1b. Insert the clamp into the hole at the front.
1c. Tighten the clamp by adjusting
the screw handle.
Once the clamp has come into contact with thedesk,
youonly need between a half and one full turn of
thehandle to achieve the correct level of clamping.
Donot overtighten.
< 50 mm (1.97 in)
1a
1b 1c
NOTE:
Also be aware of the construction of your desk and
its suitability for clamping a high-torque wheel to it.
Somedesks use a hollow-core construction, for example,
where you have a top piece of material and a bottom
piece. Those pieces are likely to be thin and are unlikely
tostand up to the forces applied when the wheel is
clamped in place. Logitech recommends only clamping
your PRO Wheel to a desk made from a solid material,
suchas MDF or wood.
5 ENGLISH
2 RACING SEAT
2a. Use the three bolt holes on the underside of the PRO
Racing wheel to attach it to most major racing seats.
You will need 3 x M6X1 bolts (not included) with a
maximum depth inside the wheel base of 15mm.
Remember to account for the thickness of the surface
that you are attaching the wheel base to.
Using a longer bolt than this will damage the wheel
unit, so use washers if needed to ensure that the bolts
do not encroach too far inside the wheel base.
You only need to hand tighten. Do not use power tools
to tighten the bolts.
2b. You can use the included cover to ll the clamp hole
when attaching to a racing seat.
WARNING:
Do not use the wheel rim as leverage to assist you when
getting into or out of your racing seat as this will damage
your PRO Racing Wheel.
M6X1
M6X1 L = T + 15MM
T L
2a
2b
6 ENGLISH
3 ATTACHING WHEEL RIM
3a. Connect the wheel rim to the wheel base,
ensuring that the sha is aligned correctly.
3b. Attach the wheel by locking the quick
releasering in its “squeezed” position.
There’sno need to hold it there while
attaching the wheel rim.
3c. Push the wheel rim onto the sha on
thewheel base until you hear the quick
release ring lock into position.
3a
3b
3c
*click*
*click*
7 ENGLISH
POWER ON AND SOFTWARE
1 Power on the wheel by pressing the Power button on
thefrontof the wheel base. The wheel rim will spin slightly
tocheck its calibration and then centre itself.
2 The settings display on the wheel base will then prompt you
to choose which platform you wish to play on.
3 Use either the le or the right dial on the steering wheel
toselect the platform and then push the dial in until it clicks
to make your selection.
4 Press the PS button in order to log in and sync the wheel
withyour preferred player prole.
To play on your console simply load the compatible game
of your choice and start racing.
On PC you must rst download and install the
latest version of the Logitech G HUB soware
atwww.logitechG.com/GHUB. Once that is installed
youcanbegin racing in the title of your choice.
Rememberthat some titles will require that you rst
congure the wheel in the control settings of the game
before it will function.
You may also wish to make use of the G923 compatibility
modefor some titles which may be required to either make
the wheel work, or to simplify set up. Details of how to access
this can be found in the section of the manual that covers
thesettings display.
Once nished, to power o the wheel, press and hold
thepowerbutton for 2 seconds.
ON
1 2
3 4
www.logitechG.com/ghub
8 ENGLISH
FEATURES
1 L1 (Gear Down)
2 Triangle, Square and L2 buttons
3 Directional Pad
4 Create (SHARE for PS4 consoles) and
L3 buttons
5 Le Dual Clutch Paddle
6 Le Adjustment Dial and push button*
7 R1 (Gear Up)
8 Cross, Circle and R2 buttons
9 Options and R3 buttons
10 Right Dual Clutch Paddle
11 Right Adjustment Dial and push button*
12 PS button
1 OLED Settings display and RPM LEDs
2 Settings button
3 Power button
4 Clamp recess cover
3
5
6
4
17
9
11
12
10
8
2
1 2
3
4
9 ENGLISH
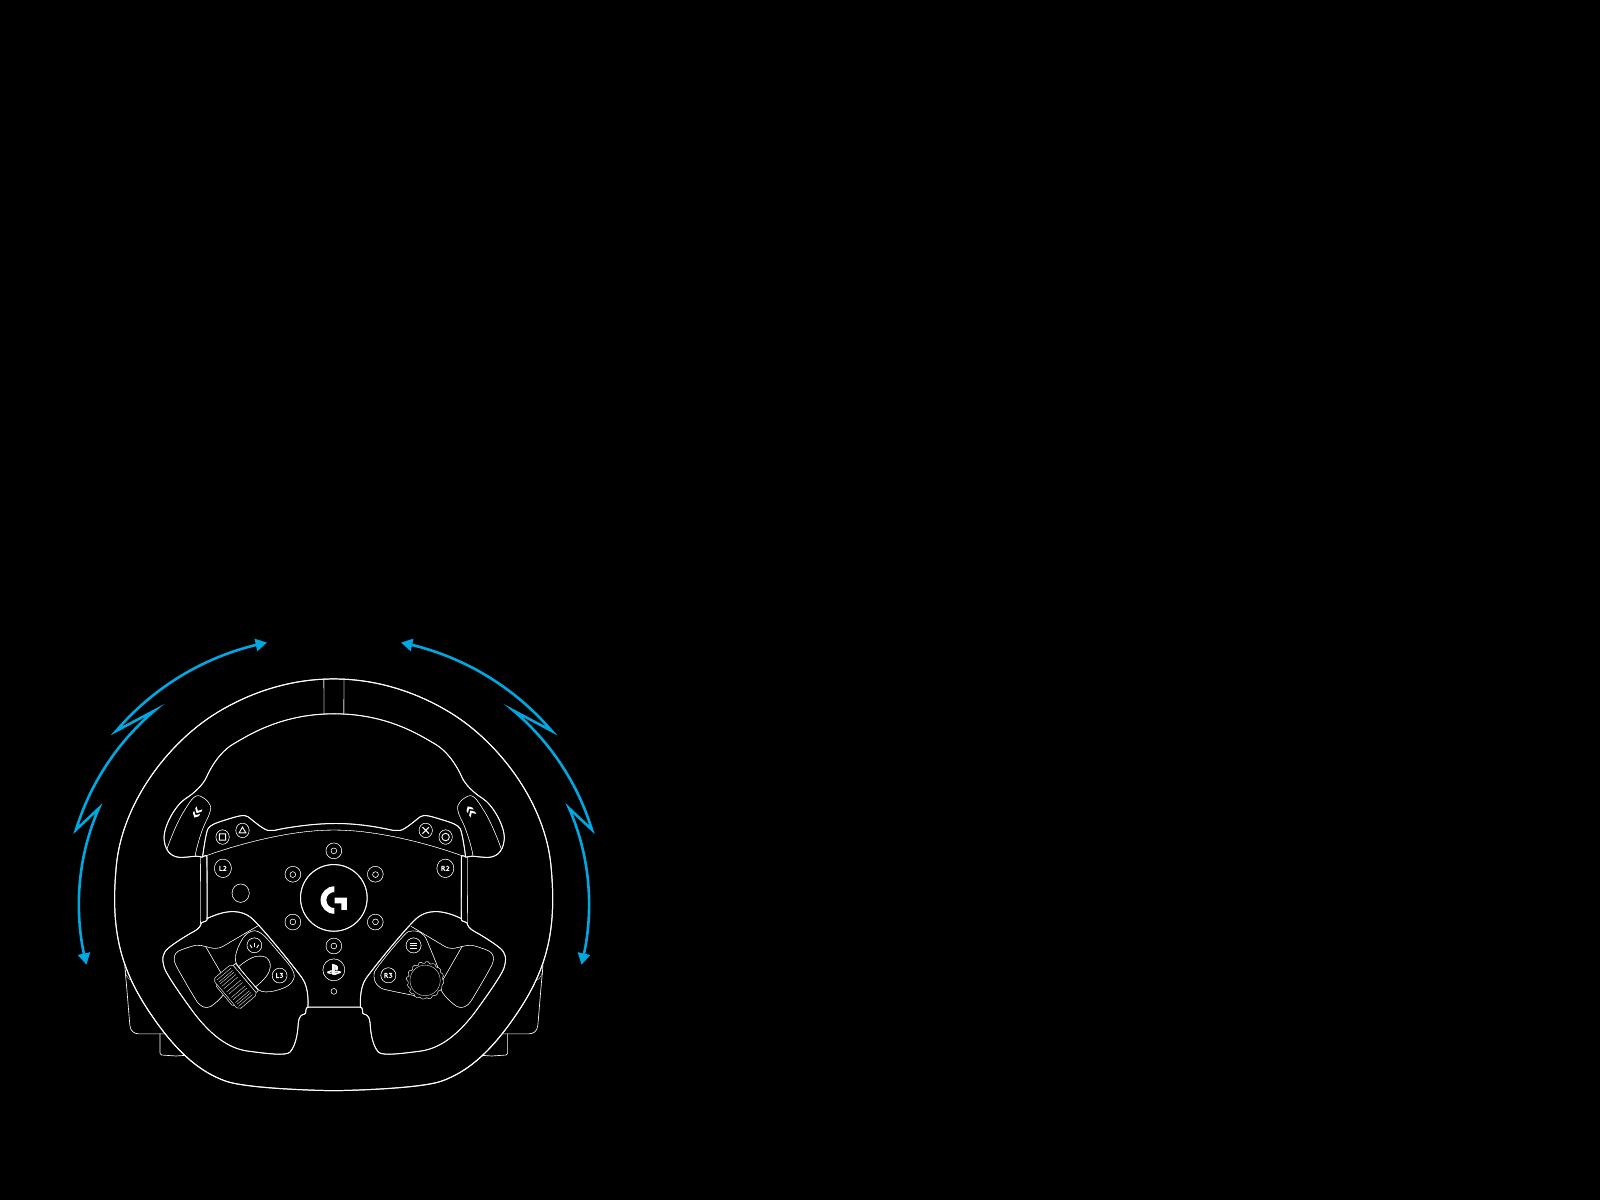
Your Logitech G PRO Racing Wheel features a direct drive motor
thatwill provide force feedback with supported games and systems.
Insupported titles, you will also experience our next generation
approach to force feedback: TRUEFORCE.
TRUEFORCE integrates directly with game physics and audio
tounlockhigh-denition, real-time force feedback. Tire grip,
suspension, weight, horsepower — even unique engine sound
resonance — are immediately and accurately felt through the wheel.
For a list of supported titles visit
logitechG.com/spport/PRO_Wheel_ps
FORCE FEEDBACK
NOTE:
The direct drive motor in your wheel can produce very high levels
oftorque (up to 11 Nm). Please exercise caution when using
thewheeland set the level of force feedback that is within the limits
oftheperson using it.
This product is not intended for use by small children.
If you crash a vehicle whilst racing in a simulation title, the wheel may
pull itself out of your hands. Do not attempt to stop the wheel from
moving as this may result in injury. You can usually stop the wheel
by pausing the game. On PC, this can be done using your keyboard
(oenthe Escape key, but other games may dier). On console,
youmay need to unplug the USB cable of your wheel from the console.
Under heavy use, you may notice a slight odor from the exhaust at the
back of the wheel. This is normal and will fade over time.
Additionally, if you run exceptionally long racing sessions with
thewheel at maximum torque, certain parts of the wheel may become
warm to the touch, especially the quick release collar on the steering
wheel and the quick release adapter on the wheel base. Insuch
circumstances, it is recommended that you allow your PRO wheel
tocool down before removing the wheel rim and / or moving the wheel
base from where it is mounted.
10 ENGLISH
SETTINGS
Press the Settings button on the wheel base to access the Settings
menu. In the settings menu you can congure dierent settings
for your wheel (and pedals, if attached) in 5 dierent onboard
proles or, ifconnected to a PC, directly adjust the currently active
prole inGHUB. You can then easily switch between proles when
youchange game titles (or even when you change cars in the same
game title). All settings are “live adjustable” and will take eect
assoon as you nish adjusting.
The 5 dierent onboard proles can be renamed using G HUB.
Ifyouare racing on console, you can connect the PRO Wheel
toyourPC, rename the onboard proles and those names will still be
present when you connect back to your console.
Menu Navigation
Use either of the adjustment dials on the wheel to scroll up/down
menus or adjust a setting. Press the dial in to select or to conrm
aselection.
11 ENGLISH
Prole
Change the active prole for the wheel. You have a choice
of5onboard proles. On PC, you have an additional option called
G HUB; if you select this, then the wheel will use the settings for
thecurrently active prole in G HUB. If you make adjustments to any
of the settings on the wheel using the settings display then those
changes will also be reected in the currently active prole in G HUB.
The names of the onboard proles can be edited using G HUB.
Strength
Allows you to set the overall peak strength of the force feedback
feltthrough the wheel, between 1 and 11Nm of torque.
12 ENGLISH
Force Feedback Filter
Each driving simulation will run the physics and force feedback
atdierent speeds - some only at 60Hz, with others 300Hz or more.
With a highly responsive direct drive wheel, it’s desirable to lter out
frequencies above which the simulation can’t run at. If you leave
thisat its default AUTO setting, then this will cover the vast majority
of simulations and provide a smoother experience. If you wish, you can
manually adjust this with settings from 1 (least lter) to 15 (maximum
lter), allowing you to feel some more of the smaller eects that some
titles produce, at the expense of introducing a bit more noise into
theforce feedback.
TF Audio
Sets the strength of the Audio eects output for games that support
TRUEFORCE. The Audio eects will replicate dierent aspects of
yourracing title such as engine note, tire grip or road surface.
NOTE:
It is usually recommended that the Trueforce Audio setting is set
at alow enough level to receive the additional information that
itprovides without overwhelming the overall experience. Think of
the level of vibration that you get through the wheel of an actual
car and aim for that. Some titles provide additional levels of control
within their control options menus by allowing you to adjust individual
elements of the audio; separating out the engine, tire and road audio,
for example.
13 ENGLISH
Angle
Change the overall operating angle range of the wheel. For most game
titles, titles you should leave this at 1080 degrees and the titles will
handle matching the correct range of rotation for the car that you’re
driving. For those that don’t or if you want to override what the game
is doing, then this will enable you to do so.
Brake Force
This setting is only available if a compatible set of pedals are attached
to the PRO Wheel. It allows you to set the level of force required to
achieve 100% braking. As you adjust the level, you can press the brake
pedal to see the axis output, making it easy to tune to your preference.
Dampener
This setting enables you to alter the feeling of the wheel in a manner
that can make it feel more realistic. Direct Drive wheels are far
more responsive than older force feedback wheels and this can
result in some unusual behavior when running older titles that don’t
support TRUEFORCE, the most common of which is when driving
down astraight part of a track. In some titles, you may experience
a sensation where the wheel starts to move le and right rapidly
around the centre. This is the wheel reacting to signals from the game
telling it to stay centered, but over-reacting due to the responsiveness
ofthe wheel. Setting a level of Dampening will help lter this out,
butremember that any level of dampening will result in an increasingly
less responsive wheel as you increase the percentage. We therefore
recommend keeping the setting as low as possible to avoid impacting
the performance of the wheel.
14 ENGLISH
L Paddle / R Paddle Mode
The Dual Clutch Paddles can be assigned to one of several
dierentaxes:
Clutch
Gas
Brake
Handbrake
Axis A
Axis B
Axis A/B are a pair of additional non-specic axes that can be
assigned to other functionalities outside of the normal sim racing
scenarios e.g. look le / right. Support for these in console titles
willdepend on the developer.
Gas and Brake enable dierently-abled gamers to still participate
insim racing with the essential analog control over those functions
thats needed for better control.
Handbrake control is a key requirement for driing and rally racing.
Clutch opens up the possibility of enabling dual clutch functionality
on the wheel. Dual clutch can be better thought of as a launch assist
feature that will enable maximum traction and launch speed from grid
starts in races.
NOTE:
In order for the Dual Clutch functionality to operate, both paddles
need to be assigned to the Clutch function.
On console titles, the Handbrake, Axis A and Axis B functions
maynot respond as support for these needs to be added by
thegamedeveloper.
15 ENGLISH
Clutch Bite
Use this setting to tune the Dual Clutch paddles axis value to
thegame/car you are using and achieve perfect standing starts.
Seethe next section of the manual for more details.
RPM Mode
The RPM LEDs have several preset patterns from which you can choose.
In addition, you can create your own custom patterns with G HUB
andsave them to the onboard memory of the wheel.
RPM Brightness
Adjusts the overall level of brightness of the RPM LEDs.
Home Screen
You can use the options here to change what is shown on the Settings
display when not adjusting the settings of the wheel or pedals.
TheSettings display on your PRO Wheel has four modes of display
1 Dynamic
2 Test
3 Prole
4 Torque
16 ENGLISH
Dynamic
Supports potential future updates to the screen functionality.
Defaultsto the Test function.
Test
By default when you turn your wheel on and there is no racing
gametitle running, the display will be showing the Test screen.
Onthisscreen, you can move the wheel, the dual clutch paddles
andpress the pedals of a compatible pedal set (if attached)
toseetheaxis response.
Prole
Displays which prole you currently have the wheel set to.
Torque
Displays the live and average torque output of the wheel.
17 ENGLISH
Compatibility Mode
On PC especially, some racing titles won’t recognize the PRO Wheel
automatically. When this occurs, you can usually recongure
thecontrols of the game and assign the PRO Wheel so that itworks,
butinsome titles, you may nd it easier to enable the G923
compatibility mode.
When you choose the G923 option in the compatibility mode,
thewheel will restart and appear to the PC/console as if it is
theG923wheel. Those games which have native support for
theG923will therefore automatically set the wheel up so that it works
(it’salsoessential that you have a compatible set of pedals attached
tothe wheel as well).
In the G923 mode, many of the settings mentioned above are not
available. You will be able to adjust Strength, FFB Filter, Dampener
and Brake Force, but your only other option is the Compatibility Mode,
which you can use to switch the wheel back to its original PRO Wheel
mode. The Dual Clutch paddles will only function as Gas and Brake in
this mode. It is therefore recommended that you remain in PRO Wheel
mode whenever possible in order to always have access to the full
feature set of the wheel.
Platform
By default, your PRO Wheel will always prompt you to choose which
platform you wish to use when you power it on. If you wish to stop
thisfrom happening, then you can force the wheel to always start
inone mode (for example, you only play on PC). The Platform setting
has anumber of options:
On Startup (default)
Consoles (these will change, depending on which version of
thePROWheel you have)
PC
Simply select the choice that you wish and the next time the wheel
ispowered on, it will choose that option for you automatically.
18 ENGLISH
1 In the game title that you want to use, start a practice or time trial
session in the car of your choice.
2 Navigate to the D Clutch Bite setting on the Settings display
ofyourPRO Wheel.
3 Fully press the le Dual Clutch Paddle, select 1st gear using
thegearpaddle and engage full gas / throttle.
4 Whilst keeping the Dual Clutch Paddle fully pressed, use the right
adjustment dial on the wheel to adjust the value on the display
untilyou see the car beginning to move onscreen.
5 Now experiment with standing starts using the directions below
and adjust the value until you’re happy with the traction that
you’regetting in-game.
SETTING THE DUAL CLUTCH
Using a dual clutch system from a grid start in a race enables you
toachieve maximum traction without the need to nd the bite point
of your clutch pedal - this can give you a signicant advantage at
thestart of a race. To use the dual clutch system in-game:
1 At race start, fully depress both of the Dual Clutch Paddles.
2 Select rst gear using the Gear Up Paddle and fully depress the gas
pedal.
3 As soon as you get the green light for race start, immediately
release the right Dual Clutch Paddle. The car should start moving
asthe bite point of the clutch is engaged.
4 Smoothly release the le Dual Clutch Paddle in order to achieve
maximum traction.
It’s worth practicing this last step and modifying the bite point
settingseveral times to nd a method that works for you.
Onceyouhave it perfected, this feature can help make up several
places on the grid.
NOTE:
Support for the dual clutch function is not possible in some games.
Alist of games that support the dual clutch feature can be found at
logitechG.com/support/pro-wheel-ps
USING THE DUAL CLUTCH
19 ENGLISH
G HUB AND CUSTOM RPM PATTERNS
G HUB WHEEL SETTINGS
Logitech G HUB enables the following features on the PRO Wheel:
Button programming with proles that can be linked to games
Adjustment of wheel settings, such as Rotation Angle and
TRUEFORCE strength
Creation of custom RPM LED patterns
Edit game proles and custom RPM LED patterns in onboard
memory
Testing of the wheel’s various axes
Sensitivity
Alters the output response of the wheel to be more or less sensitive.
Leaving this slider at 50% will provide a linear 1:1 output. Between51%
and 100% will make the wheel increasingly more sensitive around
thecentre movement of the wheel. Between 0% and 49% will make
the wheel increasingly less sensitive around the center movement
ofthe wheel.
All other settings match those present in the Settings display on
thewheel base and are described earlier in the manual.
G HUB LIGHTSYNC/RPM LED SETTINGS
The PRO Racing Wheel has a number of default RPM lighting patterns
already set in its memory and available to choose within G HUB.
Game developers can also directly address the RPM LEDs if they wish
to, recreating the exact behavior of the car that they are simulating.
However, you can also edit custom lighting patterns that are present
in the memory on the wheel. This enables console users to also take
advantage of this feature - set everything up on your Windows PC,
save to the wheels memory and then connect it to your console.
Any eect, including your own custom eects can be copied
usingthecopy icon that appears to the right of any eect when
youselectit.
Overall brightness of the RPM LEDs can be changed using the slider
underneath the drop down menu of eects.
20 ENGLISH
SETTING CUSTOM RPM PATTERN
Click the drop down menu and choose one of the Eects On Device
then click the Edit button:
  • Page 1 1
  • Page 2 2
  • Page 3 3
  • Page 4 4
  • Page 5 5
  • Page 6 6
  • Page 7 7
  • Page 8 8
  • Page 9 9
  • Page 10 10
  • Page 11 11
  • Page 12 12
  • Page 13 13
  • Page 14 14
  • Page 15 15
  • Page 16 16
  • Page 17 17
  • Page 18 18
  • Page 19 19
  • Page 20 20
  • Page 21 21
  • Page 22 22
  • Page 23 23
  • Page 24 24
  • Page 25 25
  • Page 26 26
  • Page 27 27
  • Page 28 28
  • Page 29 29
  • Page 30 30
  • Page 31 31
  • Page 32 32
  • Page 33 33
  • Page 34 34
  • Page 35 35
  • Page 36 36
  • Page 37 37
  • Page 38 38
  • Page 39 39
  • Page 40 40
  • Page 41 41
  • Page 42 42
  • Page 43 43
  • Page 44 44
  • Page 45 45
  • Page 46 46
  • Page 47 47
  • Page 48 48
  • Page 49 49
  • Page 50 50
  • Page 51 51
  • Page 52 52
  • Page 53 53
  • Page 54 54
  • Page 55 55
  • Page 56 56
  • Page 57 57
  • Page 58 58
  • Page 59 59
  • Page 60 60
  • Page 61 61
  • Page 62 62
  • Page 63 63
  • Page 64 64
  • Page 65 65
  • Page 66 66
  • Page 67 67
  • Page 68 68
  • Page 69 69
  • Page 70 70
  • Page 71 71
  • Page 72 72
  • Page 73 73
  • Page 74 74
  • Page 75 75
  • Page 76 76
  • Page 77 77
  • Page 78 78
  • Page 79 79
  • Page 80 80
  • Page 81 81
  • Page 82 82
  • Page 83 83
  • Page 84 84
  • Page 85 85
  • Page 86 86
  • Page 87 87
  • Page 88 88
  • Page 89 89
  • Page 90 90
  • Page 91 91
  • Page 92 92
  • Page 93 93
  • Page 94 94
  • Page 95 95
  • Page 96 96
  • Page 97 97
  • Page 98 98
  • Page 99 99
  • Page 100 100
  • Page 101 101
  • Page 102 102
  • Page 103 103
  • Page 104 104
  • Page 105 105
  • Page 106 106
  • Page 107 107
  • Page 108 108
  • Page 109 109
  • Page 110 110
  • Page 111 111
  • Page 112 112
  • Page 113 113
  • Page 114 114
  • Page 115 115
  • Page 116 116
  • Page 117 117
  • Page 118 118
  • Page 119 119
  • Page 120 120
  • Page 121 121
  • Page 122 122
  • Page 123 123
  • Page 124 124
  • Page 125 125
  • Page 126 126
  • Page 127 127
  • Page 128 128
  • Page 129 129
  • Page 130 130
  • Page 131 131
  • Page 132 132
  • Page 133 133
  • Page 134 134
  • Page 135 135
  • Page 136 136
  • Page 137 137
  • Page 138 138
  • Page 139 139
  • Page 140 140
  • Page 141 141
  • Page 142 142
  • Page 143 143
  • Page 144 144
  • Page 145 145
  • Page 146 146
  • Page 147 147
  • Page 148 148
  • Page 149 149
  • Page 150 150
  • Page 151 151
  • Page 152 152
  • Page 153 153
  • Page 154 154
  • Page 155 155
  • Page 156 156
  • Page 157 157
  • Page 158 158
  • Page 159 159
  • Page 160 160
  • Page 161 161
  • Page 162 162
  • Page 163 163
  • Page 164 164
  • Page 165 165
  • Page 166 166
  • Page 167 167
  • Page 168 168
  • Page 169 169
  • Page 170 170
  • Page 171 171
  • Page 172 172
  • Page 173 173
  • Page 174 174
  • Page 175 175
  • Page 176 176
  • Page 177 177
  • Page 178 178
  • Page 179 179
  • Page 180 180
  • Page 181 181
  • Page 182 182
  • Page 183 183
  • Page 184 184
  • Page 185 185
  • Page 186 186
  • Page 187 187
  • Page 188 188
  • Page 189 189
  • Page 190 190
  • Page 191 191
  • Page 192 192
  • Page 193 193
  • Page 194 194
  • Page 195 195
  • Page 196 196
  • Page 197 197
  • Page 198 198
  • Page 199 199
  • Page 200 200
  • Page 201 201
  • Page 202 202
  • Page 203 203
  • Page 204 204
  • Page 205 205
  • Page 206 206
  • Page 207 207
  • Page 208 208
  • Page 209 209
  • Page 210 210
  • Page 211 211
  • Page 212 212
  • Page 213 213
  • Page 214 214
  • Page 215 215
  • Page 216 216
  • Page 217 217
  • Page 218 218
  • Page 219 219
  • Page 220 220
  • Page 221 221
  • Page 222 222
  • Page 223 223
  • Page 224 224
  • Page 225 225
  • Page 226 226
  • Page 227 227
  • Page 228 228
  • Page 229 229
  • Page 230 230
  • Page 231 231
  • Page 232 232
  • Page 233 233
  • Page 234 234
  • Page 235 235
  • Page 236 236
  • Page 237 237
  • Page 238 238
  • Page 239 239
  • Page 240 240
  • Page 241 241
  • Page 242 242
  • Page 243 243
  • Page 244 244
  • Page 245 245
  • Page 246 246
  • Page 247 247
  • Page 248 248
  • Page 249 249
  • Page 250 250
  • Page 251 251
  • Page 252 252
  • Page 253 253
  • Page 254 254
  • Page 255 255
  • Page 256 256
  • Page 257 257
  • Page 258 258
  • Page 259 259
  • Page 260 260
  • Page 261 261
  • Page 262 262
  • Page 263 263
  • Page 264 264
  • Page 265 265
  • Page 266 266
  • Page 267 267
  • Page 268 268
  • Page 269 269
  • Page 270 270
  • Page 271 271
  • Page 272 272
  • Page 273 273
  • Page 274 274
  • Page 275 275
  • Page 276 276
  • Page 277 277
  • Page 278 278
  • Page 279 279
  • Page 280 280
  • Page 281 281
  • Page 282 282
  • Page 283 283
  • Page 284 284
  • Page 285 285
  • Page 286 286
  • Page 287 287
  • Page 288 288
  • Page 289 289
  • Page 290 290
  • Page 291 291
  • Page 292 292
  • Page 293 293
  • Page 294 294
  • Page 295 295
  • Page 296 296
  • Page 297 297
  • Page 298 298
  • Page 299 299
  • Page 300 300
  • Page 301 301
  • Page 302 302
  • Page 303 303
  • Page 304 304
  • Page 305 305
  • Page 306 306
  • Page 307 307
  • Page 308 308
  • Page 309 309
  • Page 310 310
  • Page 311 311
  • Page 312 312
  • Page 313 313
  • Page 314 314
  • Page 315 315
  • Page 316 316
  • Page 317 317
  • Page 318 318
  • Page 319 319
  • Page 320 320
  • Page 321 321
  • Page 322 322
  • Page 323 323
  • Page 324 324
  • Page 325 325
  • Page 326 326
  • Page 327 327
  • Page 328 328
  • Page 329 329
  • Page 330 330
  • Page 331 331
  • Page 332 332
  • Page 333 333
  • Page 334 334
  • Page 335 335
  • Page 336 336
  • Page 337 337
  • Page 338 338
  • Page 339 339
  • Page 340 340
  • Page 341 341
  • Page 342 342
  • Page 343 343
  • Page 344 344
  • Page 345 345
  • Page 346 346
  • Page 347 347
  • Page 348 348
  • Page 349 349
  • Page 350 350
  • Page 351 351
  • Page 352 352
  • Page 353 353
  • Page 354 354
  • Page 355 355
  • Page 356 356
  • Page 357 357
  • Page 358 358
  • Page 359 359
  • Page 360 360
  • Page 361 361
  • Page 362 362
  • Page 363 363
  • Page 364 364
  • Page 365 365
  • Page 366 366
  • Page 367 367
  • Page 368 368
  • Page 369 369
  • Page 370 370
  • Page 371 371
  • Page 372 372
  • Page 373 373
  • Page 374 374
  • Page 375 375
  • Page 376 376
  • Page 377 377
  • Page 378 378
  • Page 379 379
  • Page 380 380
  • Page 381 381
  • Page 382 382
  • Page 383 383
  • Page 384 384
  • Page 385 385
  • Page 386 386
  • Page 387 387
  • Page 388 388
  • Page 389 389
  • Page 390 390
  • Page 391 391
  • Page 392 392
  • Page 393 393
  • Page 394 394
  • Page 395 395
  • Page 396 396
  • Page 397 397
  • Page 398 398
  • Page 399 399
  • Page 400 400
  • Page 401 401
  • Page 402 402
  • Page 403 403
  • Page 404 404
  • Page 405 405
  • Page 406 406
  • Page 407 407
  • Page 408 408
  • Page 409 409
  • Page 410 410
  • Page 411 411
  • Page 412 412
  • Page 413 413
  • Page 414 414
  • Page 415 415
  • Page 416 416
  • Page 417 417
  • Page 418 418
  • Page 419 419
  • Page 420 420
  • Page 421 421
  • Page 422 422
  • Page 423 423
  • Page 424 424
  • Page 425 425
  • Page 426 426
  • Page 427 427
  • Page 428 428
  • Page 429 429
  • Page 430 430
  • Page 431 431
  • Page 432 432
  • Page 433 433
  • Page 434 434
  • Page 435 435
  • Page 436 436
  • Page 437 437
  • Page 438 438
  • Page 439 439
  • Page 440 440
  • Page 441 441
  • Page 442 442
  • Page 443 443
  • Page 444 444
  • Page 445 445
  • Page 446 446
  • Page 447 447
  • Page 448 448
  • Page 449 449
  • Page 450 450
  • Page 451 451
  • Page 452 452
  • Page 453 453
  • Page 454 454
  • Page 455 455
  • Page 456 456
  • Page 457 457
  • Page 458 458
  • Page 459 459
  • Page 460 460
  • Page 461 461
  • Page 462 462
  • Page 463 463
  • Page 464 464
  • Page 465 465
  • Page 466 466
  • Page 467 467
  • Page 468 468
  • Page 469 469
  • Page 470 470
  • Page 471 471
  • Page 472 472
  • Page 473 473
  • Page 474 474
  • Page 475 475
  • Page 476 476
  • Page 477 477
  • Page 478 478
  • Page 479 479
  • Page 480 480
  • Page 481 481
  • Page 482 482
  • Page 483 483
  • Page 484 484
  • Page 485 485
  • Page 486 486
  • Page 487 487
  • Page 488 488
  • Page 489 489
  • Page 490 490
  • Page 491 491
  • Page 492 492
  • Page 493 493
  • Page 494 494
  • Page 495 495
  • Page 496 496
  • Page 497 497
  • Page 498 498
  • Page 499 499
  • Page 500 500
  • Page 501 501
  • Page 502 502
  • Page 503 503
  • Page 504 504
  • Page 505 505
  • Page 506 506
  • Page 507 507
  • Page 508 508
  • Page 509 509
  • Page 510 510
  • Page 511 511
  • Page 512 512
  • Page 513 513
  • Page 514 514
  • Page 515 515
  • Page 516 516
  • Page 517 517
  • Page 518 518
  • Page 519 519
  • Page 520 520
  • Page 521 521
  • Page 522 522
  • Page 523 523
  • Page 524 524
  • Page 525 525
  • Page 526 526
  • Page 527 527
  • Page 528 528
  • Page 529 529
  • Page 530 530
  • Page 531 531
  • Page 532 532
  • Page 533 533
  • Page 534 534
  • Page 535 535
  • Page 536 536
  • Page 537 537
  • Page 538 538
  • Page 539 539
  • Page 540 540
  • Page 541 541
  • Page 542 542
  • Page 543 543
  • Page 544 544
  • Page 545 545
  • Page 546 546
  • Page 547 547
  • Page 548 548
  • Page 549 549
  • Page 550 550
  • Page 551 551
  • Page 552 552
  • Page 553 553
  • Page 554 554
  • Page 555 555
  • Page 556 556
  • Page 557 557
  • Page 558 558
  • Page 559 559
  • Page 560 560
  • Page 561 561
  • Page 562 562
  • Page 563 563
  • Page 564 564
  • Page 565 565
  • Page 566 566
  • Page 567 567
  • Page 568 568
  • Page 569 569
  • Page 570 570
  • Page 571 571
  • Page 572 572
  • Page 573 573
  • Page 574 574
  • Page 575 575
  • Page 576 576
  • Page 577 577
  • Page 578 578
  • Page 579 579
  • Page 580 580
  • Page 581 581
  • Page 582 582
  • Page 583 583
  • Page 584 584
  • Page 585 585
  • Page 586 586
  • Page 587 587
  • Page 588 588
  • Page 589 589
  • Page 590 590
  • Page 591 591
  • Page 592 592
  • Page 593 593
  • Page 594 594
  • Page 595 595
  • Page 596 596
  • Page 597 597
  • Page 598 598
  • Page 599 599
  • Page 600 600
  • Page 601 601
  • Page 602 602
  • Page 603 603
  • Page 604 604
  • Page 605 605
  • Page 606 606
  • Page 607 607
  • Page 608 608
  • Page 609 609
  • Page 610 610
  • Page 611 611
  • Page 612 612
  • Page 613 613
  • Page 614 614
  • Page 615 615
  • Page 616 616
  • Page 617 617
  • Page 618 618
  • Page 619 619
  • Page 620 620
  • Page 621 621
  • Page 622 622
  • Page 623 623
  • Page 624 624
  • Page 625 625
  • Page 626 626
  • Page 627 627
  • Page 628 628
  • Page 629 629
  • Page 630 630
  • Page 631 631
  • Page 632 632
  • Page 633 633
  • Page 634 634
  • Page 635 635
  • Page 636 636
  • Page 637 637
  • Page 638 638
  • Page 639 639
  • Page 640 640
  • Page 641 641
  • Page 642 642
  • Page 643 643
  • Page 644 644
  • Page 645 645
  • Page 646 646
  • Page 647 647
  • Page 648 648
  • Page 649 649
  • Page 650 650
  • Page 651 651
  • Page 652 652
  • Page 653 653
  • Page 654 654
  • Page 655 655
  • Page 656 656
  • Page 657 657
  • Page 658 658
  • Page 659 659
  • Page 660 660
  • Page 661 661
  • Page 662 662
  • Page 663 663
  • Page 664 664
  • Page 665 665
  • Page 666 666
  • Page 667 667
  • Page 668 668
  • Page 669 669
  • Page 670 670
  • Page 671 671
  • Page 672 672
  • Page 673 673
  • Page 674 674
  • Page 675 675
  • Page 676 676
  • Page 677 677
  • Page 678 678
  • Page 679 679
  • Page 680 680
  • Page 681 681
  • Page 682 682
  • Page 683 683
  • Page 684 684
  • Page 685 685
  • Page 686 686
  • Page 687 687
  • Page 688 688
  • Page 689 689
  • Page 690 690
  • Page 691 691
  • Page 692 692
  • Page 693 693

Logitech PRO Užívateľská príručka

Typ
Užívateľská príručka

V iných jazykoch