Haier HAISJ64MC Používateľská príručka

Typ
Používateľská príručka
Instruction Manual For Induction Hob
ENGLISH
Manuale di istruzioni per piano di cottura ad induzione
ITALIANO
Instrukcja obsługi płyty indukcyjnej
POLSKI
Manuel d'utilisation de la table de cuisson à induction
FRANÇAIS
Manual de instrucciones de la encimera de inducción
ESPAÑOL
Bedienungsanleitung für Induktionskochfeld
DEUTSCH
Manual de instruções para placa de indução
PORTUGUÊS
Gebruiksaanwijzing inductiekookplaat
NEDERLANDS
Εγχειρίδιο οδηγιών για επαγωγική εστία
ΕΛΛΗΝΙΚΑ
Priručnik s uputama za uporabu indukcijske ploče za kuhanje
HRVATSKI
Uputstvo za upotrebu indukcione ploče
SRPSKI
Használati útmutató indukciós főzőlaphoz
MAGYAR
Návod k obsluze indukční varné desky
ČEŠTINA
Návod na obsluhu pre indukčnú varnú dosku
SLOVENČINA
HAISJ64MC
Thank you for purchasing the HAIER induction hob. Please read this instruction manual
carefully before using the hob and keep it in a safe place for future reference.
EN-2
Hereby, Candy Hoover Group Srl declares that the radio equipment is in compliance
with Directive 2014/53/EU and with the relevant Statutory Requirements (for the UKCA
market). The full text of the declaration of conformity is available at the following internet
address: www.candy-group.com
EN-3
ENGLISH
Haier
Haier
EN-4
Haier
EN-5
ENGLISH
1. Max. 1500/2000 W zone
2. Max. 1500/2000 W zone
3. Max. 1500/2000 W zone
4. Max. 1500/2000 W zone
5. Glass plate
6. Control panel
1. Heating zone power controls
2. “Cook with me function” control
3. Timer control
4. Keylock
5. ON/OFF control
1
23
4
6
5
1
3
245
EN-6
2
Touch Controls
• The controls respond to touch, so you don’t need to apply any pressure.
• Use the ball of your finger, not its tip.
• You will hear a beep each time a touch is registered.
• Make sure the controls are always clean, dry, and that there is no object (e.g. a utensil or a
cloth) covering them. Even a thin film of water may make the controls difficult to operate.
Do not use cookware with jagged edges or a curved base.
Always lift pans off the Induction hob – do not slide, or they may scratch the glass.
Make sure that the base of your pan is smooth, sits flat against the glass, and is the same size
as the cooking zone. Use pans whose diameter is as large as the graphic of the zone selected.
Using a pot a slightly wider energy will be used at its maximum efficiency. If you use smaller
pot efficiency could be less than expected. Pot less than 140 mm could be undetected by the
hob. Always centre your pan on the cooking zone.
• Only use cookware with a base suitable for induction cooking.
Look for the induction symbol on the packaging or on the bottom of the pan.
• You can check whether your cookware is suitable bycarrying out a magnet test.
Move a magnet towards the base of the pan. If it is attracted, the pan
is suitable for induction.
• If you do not have a magnet:
1. Put some water in the pan you want to check.
2. If does not flash in the display and the water is heating, the pan is suitable.
• Cookware made from the following materials is not suitable: pure stainless steel,
aluminium or copper without a magnetic base, glass, wood, porcelain, ceramic, and
earthenware.
Choosing the right Cookware
EN-7
ENGLISH
How to use
Start cooking
Touch the ON/OFF control for three seconds. After
power on, the buzzer beeps once, all displays show
“–” or “– –”, indicating that the induction hob has
entered the state of standby mode.
Place a suitable pan on the cooking zone that you
wish to use.
• Make sure the bottom of the pan and the surface
of the cooking zone are clean and dry.
Touching the heating zone slider control , and a
indicator next to the key will flash.
Select a heat setting by touching the slider control
• If you don’t choose a heat setting within 1 minute,
the Induction hob will automatically switch off. You
will need to start again at step 1.
• You can modify the heat setting at any time during
cooking.
If the display flashes alternately with the heat setting
This means that:
• you have not placed a pan on the correct cooking zone or,
• the pan you’re using is not suitable for induction cooking or,
• the pan is too small or not properly centered on the cooking zone.
No heating takes place unless there is a suitable pan on the cooking zone.

Finish cooking
Touching the heating zone selection control that
you wish to switch off.
POWER DOWN
POWER UP
EN-8
Using the Boost function
Activate the boost function
Cancel the Boost function
Touching the heating zone slider control
shows “b”.
Touching the heating zone slider control that
you wish to cancel the boost function.
It will disappear when the surface has cooled
down to a safe temperature. It can also be used
further pans, use the hotplate that is still hot.
• The function can work in any cooking zone.
• The cooking zone returns to its original setting after 5 minutes.
• If the original heat setting equals 0, it will return to 9 after 5 minutes.
to “ 0 ”. Make sure the display shows “0”.
EN-9
ENGLISH
Short touch the Timer “ ” and Timer “ ” at the same time.
Short touch the Timer “ ”and Timer “ ”
at the same time.
Locking the Controls
Pause Mode
Power Management Function
• You can lock the controls to prevent unintended use (for example children accidentally turning
the cooking zones on).
• When the controls are locked, all the controls except the ON/OFF control are disabled.
• You can pause the heating instead of shutting the hob off.
• When entering the Pause mode, all the controls except the ON/OFF control are disabled.
• it is possible to set a maximum power absorption level for the induction hob, choosing up to
different power ranges.
• induction hobs are able to limit themselves automatically in order to work at lower power level,
to avoid the risk of overloading.
Turn on the hob, then Press at the same
“ ”.
The timer indicator will show “ P5“ which
When the hob is in the lock mode, all the controls are disable except the ON/OFF ,
you can always turn the induction hob off with the ON/OFF control in an
emergency, but you shall unlock the hob first in the next operation.
All the indicator will show “ 11“
To enter pause mode
To enter Power Management Function
To exit pause mode
When the hob is in the pause mode, all the controls are disable except the ON/OFF ,
you can always turn the induction hob off with the ON/OFF control in an emergency.
The hob will shut down after 10min if you don’t exit the pause mode.
means power level 5 The default mode
.
is on .boH eht ffo rewop xaM
time keylock and Timer
The timer indicator will show “ Lo ”
To lock the controls
To unlock the controls
Touch and hold the lock control for a
while.
Touch and hold the lock control for a while.
EN-10
“ ” for confirmation.
To switch to another level
Confirmation and Exit Power Management Function
press +/- of the timer
Make sure the cooktop is turned on.
Note: you can use the minute minder even if you’re
not selecting any cooking zone.
Touch “+” the controls of the timer. The minder
indicator will start flashing and “10” will show
in the timer display.
Set the time by touching the “-” or “+” control
of the timer
Hint: Touch the “-” or “+” control of the timer once
to decrease or increase by 1 minute.
Touch and hold the “-” or “+” control of the timer to
decrease or increase by 10 minutes.
When the time is set, it will begin to count down
immediately. The display will show the remaining
time and the timer indicator will flash for 5 seconds.
Buzzer will beep for 30 seconds and the timer
indicator shows “- - “ when the setting time finished.
There are 5 power levels, from “P1” to “p5”.
The timer indicator will show one of them.
“P1” : the maximum power is 2.5.
“P2” : the maximum power is 3.5.
“P3” : the maximum power is 4.5.
“P4” : the maximum power is 5.5.
Then the hob will be turned off.
or
Timer control
a) Using the Timer as a Minute Minder
If you are not selecting any cooking zone
You can use the timer in two different ways:
• You can use it as a minute minder. In this case, the timer will not turn any cooking zone off
when the set time is up.
• You can set it to turn one or more cooking zones off after the set time is up.
“P5” : the maximum power is Max power of
the hob.
Press at the same time keylock control and
Timer
EN-11
ENGLISH
Set one zone
b) Setting the timer to turn one or more cooking zones off
set more zones:
Touching the heating zone slider control
Set the time by touching the or control of the timer
Hint: Touch the “-“ or “+” control of the timer
once will decrease or increase by 1 minute.
Touch and hold the ”-“ or “+”control of the timer
will decrease or increase by 10 minutes.
When the time is set, it will begin to count down
immediately. The display will show the remaining time
and the timer indicator flash for 5 seconds.
NOTE: The red dot next to power level indicator will
illuminate indicating that zone is selected.
When cooking timer expires, the corresponding
cooking zone will be switched off automatically.
The steps for setting more zones are similar to the steps of setting one zone;
When you set the time for several cooking zones simultaneously, decimal dots of the
relevant cooking zones are on. The minute display shows the min. timer. The dot of the
corresponding zone flashes.
The shown as below:
Once the countdown timer expires, the
corresponding zone will switch off. Then it will
show the new min. timer and the dot of
corresponding zone will flash.
The shown as right:
Touch the heating zone selection control, the corresponding timer will be shown in the
timer indicator.
(set to 15 minutes)
(set to 45 minutes)
(set to 30 minutes)
Other cooking zone will keep operating if they are turned on previously.
EN-12
Auto shut down is a safety protection function for your induction hob. It shut down automatically
if ever you forget to turn off your cooking. The default working times for various power levels
are shown in the below table:
When the pot is removed, the induction hob can stop heating immediately and the hob
automatically switch off after 2 minutes.
Power level
Default working timer (hour)
1
8
2
8
3
8
4
4
5
4
7
2
6
4
8
2
9
2
c) Cancel the timer
Default working times
induction hob following the instructions directly from the App.
When wi-fi ON: one dot will appear on the right side of the LED
When WIFI OFF: No dot will appear.
Touching the heating zone slider control that
you want to cancel the timer
Touch and hold the timer control “ - ”, the timer
decreases to “00” and the timer is cancelled.
People with a heart pace maker should consult with their doctor before using this unit.
“Cook with me function”
To make the pairing between Hob and APP use the following process:
Press 4 seconds the "Cook with me" button on the hob. Once the 4 seconds have passed, the
digit of the TIMER starts to blink with PA written on it and starts the pairing process. Now follow
the instructions from the App.
How to set Cook with me
First of all, you should download hOn App and install to your porta ble device. Then enroll your
press 4 seconds
Choose from the hOn App recipes menu or special
programs menu. Follow step by step the indications
on the App and when you have finished send the
parameters to the hob that will cook for you.
When the hob receives the command from the app,
the hob will beep for 2 times and blink for one second
to indicate that the instructions have been received.
EN-13
ENGLISH
If you want to get out of "Cook with me" function
change the power level of the zone.
EN-14
a. WIRELESS PARAMETERS
Technology Wi-Fi BLE NFC
Standard IEEE 802.11b/n/g Bluetooth v4.2, BR/EDR, BLE /
Frequency Band(s) [MHz] 2402-2480 2402-2480 /
Maximum Power [mW] 1500 1500 /
b. PRODUCT INFORMATION FOR NETWORKED EQUIPMENT
Product information for networked equipment
power consumption of the product in networked
standby if all wired network ports are connected
and all wireless network ports are activated:
1,5 W
How to activate wireless network port: Turn on the Hob
How to deactivate wireless network port: Turn off the Hob.
EN-15
Selection of cooking vessels
You may have a number of different cooking vessels
1. This induction hob can identify a variety of cooking vessels, which you can test by
one of the following methods:
Place the vessel on the cooking zone. If the corresponding cooking zone displays a
power level, then the vessel is suitable. If “U” flashes, then the vessel is not
suitable for use with the induction hob.
2. Hold a magnet to the vessel. If the magnet is attracted to the vessel is suitable for
use with the induction hob.
NB: The base of the vessel must contain magnetic material.
It must have flat bottom with a diameter according to the table 1 below.
3. Use only ferromagnetic cookwares made from enameled steel, cast iron or stainless
steel but compatible with induction
4. Use pans whose diameter of the ferromagnetic area (base of the pan) is in the range
of dimensions in the table below. (Table 1)
- If you use smaller pots, performance could be affected
- If you use pot with a diameter smaller than the one indicated in the table 1, pots
may not be detected
According to the dimension of the zone you can use pots of different diameters as picture
below:
Iron oil frying
Stainless steel
Iron pan Iron kettle
Enamel
stainless steel
kettle
Enamel cooking
utesil
Iron plate
ENGLISH
EN-16
5. If the ferromagnetic part covers only partially the base of the pan, only the
ferromagnetic area will heat up, the rest of the base may not heat up a sufficient
temperature for cooking.
6. If the ferromagnetic area is not homogeneous, but presents others material such as
aluminum this may affect the heating up and the pan detection.
If the base of the pan is similar to the pictures below the pan could be not detected.
The base diameter of induction cookware
Cooking zone
1 & 2 140
140
180
1803 & 4
Minimum(mm) Maximum(mm)
The above may vary according to the size of the pan and the material it is made from.
The induction hob is equipped with a self diagnostic function. With this test the technician is
able to check the function of several components without disassembling or dismounting the hob
from the working surface.
Troubleshooting
1) Failure code occur during customer using & Solution;
E1
E2
E3
F3/F6
F4/F7
F5/F8
F9/FA
FC /FD
Ceramic plate temperature sensor failure- -
short circuit. (F3 for 1#,F6 for2#)
Ceramic plate temperature sensor failure--
open circuit. (F4 for 1#,F7 for2#)
Ceramic plate temperature sensor failure—
invalid . (F5 for 1#,F8 for2#)
Temperature sensor of the IGBT failure.
short circuit/open circuit for 1#
Temperature sensor of the IGBT failure.
short circuit/open circuit for 2#
Supply voltage is above the rated voltage.
Supply voltage is below the rated voltage.
High temperature of ceramic plate sensor . 1#
Please inspect whether power supply is normal.
Power on after the power supply is normal.
Wait for the temperature of ceramic plate return
to normal.
Touch “ON/OFF” button to restart unit.
Wait for the temperature of IGBT return to
normal.
Touch “ON/OFF” button to restart unit.
Check whether the fan runs smoothly;
if not , replace the fan.
Check the connection or replace the ceramic
plate temperature sensor.
Replace the power board.
Failure code Problem
No Auto-Recovery
Auto-Recovery
Solution
E4
E5
E6
High temperature of ceramic plate sensor . 2#
High temperature of IGBT . 1#
High temperature of IGBT. 2#
EN-17
ENGLISH
The LED does not
come on when unit is plugged
in.
No power supplied. Check to see if plug is
secured tightly in outlet and
that outlet is working.
The accessorial power
board and the display
board connected failure.
Check the connection.
The accessorial power
board is damaged.
Replace the accessorial
power board.
The display board is
damaged.
Replace the display board.
The display board is
damaged.
Replace the display board.
High temperature of the
hob.
Ambient temperature may
be too high. Air Intake or
Air Vent may be blocked.
There is something wrong
with the fan.
Check whether the fan runs
smoothly
if not , replace the fan.
The power board is
damaged.
Replace the power board.
Pan Type is wrong.
Pot diameter is too small.
Cooker has overheated;
The power board and the
display b oard connected
failure;
Check the connection.
Replace the display board.
Replace the power board.
Replace the fan.
The display board of
communicate part is
damaged.
The Main board is
damaged.
The fan motor is damaged.
Unit is overheated. Wait for
temperature to return to
normal.
Push “ON/OFF” button to
restart unit.
Use the proper pot (refer to
the instruction manual.)
Some buttons can’t work, or
the LED display is not normal.
The Cooking Mode Indicator
comes on, but heating does
not start.
Heating stops suddenly
during operation and the
display flashes “u”.
Pan detection circuit is
damaged, replace the
power board.
Heating zones of the same
side ( Such as the first and
the second zone ) would
display “u” .
Fan motor sounds abnormal.
Failure Problem Solution A Solution B
2) Specific Failure & Solution
EN-18
This appliance is labelled in accordance with European Directive 2012/19/EU regarding electric
and electronic appliances (WEEE). The WEEE contain both polluting substances (that can have a
negative effect on the environment) and base elements (that can be reused). It is important that
the WEEE undergo specific treatements to correctly remove and dispose of the pollutants and
recover all the materials. Individuals can play an important role in ensuring that the WEEE do not
become an environmental problem; it is essential to follow a few basic rules;
- The WEEE should not be treated as domestic waste;
- The WEEE should be taken to dedicated collection areas managed by the town council or a
registered company.
In many countries, domestic collections may be available for large WEEEs. When you buy a new
appliance, the old one can be returned to the vendor who must accept it free of charge as one-off,
as long as the appliance is of an equivalent type and has the same functions as the purchased
appliance.
EN-19
ENGLISH
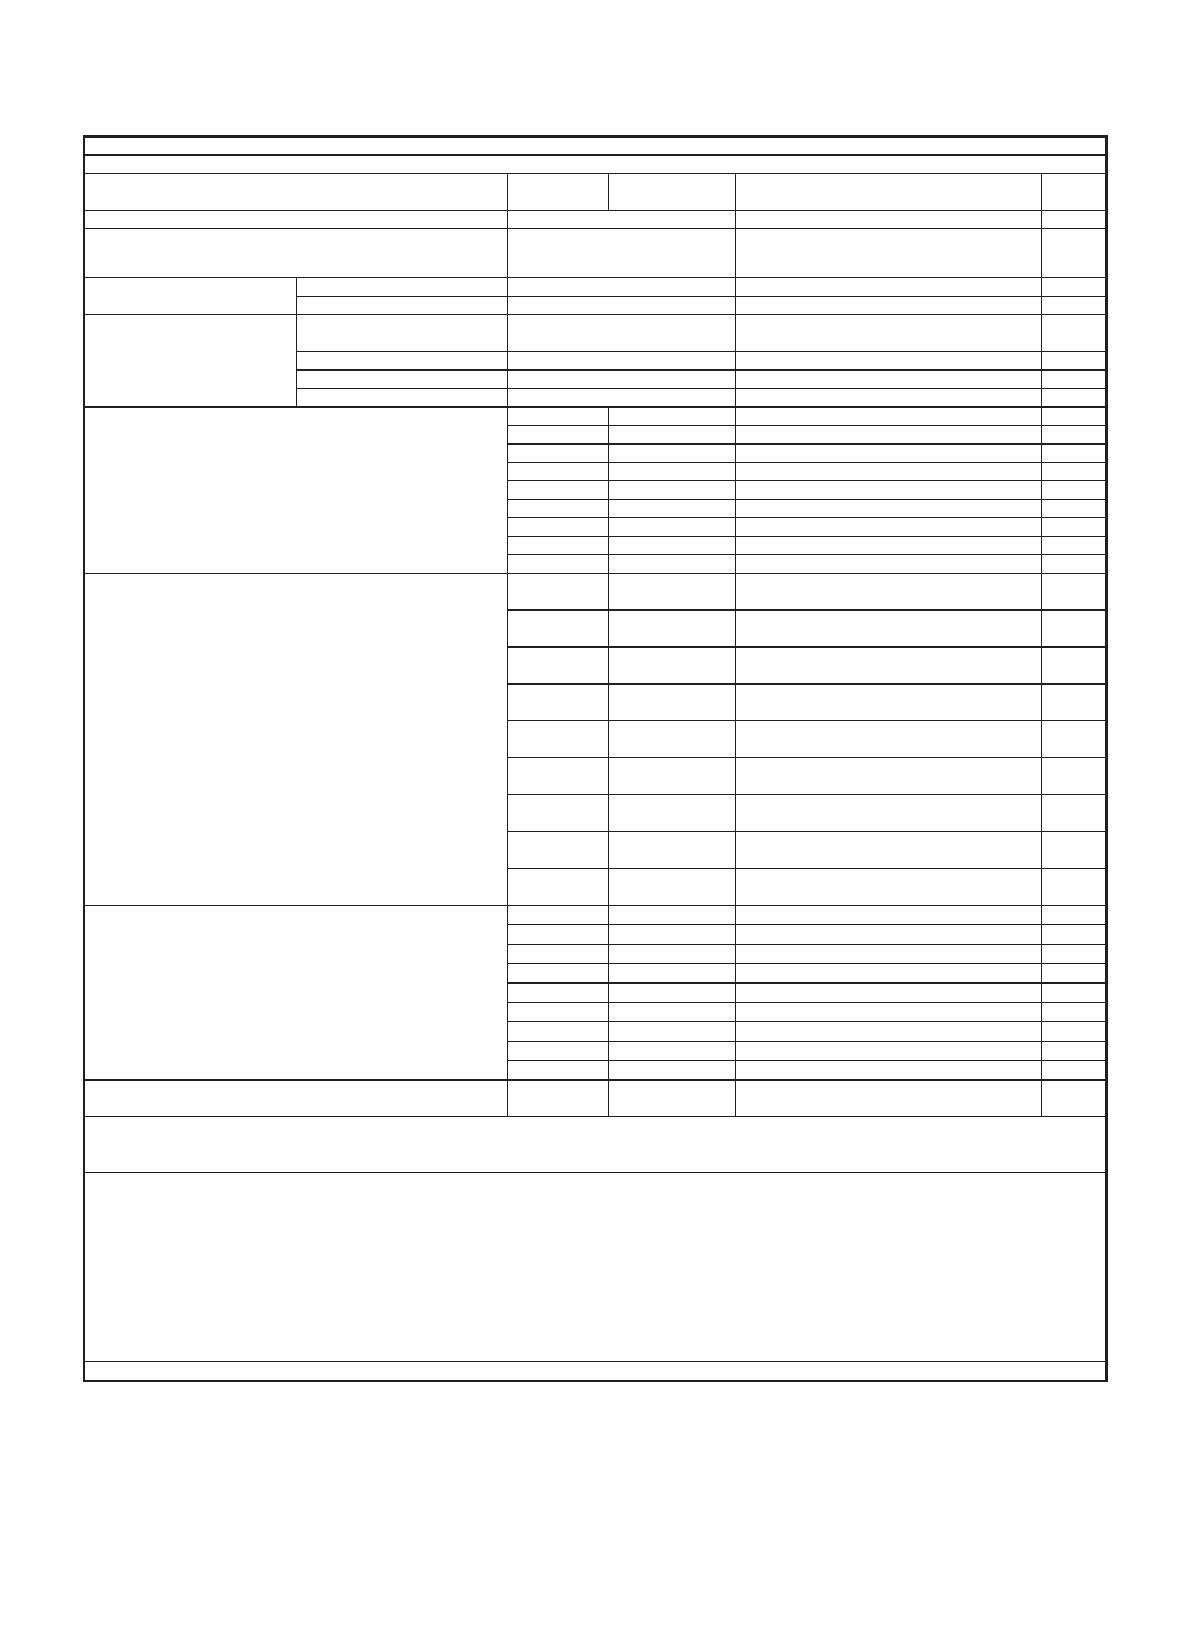
Posion Symbol Value Unit
HAISJ64MC
Electric Hob
zones 4
areas
Inducon cooking zones X
Inducon cooking cooking areas
radiant cooking zones
solid plates
Rear leØ18,0 cm
Rear central Ø cm
Rear right Ø 18,0 cm
Central leØ cm
Central central Ø cm
Central right Ø cm
Front leØ18,0 cm
Front central Ø cm
Front right Ø 18,0 cm
Rear leL
Wcm
Rear central L
Wcm
Rear right L
Wcm
Central leL
Wcm
Central central L
Wcm
Central right L
Wcm
Front leL
Wcm
Front central L
Wcm
Front right L
Wcm
Rear leECelectric cooking 186,2 Wh/kg
Rear central ECelectric cooking Wh/kg
Rear right ECelectric cooking 202,8 Wh/kg
Central leECelectric cooking Wh/kg
Central central ECelectric cooking Wh/kg
Central right ECelectric cooking Wh/kg
Front leECelectric cooking 182,4 Wh/kg
Front central ECelectric cooking Wh/kg
Front right ECelectric cooking 185,0 Wh/kg
ECelectric hob 189,1 Wh/kg
Suggesons for Energy Saving:
To obtain the best eciency of your hob, please place the pan in the centre of the cooking zone
Using a lid will reduce cooking mes and save energy by retaining the heat
• Minimise the amount of liquid or fat to reduce cooking me
• Start cooking on a high seng and reduce the seng when the food has heated through
• Use pans whose diameter is as large as the graphic of the zone selected
These informaon are to be considered as part of the appliance user manual
Standard applied : EN 60350-2 Household electric cooking appliances - Part 2: Hobs - Methods for measuring performance
For circular cooking zones or areas: diameter of useful surface area per
electric heated cooking zone, rounded to the nearest 5mm
For non-circular cooking zones or areas: length and width of useful
surface area per electric heated cooking zone or area, rounded to the
nearest 5mm
Energy consumpon for cooking zone or area calculated per kg
Energy consumpon for the hob calculated per kg
Heang technology (inducon
cooking zones and cooking areas,
radiant cooking zones, solid plates)
Type of hob:
Number of cooking zones and/or
areas
Model idencaon
Product Informaon for Domesc Electric Hobs Compliant to Commission Regulaon (EU) No 66/2014
EN-20
  • Page 1 1
  • Page 2 2
  • Page 3 3
  • Page 4 4
  • Page 5 5
  • Page 6 6
  • Page 7 7
  • Page 8 8
  • Page 9 9
  • Page 10 10
  • Page 11 11
  • Page 12 12
  • Page 13 13
  • Page 14 14
  • Page 15 15
  • Page 16 16
  • Page 17 17
  • Page 18 18
  • Page 19 19
  • Page 20 20
  • Page 21 21
  • Page 22 22
  • Page 23 23
  • Page 24 24
  • Page 25 25
  • Page 26 26
  • Page 27 27
  • Page 28 28
  • Page 29 29
  • Page 30 30
  • Page 31 31
  • Page 32 32
  • Page 33 33
  • Page 34 34
  • Page 35 35
  • Page 36 36
  • Page 37 37
  • Page 38 38
  • Page 39 39
  • Page 40 40
  • Page 41 41
  • Page 42 42
  • Page 43 43
  • Page 44 44
  • Page 45 45
  • Page 46 46
  • Page 47 47
  • Page 48 48
  • Page 49 49
  • Page 50 50
  • Page 51 51
  • Page 52 52
  • Page 53 53
  • Page 54 54
  • Page 55 55
  • Page 56 56
  • Page 57 57
  • Page 58 58
  • Page 59 59
  • Page 60 60
  • Page 61 61
  • Page 62 62
  • Page 63 63
  • Page 64 64
  • Page 65 65
  • Page 66 66
  • Page 67 67
  • Page 68 68
  • Page 69 69
  • Page 70 70
  • Page 71 71
  • Page 72 72
  • Page 73 73
  • Page 74 74
  • Page 75 75
  • Page 76 76
  • Page 77 77
  • Page 78 78
  • Page 79 79
  • Page 80 80
  • Page 81 81
  • Page 82 82
  • Page 83 83
  • Page 84 84
  • Page 85 85
  • Page 86 86
  • Page 87 87
  • Page 88 88
  • Page 89 89
  • Page 90 90
  • Page 91 91
  • Page 92 92
  • Page 93 93
  • Page 94 94
  • Page 95 95
  • Page 96 96
  • Page 97 97
  • Page 98 98
  • Page 99 99
  • Page 100 100
  • Page 101 101
  • Page 102 102
  • Page 103 103
  • Page 104 104
  • Page 105 105
  • Page 106 106
  • Page 107 107
  • Page 108 108
  • Page 109 109
  • Page 110 110
  • Page 111 111
  • Page 112 112
  • Page 113 113
  • Page 114 114
  • Page 115 115
  • Page 116 116
  • Page 117 117
  • Page 118 118
  • Page 119 119
  • Page 120 120
  • Page 121 121
  • Page 122 122
  • Page 123 123
  • Page 124 124
  • Page 125 125
  • Page 126 126
  • Page 127 127
  • Page 128 128
  • Page 129 129
  • Page 130 130
  • Page 131 131
  • Page 132 132
  • Page 133 133
  • Page 134 134
  • Page 135 135
  • Page 136 136
  • Page 137 137
  • Page 138 138
  • Page 139 139
  • Page 140 140
  • Page 141 141
  • Page 142 142
  • Page 143 143
  • Page 144 144
  • Page 145 145
  • Page 146 146
  • Page 147 147
  • Page 148 148
  • Page 149 149
  • Page 150 150
  • Page 151 151
  • Page 152 152
  • Page 153 153
  • Page 154 154
  • Page 155 155
  • Page 156 156
  • Page 157 157
  • Page 158 158
  • Page 159 159
  • Page 160 160
  • Page 161 161
  • Page 162 162
  • Page 163 163
  • Page 164 164
  • Page 165 165
  • Page 166 166
  • Page 167 167
  • Page 168 168
  • Page 169 169
  • Page 170 170
  • Page 171 171
  • Page 172 172
  • Page 173 173
  • Page 174 174
  • Page 175 175
  • Page 176 176
  • Page 177 177
  • Page 178 178
  • Page 179 179
  • Page 180 180
  • Page 181 181
  • Page 182 182
  • Page 183 183
  • Page 184 184
  • Page 185 185
  • Page 186 186
  • Page 187 187
  • Page 188 188
  • Page 189 189
  • Page 190 190
  • Page 191 191
  • Page 192 192
  • Page 193 193
  • Page 194 194
  • Page 195 195
  • Page 196 196
  • Page 197 197
  • Page 198 198
  • Page 199 199
  • Page 200 200
  • Page 201 201
  • Page 202 202
  • Page 203 203
  • Page 204 204
  • Page 205 205
  • Page 206 206
  • Page 207 207
  • Page 208 208
  • Page 209 209
  • Page 210 210
  • Page 211 211
  • Page 212 212
  • Page 213 213
  • Page 214 214
  • Page 215 215
  • Page 216 216
  • Page 217 217
  • Page 218 218
  • Page 219 219
  • Page 220 220
  • Page 221 221
  • Page 222 222
  • Page 223 223
  • Page 224 224
  • Page 225 225
  • Page 226 226
  • Page 227 227
  • Page 228 228
  • Page 229 229
  • Page 230 230
  • Page 231 231
  • Page 232 232
  • Page 233 233
  • Page 234 234
  • Page 235 235
  • Page 236 236
  • Page 237 237
  • Page 238 238
  • Page 239 239
  • Page 240 240
  • Page 241 241
  • Page 242 242
  • Page 243 243
  • Page 244 244
  • Page 245 245
  • Page 246 246
  • Page 247 247
  • Page 248 248
  • Page 249 249
  • Page 250 250
  • Page 251 251
  • Page 252 252
  • Page 253 253
  • Page 254 254
  • Page 255 255
  • Page 256 256
  • Page 257 257
  • Page 258 258
  • Page 259 259
  • Page 260 260
  • Page 261 261
  • Page 262 262
  • Page 263 263
  • Page 264 264

Haier HAISJ64MC Používateľská príručka

Typ
Používateľská príručka