20
HU
Mosószerek és mosandók
Mosószer-adagoló ók
A mosás eredményessége függ a mosószer helyes
adagolásától is: ha túl sokat adagol belőle, a mosás nem
lesz hatékonyabb, de hozzájárul ahhoz, hogy lerakódás
képződjön a mosógépben, valamint a környezetet is
jobban szennyezi.
! Ne használjon kézi mosószert, mert túlzottan sok hab
képződik.
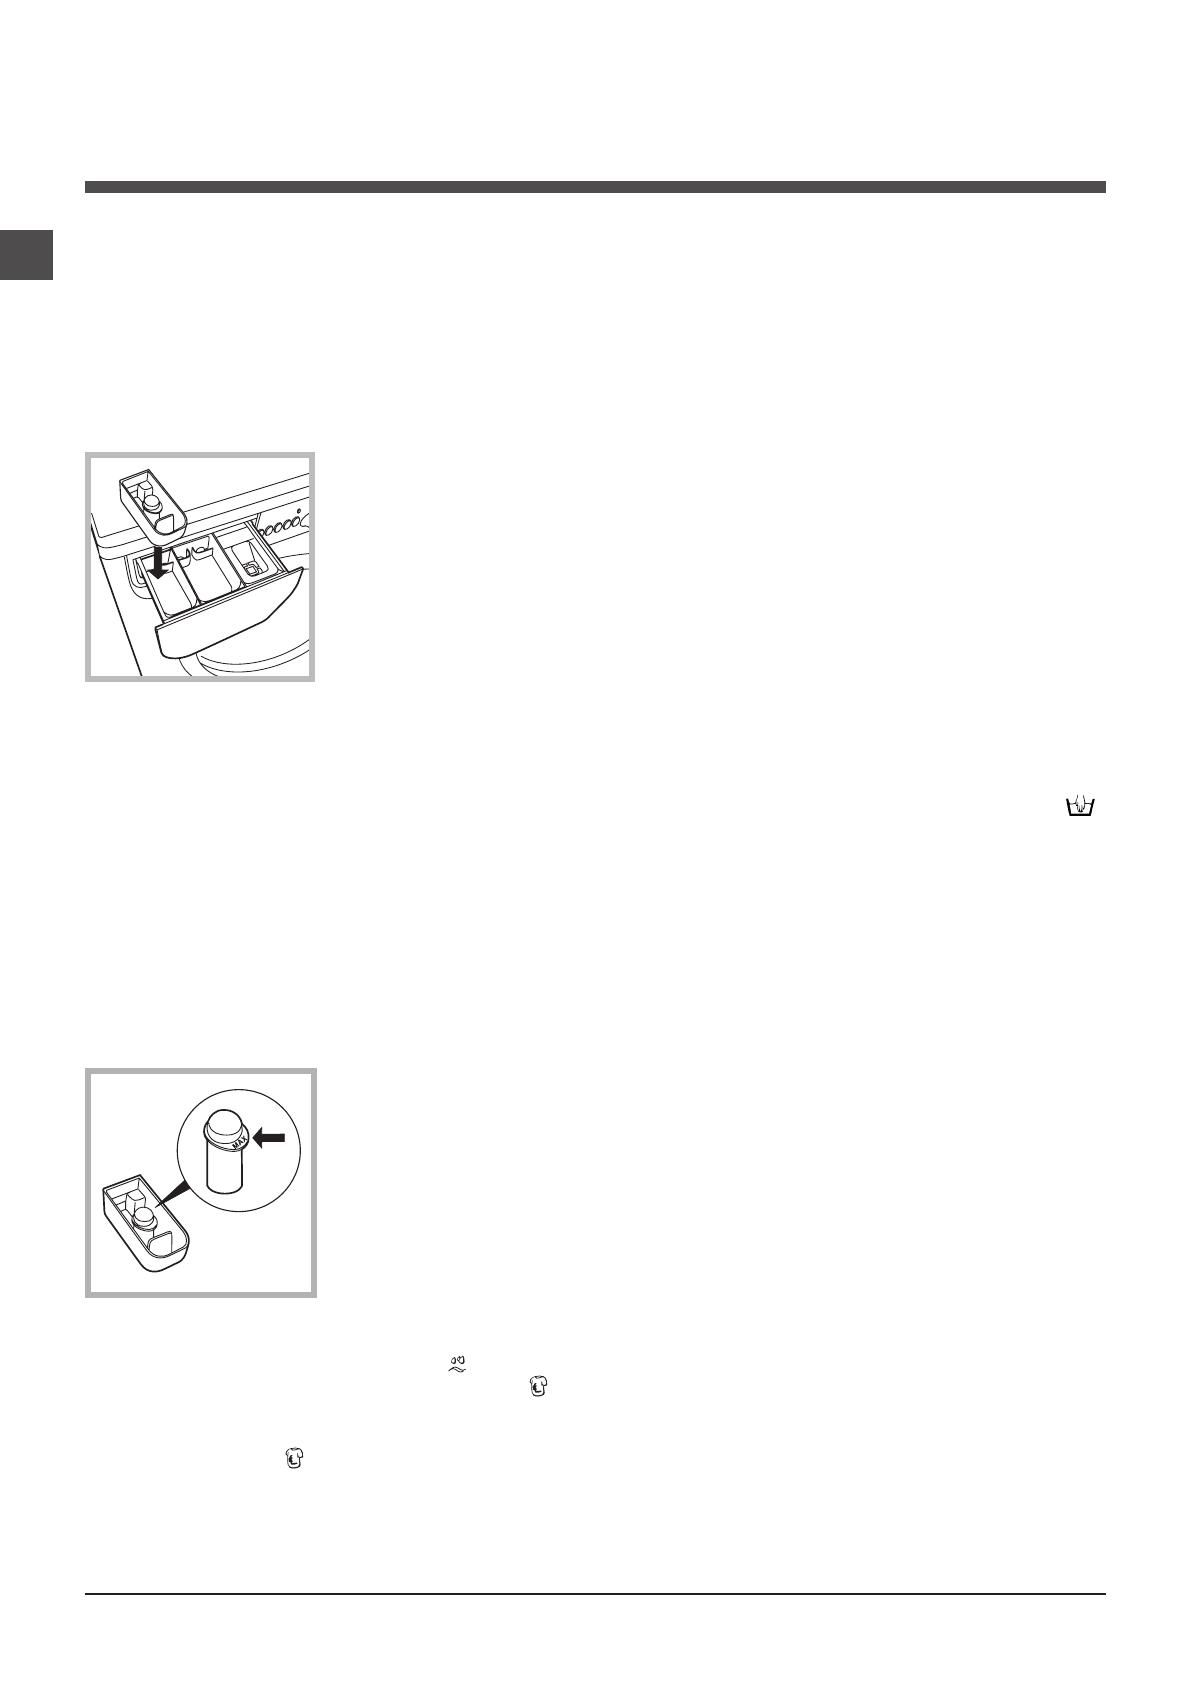
Húzza ki a mosószer-
adagoló ókot, és a
következők szerint tegye
bele a mosószert, illetve az
adalékot.
1-es rekesz: Mosószer előmosáshoz (por)
A mosószer betöltése előtt győződjön meg arról, hogy a
4-es berakható rekesz nincs ebben a rekeszben.
2-es rekesz: Mosószer mosáshoz (por vagy folyadék)
A folyékony mosószert csak az indítás előtt lehet betöl-
teni.
3-as rekesz: Adalékok (öblítők stb.)
Az öblítő ne érjen a rács fölé.
4-es berakható rekesz: Fehérítőszer
Fehérítő ciklus
! A hagyományos fehérítést tartós fehér ruhákhoz, a
kíméletest pedig színes, szintetikus vagy gyapjú anya-
gokhoz használjuk.
Tegye be a 4-es berakható
tartályt az 1-es rekeszbe.
A fehérítőszer betöltése
közben vigyázzon arra,
hogy az a központi csapon
jelzett “max” szintet ne
haladja meg (lásd ábra).
Ha csak fehérítést akar végezni, öntse a fehérítőszert
a 4-es berakható tartályba, és állítsa be az “Öblítés”
programot és kapcsolja be a “Folteltávolítás” funkció .
Ha a mosás során akar fehéríteni, töltse be a mosószert és
az adalékokat, állítsa be a kívánt programot, és kapcsolja be
a “Folteltávolítás” funkció .
A 4-es berakható tartály használata kizárja az előmosást.
A mosandó ruhák előkészítése
• Osztályozza a mosandókat a következők szerint:
- Szövet típusa / címkén lévő szimbólum.
- Színek Válogassa külön a színes és fehér ruhákat.
• Ürítse ki a zsebeket, és vizsgálja meg a gombokat.
• Ne lépje túl a mosandók száraz súlyára vonatkozóan
megadott értékeket:
Magasabb hőmérsékleten mosható anyagok: max. 4 kg
Műszálas anyagok: max. 1,8 kg
Kényes anyagok: max. 1,5 kg
Gyapjú: max. 1 kg
Selyem: max. 1 kg
Milyen nehezek a mosandó ruhák?
1 lepedő: 400–500 g
1 párnahuzat: 150–200 g
1 asztalterítő: 400–500 g
1 fürdőköpeny: 900–1200 g
1 törölköző: 150–250 g
Különleges bánásmódot igénylő ruhada-
rabok
Gyapjú: A 7-os programmal gyapjúholmikat lehet mosni,
azokat is, melyek címkéjén a „csak kézzel mosható”
utasítás szerepel. A legjobb eredmény elérése érdeké-
ben használjon speciális mosószert, és ne lépje túl az 1
kg ruhatöltetet.
Selyem: az összes selyem ruhadarab mosásához
használja az ehhez való, 8-es programot! A kényesebb
ruhaneműkhöz tanácsos speciálisan rájuk kifejlesztett
mosószert használni.
Függönyök: hajtogatva tegye párnahuzatba (vászon-
zsákba) vagy hálós zacskóba. Használja a 8-es progra-
mot.
Jeans: A mosás előtt fordítsa ki a ruhadarabokat, és
használjon folyékony mosószert. Használja a 9-as pro-
gramot.
A bepakolt ruhák kiegyensúlyozására
szolgáló rendszer
A túlzott zajhatás megelőzésére, valamint a mosandók
egyenletes eloszlása érdekében a forgódob a cen-
trifugafázis előtt a mosási centrifugasebességnél kicsit
nagyobb sebességre kapcsol. Amennyiben a töltet kiegy-
ensúlyozására irányuló próbálkozások nem vezetnek
eredményre, a készülék az elméleti centrifugasebessé-
gnél lassabb centrifugálásra kapcsol. Jelentős kiegyen-
súlyozatlanság esetén a mosógép, centrifugálás előtt
megpróbálja a töltetet megfelelően eloszlatni. A töltet
megfelelő eloszlásának biztosítása érdekében ajánlatos
a nagy ruhaneműket a kicsikkel összekeverni.


