Electrolux EWF10843 Používateľská príručka

Kategória
Práčky
Typ
Používateľská príručka

Táto príručka je tiež vhodná pre

EWF80743
EWF85743
EWF10843
EWF12843
2
34
User Manual
Tài Liệu Hướng Dẫn Sử Dụng
Washing Machine
Máy Giặt
EN
VI
CONTENTS
2 www.electrolux.com
SAFETY INFORMATION
PRODUCT DESCRIPTION
CONTROL PANEL
BEFORE FIRST USE
DAILY USE
WASHING HINTS
INTERNATIONAL WASH CODE SYMBOLS
CARE AND CLEANING
TROUBLESHOOTING
.................................................................................... 3
................................................................................. 6
............................................................................................ 7
....................................................................................... 12
...................................................................................................... 13
............................................................................................ 18
..................................................... 21
.................................................................................... 22
..................................................................................... 25
1
2
3
4
5
6
7
8
9
TECHNICAL DATA .......................................................................................... 2810
INSTALLATION................................................................................................ 2811
ENVIRONMENT CONCERNS .......................................................................... 3312
WE’RE THINKING OF YOU
CUSTOMER CARE AND SERVICE
Thank you for purchasing an Electrolux appliance. You’ve chosen a product that
brings with it decades of professional experience and innovation. Ingenious and
stylish, it has been designed with you in mind. So whenever you use it, you can be
safe in the knowledge that you’ll get great results every time. Welcome to Electrolux.
We recommend the use of original spare parts.
When contacting Service, ensure that you have the following data available.
The information can be found on the rating plate. Model, PNC, Serial Number.
Visit our website to:
Get usage advice, brochures, trouble shooter, service information:
www.electrolux.com
Subject to change without notice.
Warning / Caution-Safety information.
General information and tips.
Environmental information.
Being ensured permissible content limitaon of some toxic
chemicals (RoHS compliant)
RoHS
Compliant
SAFETY INFORMATION
ENGLISH 3
1.
In the interest of your safety and to ensure the correct use, before
installing and first using the appliance, read this user manual care-
fully, including its hints and warnings.
This appliance is intended to be used in household and similar
applications such as:
Farm houses
By clients in serviced apartments, holiday apartments and
residential type environments.
CONDITIONS OF USE
To avoid unnecessary mistakes and accidents, it is important to
ensure that all people using the appliance are thoroughly familiar
with its operation and safety features.
Save these instructions and make sure that they remain with the
appliance if it is moved or sold, so that everyone using it through its
life will be properly informed on appliance use and safety.
1.1 GENERAL SAFETY
Make sure that small pets do not climb into the drum. To avoid this,
please check into the drum before using the appliance.
Any objects such as coins, safety pins, nails, screws, stones or any other
hard, sharp material can cause extensive damage and must not be placed
into the machine.
Only use the advised quantities of fabric softener and detergent. Damage
to the fabric or appliance can occur if you overfill. Refer to the
manufacturer’s recommendations of quantities.
Wash small items such as socks, laces, washable belts etc in a washing
bag or pillow case as it is possible for such items to slip down between the
tub and the inner drum.
It is dangerous to alter the specifications or attempt to modify this product
in anyway.
During high temperature wash program the door glass may get hot.
Do not touch it!
4
www.electrolux.com
Do not use your washing machine to wash articles with whalebones,
material without hems or torn material.
Always unplug the appliance and turn off the water supply after use, clean
and maintenance.
This appliance is heavy. Care should be taken when moving it.
When unpacking the appliance, check that it is not damaged. If in doubt,
do not use it and contact the Service Centre.
All packing and transit bolts must be removed before use. Serious damage
can occur to the product and to property if this is not adhered to. See
relevant section in the user manual.
After having installed the appliance, check that it is not standing on the
inlet and drain hose and the worktop is not pressing the electrical supply
cable.
If the machine is situated on a carpeted floor, please adjust the feet in
order to allow air to circulate freely.
Always be sure, that there is no water leakage from hoses and their
connections after the installation.
Any plumbing work required to install this appliance should be carried out
by a qualified plumber.
Any electrical work required to install this appliance should be carried out
by a qualified electrician.
Under no circumstances should you attempt to repair the machine
yourself. Repairs carried out by inexperienced persons may cause injury or
serious malfunctioning. Contact your local Service Centre. Always insist on
genuine spare parts.
1.2 INSTALLATION
This appliance is not intended for use by persons (including children) with
reduced physical, sensory or mental capabilities, or lack of experience and
knowledge, unless they have been given supervision or instruction
concerning use of the appliance by a person responsible for their safety.
ENGLISH 5
This washing machine is not intended for use by young children or infirm
persons without supervision.
Young children should be supervised to ensure that they do not play with
the appliance.
The packaging components (e.g. plastic film, polystyrene) can be dangerous
to children - danger of suffocation! Keep them out of children’s reach.
Make sure that children or pets do not climb into the drum.
Keep all detergents in a safe place out of children’s reach.
This appliance is designed for domestic use. It must not be used for
purposes other than those for which it was designed.
Only wash fabrics which are designed to be machine washed. Follow the
instructions on each garment label.
Do not overload the appliance. See the relevant section in the user manual.
Before washing, ensure that all pockets are empty and buttons and zips are
fastened. Avoid washing frayed or torn articles and treat stains such as
paint, ink, rust, and grass before washing. Underwired bras must NOT be
machine washed.
Garments which have been in contact with volatile petroleum products
should not be machine washed. If volatile cleaning fluids are used, care
should be taken to ensure that the fluid is removed from the garment before
placing in the machine.
Never pull the power supply cable to remove the plug from the socket;
always take hold of the plug itself.
Never use the washing machine if the power supply cable, the control panel,
the working surface or the base are damaged so that the inside of the
washing machine is accessible.
1.3 USE
1.4 CHILD SAFETY
This machine is provided child lock option ( ) to prevent the children play
with the control panel. (see page 10)
PRODUCT DESCRIPTION2.
1
Worktop
2
Detergent/Softener Dispenser
3
Control Panel
4
Door Handle
5
Door
13
Rating Label
14
Drum Leaf Lifter
7
6
Level Adjustment Feet (Front)
8
Mains Cable
9
Water Inlet Hose
10
Water Drain Hose
11
Hose Support (2pcs)
12
Back Feet (Fixed)
Transit Bolts (3pcs)
6
www.electrolux.com
To connect the drain
hose on the edge of a
sink.
Plastic caps
To close the holes on
the rear side of the
cabinet after the
removal of the transit
bolts.
ACCESSORIES
Plastic hose guide
3
4
5
7
2
1
12
6
9
8
13
14
11
10
This machine is integrated drain design; lint will be drained out and don't need to clean the
filter regularly. If you would like to clean the filter, please contact your local Service
Center.
*
CONTROL PANEL3.
ENGLISH 7
* Picture of control panel
model: EWF12843
3.1 Control Panel Description
1 2 3 4 5 7 6 8
9 10
For model
EWF80743, this
option replaced
by “Easy Iron
program.
NOTE:
1
On/Off Button ( )
2
3
4
5
On/Off button is used to turn on
and turn off your washing machine.
Program Touchpads ( )
Press this touchpad to select the
washing program. The relevant light
will light up. (For more information
about washing program, please see
on page 11-12)
Temperature Touchpad ( )
Press this touchpad repeatedly to
increase or decrease the wash
temperature if you want your
laundry to be washed at a
temperature different from the one
proposed by the washing machine.
The relevant light will light up.
Option Touchpad ( )
Press the option touchpad, if you want your
laundry to be washed with special functions.
The relevant light will light up.
Spin Touchpad ( )
Press this touchpad repeatedly to increase
or decrease the spin speed, if you want your
laundry to be spun at a speed different from
the one proposed by the washing machine.
The relevant light will light up.
This option eliminates all the spin phases
and adds 3 rinses to the Cottons program
and 1 rinse for another programs.
No Spin
By selecting this option the water of the last
rinse is not emptied out and the drum turns
regularly to prevent the laundry creases.
The door is still locked to indicate that the
water must be emptied out.
Rinse Hold
The door stays locked with the water
in the drum. To drain the water refer
to relevant paragraph on page 17.
Different temperatures can be
combined which is dependent
on the program selected.
During a high temperature
cycle you may notice
vapour exiting from the
detergent dispenser drawer
of the washing machine,
this is normal and there is
no cause for alarm.
Different spin speed can be combined
which is dependent on the program
selected.
8
www.electrolux.com
(For models: EWF85743, EWF10843,
EWF12843)
With this option you can decrease the program
duration. Use this option for items with light soil
or items to refresh.
Quick
Different options can be combined which
is dependent on the program selected.
This option will reduce the working time
and the number of rinses.
If you need to add more rinse phases,
press “ ” + “ ” at the same time to
add “Rinse Plus” option. (see page 10)
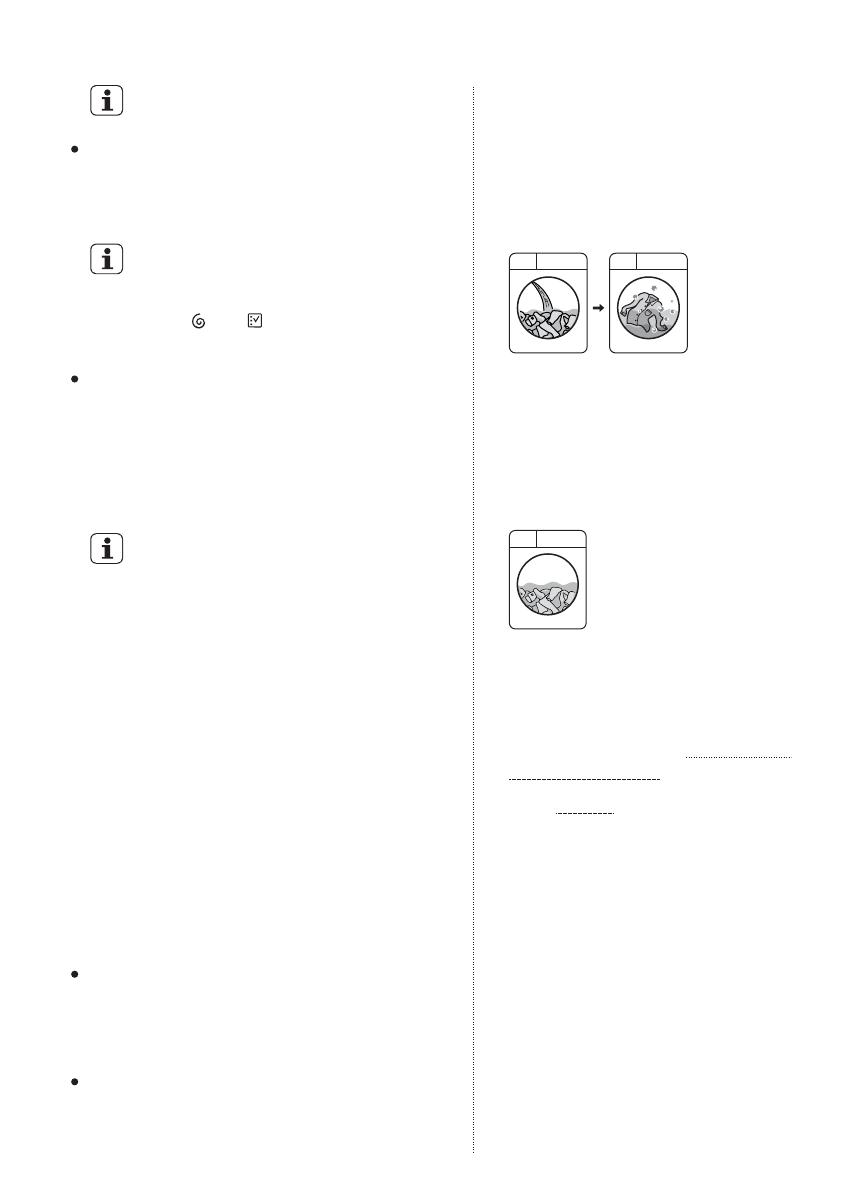
-
-
-
-
-
-
Vapour
Select this option to add approximately 30 - 45
minutes of tumbling in vapour during the wash
cycle. Vapour helps open fabric fibers up to
allow laundry additives to release tough stains.
The indicator of this option comes on.
Vapour may not necessarily be visible inside
the drum during a vapour wash cycle.
Vapour is created below the drum and
allowed to naturally rise into the clothes.
NOTE:
At the end of the Vapour cycle the clothes
will be warmer, softer and detached from the
drum.
If Vapour option is selected, rinse tempera-
tures will be elevated.
During a vapour cycle you may notice vapour
exiting from the drain hose of the washing
machine, this is normal and there is no cause
for alarm.
Vapour may not be present during the entire
vapour wash cycle.
Vapour function is more effective with half
load.
This option allows you to soak heavily soiled
clothes and stained items at the beginning of
the wash before main washing phase.
This option will increase the duration
of the program selected for about 50
minutes. And uses more water from
normal wash. The process is as
follows.
Soak
(3) Once the soak process complete,
the machine will check the water
level again and will start the selected
program and continue by using the
same soak water.
If you Do not wish to use the soak
water to wash cloth, please follow
the steps below:
After press Start/Pause touchpad,
the machine will start add water to
the washing drum, which will start to
rotate slowly to dissolve detergent
and evenly distribute cloths.
(1) fill water and turn the washing
drum (this takes about 20 minutes)
(2) soak (this takes about 30 minutes.)
The machine will enter
the process of soaking,
The washing drum will
stop and rotate once in
a while in order to
redistribute cloths.
Press Start/Pause to pause the
washing machine. Then press
ON/OFF to turn off the machine.
1.
Press ON/OFF again to start the
machine, add detergent, and
select the program of your choice.
Press Start/Pause again to start
the selected program. The
machine will detect and drain the
water in the washing drum out
automatically and fill in water once
again to be used for washing.
2.
When selecting this option the laundry is
gently washed and spun to avoid creasing.
In this way ironing is easier.
Easy Iron (For model: EWF80743)
ENGLISH 9
If you set also the Rinse Plus function ( )
the appliance adds two rinses.
Display
With this option you can perform only a
last rinse of a selected washing program.
If you set also the “No Spin ” option,
the appliance only drains.
Rinse & Spin
Use this option for very wet clothes to
remove the water and spin.
Drain & Spin
Start/Pause Touchpad ( )
To start the selected program, press
the “Start/Pause ( )”.
To interrupt a program which is
running, press the “Start/Pause ( )”
to pause the machine, t
he Start/Pause
pilot light flashes.
To restart the program from the point
at which it was interrupted, press the
“Start/Pause ( )” again,
the Start/
Pause pilot light will stop flashing.
The display shows the following
information:
Estimated time of the selected
program
After selecting a
program, the estimated
time is displayed in
hours and minutes (for example 3.01).
The estimated time is calculated
automatically on the basis of the
maximum recommended load for
each type of fabric.
7
8
Any temperature may be
selected, but COLD ( ) water
is recommended with this cycle
as hotter water may set some
stains.
Use the amount of detergent recom-
mended for a normal wash cycle. If
desired, use a bleach or a soaking agent
safe for the fabric, by pouring it into the
detergent compartment.
If you set also the “No Spin ” option,
the appliance only rinse.
Delay End Touchpad ( )
Before you start the program, this option
makes it possible to define the end of the
washing program from minimum 3 hours to
maximum 20 hours.
If program duration is longer than 3
hours minimum Delay End option starts
from 4 hours.
For example, if the program duration of your
selected program is 3.20 hours and you
define the “Delay End” time to 6 hours. This
means your wash program will finish in 6
hours. (See diagram)
After select Delay End time, press
Start/Pause touchpad to start the
program. Machine will then countdown
and update time on the display every
hours until it reaches the starting point
of the wash cycle.
Press the Delay End touchpad to choose
the end time as your wish. The display
shows the number of hours and the
indicator above the touchpad is on. This
option must be selected after choosing the
wash program, and before pressing the
“Start/Pause” touchpad.
6
3.20 hrs.2.40 hrs.
Working Cycle
“Delay End” Time : 6 hrs.
Pressed
Start/Pause
End of
Cycle
Start the
Program
Countdown
NOTE:
If you wish to modify or cancel Delay
End option after starting the program,
follow the steps below:
set the washing machine to PAUSE
by pressing “Start/Pause” touchpad;
-
deselect this option by pressing
Delay End once;
-
press the “Start/Pause” to start the
program.
-
10
www.electrolux.com
If you want to disable the buzzer
sound (except for event of
appliance malfunction)
,
press
and hold
“Programs ” and
“Temp ” touchpads at the
same time for 3 seconds, and
listen for “BEEP, BEEP”.
Rinse Plus Option ( )
This option is recommended
for people who are allergic to
detergents, and in areas
where the water is very soft.
Select this option to add 2
rinses to a program.
This function increases
the program duration.
Child Lock Option ( )
Your appliance is provided with CHILD
SAFETY LOCK which permits you to leave
the appliance unsupervised with the door
closed without having to worry that
children might be injured by or cause
damage to the appliance. Set this option
after pressing the Start/Pause touchpad.
This function remains enabled
even after the appliance is
switched off.
The touchpads are locked
(except for the On/Off “ ”
button).
To set “Child Lock” option:
When the program is
completed the display will
show “ ”.
Incorrect Option Selection
If an option which is not
compatible with the set wash
program selected,
the display will show “ ” and flash with
3 consecutive short beeps.
End Of Program
In the event of operating
problems, some alarm codes
can be displayed,
for example . (see “Troubleshooting”)
After the program has started, the time
remaining is updated every minute.
Alarm Codes
To set “Rinse Plus” option:
9
10
This function remains
enabled even after the
appliance is switched off.
Press and hold “ ” and “ ”
touchpads at the same time until the
LED “ ”
lights up
.
To deactivate press
and hold
these 2
touchpads at the same time
until the
LED “ ” goes off.
Press and hold “ ” and
“ ” touchpads at the
same time until the LED
“ ”
lights up
.
To deactivate press
and
hold
these 2 touchpads at
the same time
until the
LED “ ” goes off.
Enabling/Disabling Buzzer
Sounds
3.2
The program is completed.
The appliance has a malfunction.
The buzzer sounds operate when:
To enable the Buzzer press
and
hold
these 2 touchpads at the
same time for 3 seconds, and
listen for “BEEP”.
-
-
ENGLISH 11
3.3 Programs + Options
Program;
Temp.
Cottons;
White and
coloured
cotton with heavy
level of soil.
30 °C
EWF10843,
EWF12843:
8 kg
EWF85743:
7.5 kg
EWF80743:
7 kg
EWF12843:
1200 RPM
EWF10843:
1000 RPM
EWF80743,
EWF85743:
850 RPM
EWF10843,
EWF12843:
4 kg
EWF80743,
EWF85743:
3.5 kg
Program
Description
(type of load and
soil level)
Maximum
Dry Clothes
Capacity
(Model: Max.
kg)
Maximum
Spin Speed
(Model: Max.
RPM)
Options
Quick
(Models: EWF85743,
EWF10843, EWF12843)
Vapour
1)
Soak
Easy Iron
(Models: EWF80743)
Rinse & Spin
Drain & Spin
Delay End
Rinse +
Mixed;
Synthetic or mixed
fabric items with
normal level of soil.
Delicates;
Quick 20;
Delicate fabrics as
acrylics, viscose,
polyester items
with normal soil.
Synthetic and
mixed fabric items.
Light soil and
items to freshen
up.
Bedding;
Special program
for one synthetic
blanket, duvet,
bedspread and
so on.
Wool/
Handwash
;
Specially tested
program for woollen
garments bearing
the “Pure new
woollen, non-shrink,
machine washable”
label and hand
washing fabrics.
No Spin
Rinse Hold
EWF12843:
1200 RPM
EWF10843:
1000 RPM
EWF80743,
EWF85743:
850 RPM
EWF12843:
1200 RPM
EWF10843:
1000 RPM
EWF80743,
EWF85743:
850 RPM
EWF12843:
800 RPM
EWF10843:
800 RPM
EWF80743,
EWF85743:
600 RPM
EWF12843:
800 RPM
EWF10843:
800 RPM
EWF80743,
EWF85743:
600 RPM
EWF12843:
1000 RPM
EWF10843:
1000 RPM
EWF80743,
EWF85743:
850 RPM
EWF10843,
EWF12843:
4 kg
EWF80743,
EWF85743:
3.5 kg
EWF10843,
EWF12843:
2.5 kg
EWF80743,
EWF85743:
2 kg
EWF10843,
EWF12843:
4 kg
EWF80743,
EWF85743:
3.5 kg
EWF10843,
EWF12843:
1.5 kg
EWF80743,
EWF85743:
1 kg
Cold ( )
to 90 °C
Cold ( )
to 60 °C
Cold ( )
to 40 °C
Cold ( )
to 40 °C
Cold ( )
to 40 °C
12
www.electrolux.com
BEFORE FIRST USE4.
Ensure that the electrical and water
connections comply with the
installation instructions.
Put 2 litres of water in the detergent
compartment for washing phase.
This activates the drain system.
1.
2.
3.
Select “Cottons” cycle at 90 °C,
without any laundry in the machine,
to remove any manufacturing
residue from the drum and tub then
start the machine.
1) Vapour option can be combined with temperature 40 to 90 °C only.
2) “Energy Saving” program with 60 °C option selected is recommended for a full load of normally soiled cottons.
Program;
Temp.
Energy
Saving;
40 °C and
60 °C
2)
Baby
Wear;
White and
colourfast, cotton
with normal soil.
Set this program
to have a good
washing results
and decrease the
energy consump-
tion. The time of
the washing
program is
extended;
Baby cotton
clothes and
delicate knitting
items with normal
soil;
Program
Description
(type of load
and soil level)
Options
EWF12843:
1200 RPM
EWF10843:
1000 RPM
EWF80743,
EWF85743:
850 RPM
EWF12843:
1200 RPM
EWF10843:
1000 RPM
EWF80743,
EWF85743:
850 RPM
Quick
Vapour
1)
Soak
Rinse & Spin
Drain & Spin
Delay End
Rinse +
No Spin
Rinse Hold
EWF10843,
EWF12843:
8 kg
EWF85743:
7.5 kg
EWF80743:
7 kg
EWF10843,
EWF12843:
4 kg
EWF80743,
EWF85743:
3.5 kg
Cold ( )
to 40 °C
Maximum
Dry Clothes
Capacity
(Model: Max.
kg)
Maximum
Spin Speed
(Model: Max.
RPM)
(Models: EWF85743,
EWF10843, EWF12843)
Easy Iron
(Models: EWF80743)
ENGLISH 13
DAILY USE5.
Connect the mains plug to the mains
socket.
Turn the water tap on.
Place the laundry in the drum, one
item at a time, shaking them out as
much as possible.
3.
Open the door by carefully pulling
the door handle outwards.
Check and remove objects (if there
are any) that could be trapped in the
fold.
2.
Close the door and make sure that
no laundry remains between the seal
and the door. There is a risk of water
leakage or damage to the machine
and your laundry.
4.
Step 1 - Loading The Laundry
5.1 Four Steps Start Up Guide
1.
Make sure that you wash lint
collectors separately from lint
producers.
IMPORTANT!
Button up pillowcases, close zip
fasteners, hooks and poppers.
Tie any belts or long tapes.
Make sure that no metal objects
are left in the laundry (e.g. hair
clips, safety pins, pins).
Wash bras, pantyhose and other
delicates in a mesh
laundry bag,
which you can
purchase from
your supermarket.
14
www.electrolux.com
Measure out the amount of
detergent required, pour it into
the main wash compartment
( ).
Step 2 - Using Detergent And Additives
Detergent Dispenser Drawer
1.
The detergent dispenser is divided into
two compartments.
Compartment “SOFTENER”
This compartment is used for fabric
conditioner and starching agent.
-
-
-
Compartment “DETERGENT”
This compartment is used for
detergent on all programs.
-
Powder or liquid detergent ( )
Position down: for liquid detergent.
Position up: for powder detergent
(factory setting).
Do not use gelatinous or thick
liquid detergents.
-
Do not put more liquid than the
maximum level.
-
Do not set the DELAY END.
-
When you use the liquid
detergent:
Pull out the dispenser drawer
until it stops.
-
-
Measure out the detergent and the
fabric softener;
2.
IMPORTANT: Please read the
detergents instructions on page 20
before use.
up: for powder
down: for liquid
ENGLISH 15
If required, pour fabric softener
into the compartment marked
(the amount used must not
exceed the “MAX” mark in the
drawer).
-
Close the drawer gently.
-
After washing cycle finish,
residues of detergent,
softener and water may
remain in the dispenser. It
is recommended to clean
the dispenser regularly to
remove any residue.
If you use thick softeners it
is recommended to dilute
with water.
Pess the Spin “ ” and the tempera-
ture “ ” touchpads repeatedly to
change the spin speed and tempera-
ture.
Step 3 - Setting A Program For Washing
1.
Press the On/Off button
to turn on the washing
machine. The indicator of
the “Start/Pause”
touchpad flashes.
3.
If you want your laundry
to be spun or use
temperature different
from the one proposed
by the washing machine.
4.
Press this touchpad, if you
want your laundry to be
washed with special
functions. The relevant
light will light up.
Different functions can be
combined which is dependent
on the program selected.
2.
Press the Program
touchpad, to choose the
wash program you
require.
(For more
information about
washing programs,
please see page 11-12)
-
The display shows the program
duration.
-
5.
The relevant light will light up.
If you want to reduce washing
time, select the Quick* option
to reduce washing time.
(* this option suitable for
light
soil items or items need to
refresh
)
If you want
to define the end of the
washing program
, press the “Delay
End ( )” touchpad repeatedly to
choose your washing machine
working time.
16
www.electrolux.com
Step 4 - Starting a program
To start a program, press the Start/Pause ( ) touchpad, the
corresponding pilot light will stop flashing and a default program
duration will be displayed on the screen.
To pause press Start/Pause. The
indicator will start flashing.
Press the Start/Pause again. The
program will continue.
Changing a running program is possible
only by switching off the appliance.
Press the “On/Off” button to cancel the
program and to turn off the appliance.
5.2 Interruption Of A Program
5.3 Changing A Program
It is possible to change only some
option after the program has
started.
Press the touchpad Start/Pause. The
indicator will start flashing.
1.
Change the options.2.
Press Start/Pause again. The program
will continue.
3.
While a program or the Delay End
is operating, the appliance door is
locked and the door lock indicator
“ ” is on.
First set the machine to PAUSE by
pressing the “Start/Pause”
touchpad. Wait until the door lock
indicator “ ” goes off, then the
door can be opened.
If the door lock indicator “ ”
does not disappear, this means
that the machine is already
heating and the water level is
above the bottom edge of the
door or the drum is turning. In
this case the door CAN NOT be
opened. If you need to open it, you
must drain the water to open the
door.
To drain the water, you have to
switch the machine off by pressing
the “On/Off” button to deactivate
the appliance. Turn On the
machine and select “Drain & Spin”
option, then press Start/Pause
touchpad to start the program.
Press the “On/Off” button again to
start the appliance. Now, you can set a
new washing program.
The appliance will not drain the
water.
5.4 Changing The Options
5.5 Opening The Door
You can select “No Spin
”, if you want the machine
to only drain the water.
After starting the washing program the dot ( ) on the display starts
to flash.
The appliance will automatically adjust the selected
program duration according to the type and size of the load
(
approximately 15 minutes
)
.
When this phase ends the dot ( ) lights
up fixed and t
he display will show adjusted program duration.
NOTE
ENGLISH 17
When the program is completed
and the door lock indicator “ ”
goes off, you can open the door.
When The Washing Program
Is Completed, But There Is
Water In The Drum (Option
“Rinse Hold ” is used)
The drum turns regularly to
prevent the creases in the
laundry.
You must drain the water to open
the door.
The door lock indicator “ ” is
on. The door stays locked.
5.6
The appliance stops automatically.
The acoustic signal will operate.
The display will show “ ”.
The indicator of the “Start/Pause”
touchpad goes off.
The door lock indicator “ ”
goes off.
Remove the laundry from the
appliance. Make sure that the
drum is empty.
Keep the door and the detergent
drawer ajar, to prevent the
mildew and odours.
Turn off the water tap.
5.7 At The End Of The Program
The indicator “Start/Pause”
flashes to remind you to drain
the water.
When the program is completed
and the door lock indicator “ ”
goes off, you can open the door.
1.
To drain the water:
NOTE
Alternatively, before pressing the
“Start/Pause” touchpad, you can
press the “Spin ” touchpad to
change the spin speed. You can
select “No Spin ”, if you want
the machine to only drain the
water, then press the Start/Pause
touchpad. The appliance will drain
the water and spin.
Press the “Start/Pause ”
touchpad. The appliance
drains the water and spins with
the maximum spin speed for
selected program.
2.
Press the “On/Off” button to
deactivate the appliance.
3.
After approximately 18 hours
if you do not press
Start/Pause touchpad, the
appliance will drain and spin
automatically (except for
Wool/Handwash program) .
At the end of the program
the time remaining can
suddenly decrease from 7
minutes or less to 0 due to
the overestimated total
program time during the load
sensing phase.
In some cases (with perfectly
balanced load) the program
time can be shorter than the
time estimated after the load
sensing phase is completed.
This is a normal behavior of
the machine and not a cause
for concern as it does not
compromise its performance.
18
www.electrolux.com
WASHING HINTS6.
Follow the wash code symbols on
each garment label and the
manufacturer’s washing
instructions. Sort the laundry as
follows: whites, coloureds,
synthetics, delicates, woollens.
6.1 Sorting The Laundry
6.2 Temperatures
90°C
60°C
50°C
40°C
30°C
Cold
For normally soiled,
colourfast garments (e.g.
shirts, night dresses,
pyjamas....) in linen, cotton
or synthetic fibres and for
lightly soiled white cotton
(e.g.underwear).
For delicate items (e.g. net
curtains), mixed laundry
including synthetic fibres
and woollens bearing the
label pure new wool,
machine washable,
non-shrink.
For heavily or normally
soiled white cottons and
linen (e.g. teacloths, towels,
tablecloths, sheets...).
Never wash whites and coloureds
together. Whites may lose their
“whiteness” in the wash.
New coloured items may run in the
first wash; they should therefore be
washed separately the first time.
Button up pillowcases, close zip
fasteners, hooks and poppers. Tie
any belts or long tapes.
Remove persistent stains before
washing.
Rub particularly soiled areas with a
special detergent or detergent paste.
Treat curtains with special care.
Remove hooks or tie them up in a
bag or a net.
Make sure that no metal objects
are left in the laundry (e.g. hair
clips, safety pins, pins).
6.3 Before Loading The
Laundry
Auto Off Function
5.8
The Auto Off Function automatically
deactivates the appliance to
decrease the energy consumption
when:
You do not press any touch-
pads for 5 minutes before you
press “Start/Pause”.
Press the “On/Off” button to
activate the appliance again.
After 5 minutes from the end of
the washing program.
Press the “On/Off” button to
activate the appliance again.
Touch any touchpad the
display shows the last setup
program and option.
Touch the program pad again
to set a new cycle.
-
-
-
-
The display shows the end of
the last set program.
ENGLISH 19
Recommended loads are indicated
in the program charts. General
rules:
Washing a maximum load makes
the most efficient use of water and
energy. For heavily soiled laundry,
reduce the load size.
Cotton, linen:
drum full but not
too tightly packed;
Synthetics,
Delicate:
drum no more
than half full;
woollens:
drum no more
than one third full.
6.4 Maximum Loads
Blood: treat fresh stains with cold
water. For dried stains, soak
overnight in water with a special
detergent then rub in the soap and
water.
Oil based paint: moisten with
benzine stain remover, lay the
garment on a soft cloth and dab
the stain; treat several times.
Dried grease stains: moisten with
turpentine, lay the garment on a
soft surface and dab the stain with
the fingertips and a cotton cloth.
Stubborn stains may not be
removed by just water and
detergent. It is therefore advisable
to treat them prior to washing.
6.5 Removing Stains
Rust: oxalic acid dissolved in hot
water or a rust removing product
used in cold water. Be careful with
rust stains which are not recent
since the cellulose structure will
already have been damaged and
the fabric tends to hole.
Mould stains: treat with bleach,
rinse well (whites and fast
coloureds only).
Grass: soap lightly and treat with
bleach (whites and fast coloureds
only).
Ball point pen and glue: moisten
with acetone (*), lay the garment on
a soft cloth and dab the stain.
Lipstick: moisten with acetone (*)
as above, then treat stains with
methylated spirits. Remove any
residual marks from white fabrics
with bleach.
Red wine: soak in water and
detergent, rinse and treat with
acetic or citric acid, then rinse.
Treat any residual marks with
bleach.
Ink: depending on the type of ink,
moisten the fabric first with
acetone (*), then with acetic acid;
treat any residual marks on white
fabrics with bleach and then rinse
thoroughly.
Tar stains: first treat with stain
remover, methylated spirits or
benzine, then rub with detergent
paste.
(*) do not use acetone on artificial
silk.
20
www.electrolux.com
Low sudsing detergent is required
for this washing machine to prevent
oversudsing problems, unsatisfied
washing result and harm to the
machine. Low sudsing detergents
designed for front load washing
machines are labelled “Front Loading”,
“high efficiency”, “HE”, such as Cold
Power for Front Loaders or “Matic”.
Detergents Type and Quantity of
Detergent
Do not use wrong types of detergent,
such as Top Loading, Handwash
detergent or Soap-Based products in
your frontload washing machine. This
can result in excessive suds, longer cycle
time, low spin speeds, poor rinsing and
overloading of the motor.
6.6
The choice and quantity of
detergent will depend on ;
type of fabric (delicates, woollens,
cottons, etc.) ;
degree of soiling ;
size of the load ;
washing temperature ; and
hardness of the water used.
the colour of clothes ;
Information on hardness of the water
in your area can be obtained from the
relevant water supply company, or
from your local authority.
You may have to try using the
detergent quantity as per the product
manufacturers’ instructions then
compare the washing result to the list
below and adjust the amount of
detergent for the next time accordingly.
Water hardness is classified by
so-called “degrees” of hardness.
NOTE:
Use only low sudsing front load
type detergents and REDUCE
the amount of detergent if
oversudsing occurs.
The choice of detergent and use of
correct quantities not only affects your
washing performance, but helps to avoid
waste and protect the environment.
Quantity of detergent to be
used
Although biodegradable, detergents
contain substances which, in large
quantities, can upset the delicate
balance of nature.
the washload to turn grey,
greasy clothes.
sudsing,
inadequate rinsing.
reduced washing effect,
Not enough washing powder
causes:
Too much washing powder causes:
you are washing a small load,
large amounts of foam during
washing.
the laundry is lightly soiled,
Use less detergent if:
  • Page 1 1
  • Page 2 2
  • Page 3 3
  • Page 4 4
  • Page 5 5
  • Page 6 6
  • Page 7 7
  • Page 8 8
  • Page 9 9
  • Page 10 10
  • Page 11 11
  • Page 12 12
  • Page 13 13
  • Page 14 14
  • Page 15 15
  • Page 16 16
  • Page 17 17
  • Page 18 18
  • Page 19 19
  • Page 20 20
  • Page 21 21
  • Page 22 22
  • Page 23 23
  • Page 24 24
  • Page 25 25
  • Page 26 26
  • Page 27 27
  • Page 28 28
  • Page 29 29
  • Page 30 30
  • Page 31 31
  • Page 32 32
  • Page 33 33
  • Page 34 34
  • Page 35 35
  • Page 36 36
  • Page 37 37
  • Page 38 38
  • Page 39 39
  • Page 40 40
  • Page 41 41
  • Page 42 42
  • Page 43 43
  • Page 44 44
  • Page 45 45
  • Page 46 46
  • Page 47 47
  • Page 48 48
  • Page 49 49
  • Page 50 50
  • Page 51 51
  • Page 52 52
  • Page 53 53
  • Page 54 54
  • Page 55 55
  • Page 56 56
  • Page 57 57
  • Page 58 58
  • Page 59 59
  • Page 60 60
  • Page 61 61
  • Page 62 62
  • Page 63 63
  • Page 64 64
  • Page 65 65
  • Page 66 66
  • Page 67 67
  • Page 68 68

Electrolux EWF10843 Používateľská príručka

Kategória
Práčky
Typ
Používateľská príručka
Táto príručka je tiež vhodná pre

V iných jazykoch