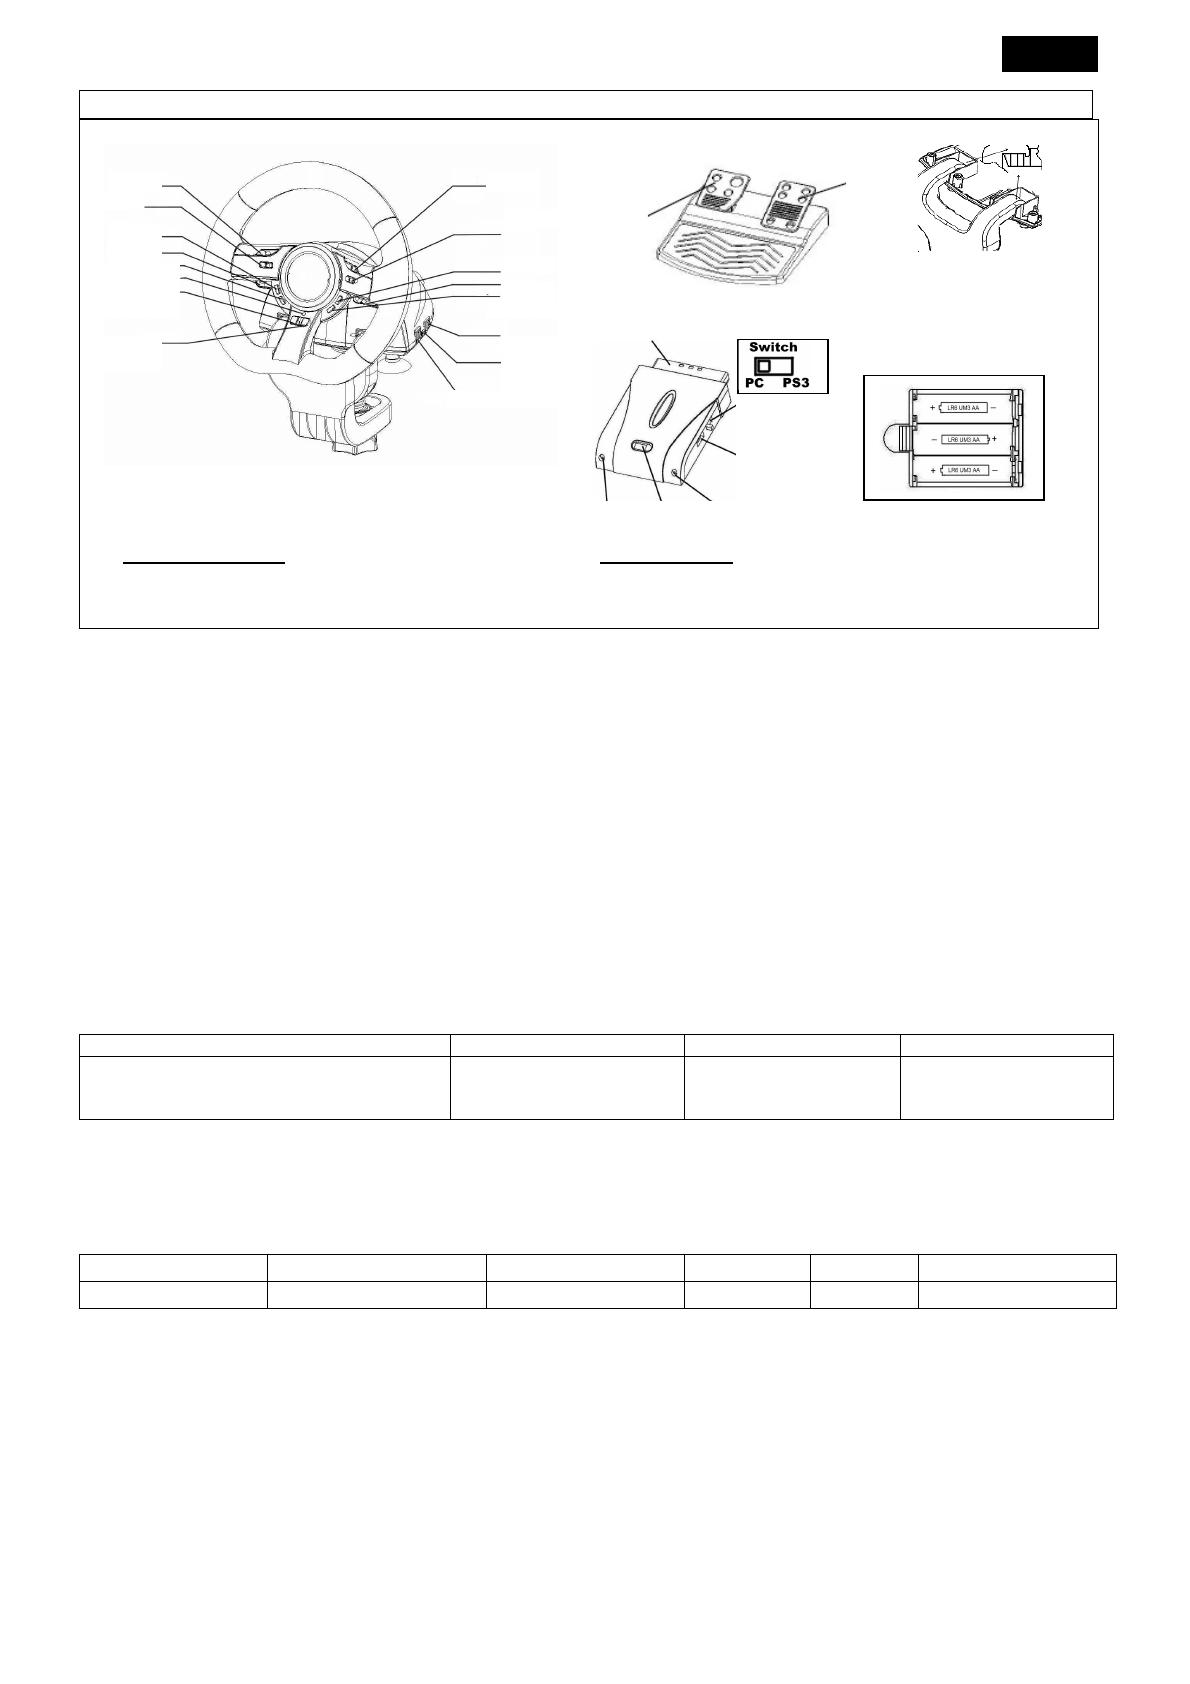
Genius WIRELESS TRIO RACER Návod na obsluhu

Typ
Návod na obsluhu

Táto príručka je tiež vhodná pre

INDEX
English
……………………………………………………………
…………………………………………………………………………………………………………………………
……………………………………………………………..
....
..……………………
…………………………………………
…………………….
..
.
1
Русский
……………………………………………………………
…………………………………………………………………………………………………………………………
……………………………………………………………..
....
..……………………
…………………………………………
…………………….
..
.
3
Deutsch
……………………………………………………………
…………………………………………………………………………………………………………………………
……………………………………………………………..
....
..……………………
…………………………………………
…………………….
..
.
5
Français
……………………………………………………………
…………………………………………………………………………………………………………………………
……………………………………………………………..
....
..……………………
…………………………………………
…………………….
..
.
7
Italiano
……………………………………………………………
…………………………………………………………………………………………………………………………
……………………………………………………………..
....
..……………………
…………………………………………
…………………….
..
.
9
Español
……………………
…………………………………………
……………………………………………………
………………………………………………………………………………
………………………………………..
....
..……………………
…………………………………………
…………………….
..
.
11
Português
……………………………………………………………
…………………………………………………………………………………………………………………………
……………………………………………………………..
....
..……………………
…………………………………………
…………………….
..
.
13
Brasil
……………………………………………………………
…………………………………………………………………………………………………………………………
……………………………………………………………..
....
..……………………
…………………………………………
…………………….
..
.
15
Nederlands
……………………………………………………………
…………………………………………………………………………………………………………………………
……………………………………………………………..
....
..……………………
…………………………………………
…………………….
..
.
17
Česky
……………………………………………………………
…………………………………………………………………………………………………………………………
……………………………………………………………..
....
..……………………
…………………………………………
…………………….
..
.
19
Magyar
……………………………………………………………
…………………………………………………………………………………………………………………………
……………………………………………………………..
....
..……
…………
…………………
………………………………
……………….
..
.
21
Polski
……………………………………………………………
…………………………………………………………………………………………………………………………
……………………………………………………………..
....
..……………………
…………………………………………
…………………….
..
.
23
Slovenčina
……………………………………………………………
…………………………………………………………………………………………………………………………
……………………………………………………………..
....
..……………………
…………………………………………
…………………….
..
.
25
Hrvatski/Bosanski/Srpski
……………………………………………………………
…………………………………………………………………………………………………………………………
……………………………………………………………..
....
..……………………
…………………………………………
…………………….
..
.
27
Română
……………………………………………………………
…………………………………………………………………………………………………………………………
……………………………………………………………..
....
..……………………
…………………………………………
…………………….
..
.
29
Български
……………………………………………………………
…………………………………………………………………………………………………………………………
……………………………………………………………..
....
..…
………………
……………………………………
………………….
..
.
31
Ελληνικά
……………………………………………………………
…………………………………………………………………………………………………………………………
……………………………………………………………..
....
..……………………
…………………………………………
…………………….
..
.
33
Türkçe
……………………………………………………………
…………………………………………………………………………………………………………………………
……………………………………………………………..
....
..……………………
…………………………………………
…………………….
..
.
35
Укрʜ
ʜʜ
ʜськa
……………………………………………………………
…………………………………………………………………………………………………………………………
……………………………………………………………..
....
..……………………
…………………………………………
…………………….
..
.
37
Eesti
……………………………………………………………
…………………………………………………………………………………………………………………………
……………………………………………………………..
....
..……………………
…………………………………………
…………………….
..
.
39
Latviešu
……………………………………………………………
…………………………………………………………………………………………………………………………
……………………………………………………………..
....
..……………………
…………………………………………
…………………….
..
.
41
Lietuviškai
……………………………………………………………
…………………………………………………………………………………………………………………………
……………………………………………………………..
....
..……………………
…………………………………………
…………………….
..
.
43
Қазақ
……………………………………………………………
…………………………………………………………………………………………………………………………
……………………………………………………………..
....
..……………………
…………………………………………
…………………….
..
.
45

……………………………………………………………
…………………………………………………………………………………………………………………………
……………………………………………………………..
....
..……………………
…………………………………………
…………………….
..
.
47
ENGLISH
1
Hook C-Clamp to inner stopper
PS2
AA Size Alkaline Battery
SWITCH
PC/PS3
USB Port
RX LED Link Power LED
System Requirements:
For PC
IBM PC Pentium 166MHz compatibles or higher.
Microsoft Windows VISTA/XP/ME/2000/98
CD/DVD-ROM Drive for driver installation.
For PlayStation
PlayStation
2
PlayStation
3
Software Installation: Install the driver first before you install Wireless Trio Racer to the system. The Wheel will not support
the vibration function, if the driver is not installed.
1. Insert the driver CD into your CD-ROM; wait for a few seconds for your PC to load the disc; the auto run program is
executed and the opening installation screen appears. Please follow the on-screen instructions.
2. If your system doesn’t launch the installation software automatically, you can locate the file in the directory of your CD drive
and click on it, then follow the on-screen instruction to install the software.
Hardware Installation
1. Connect the USB Cable and plug it to an USB port on the PC/PlayStation
3 or a USB Hub. Then, connect the Pedals to the
main unit with the included cable. After connection, system will “Find a new hardware” and complete the installation.
2. Go to Game Controllers page and select “Advanced“. It should work as a wheel. Or a game pad with compatible electrical
function design. Check the installation again if it is not correct.
Set wireless function:
Once you complete the Wireless Trio Racer installation, it will automatically search and link with the receiver. The green LED
on the steering wheel will be lit for five seconds then will turn off if you have a successful connection.
Link Mode Wake suspend mode up Suspend Mode Low Battery Indicator
START/Key 10+Key11/Fn button at Wheel
Connect button at Receiver Dongle
START/Key 10 button or
SELECT/Key 9 button.
After 2 minutes without
any button activity.
Green LED continues to
flash slowly.
Turbo Function:
1. Set/Clear Turbo Function: Press and hold the TURBO button, then press any action Key except buttons 9-10, or Brake
Pedal to set the turbo function for it. Turbo LED will flash accordingly. To release the Turbo function, repeat the same
procedures.
2. Set Turbo Speed: Press and hold the Turbo button, then press the Key_10/START button only. The Turbo speed will be
adjusted cyclically from 2->4->8->16->2 Hz, each time the Key_10/START button is pressed.
Turbo Speed Setting
Key Remapping Setting
PS3 Mode Select_Key Start_Key
PS_Key
Turbo+ Key10/Start Key_10/START + Turbo
Switch to PS Position
Key_9 Key_10 Key_Fn at PS mode
Active Direction Function for Game Setup Page:
1.
Press Key9-Select button for two seconds, the Turbo LED will light to show the activation of “Direction function”.
The following will act as each direction controlling: Button 5=UP; Button 6 = DOWN; Wheel Turn to right = RIGHT; Wheel
Turn to left = LEFT.
2.
Press Key9-Select two seconds again to release the Direction function. The Turbo LED will return to normal status.
Wireless
Trio Racer
Brake
Acceleration
Key1
Key3
Key10/Start
Key8
Power Switch
Key7
Key4
Key2
Key5
Key9/Select
Turbo
Led
Pedal Connector
Turbo Key
Key6
Key11/Fn
DC 5V
ENGLISH
2
Key Mapping Functions
For certain racing games, the brake and acceleration function may be not relate to the BRAKE pedal or ACCELERATION pedal.
With the help of Key Mapping, you can duplicate the function to your favor buttons.
Note that Wireless Trio Racer can only set the KeyMapping function at buttons 5/6/7/8, Brake Pedal and Acceleration pedal.
Each KeyMapping operation only can duplicate one key to another.
1. Set Key Mapping Function: Press and hold Button 10/Start and press Turbo button at the same time. The TURBO LED
will be blinking fast to show the activation of the KeyMapping function. Press your favor TARGET button which you would
like to copy that function to it. The TURBO LED will now blink slowly. Then, press the SOURCE button to duplicate its
function to the TARGET button to complete the procedure. The TURBO LED will turn off to indicate the function duplication
is complete. Use these procedures again for other function duplication.
2. Release Key Mapping Function: Press and hold Button 10/Start and press Turbo button at the same time. TURBO LED
will be blinking fast. Press the TARGET button which you would like to release that function. The TURBO LED will now
blink slowly. Then, press and hold Button 10/Start, and press Turbo at the same time to release the function. The TURBO
LED will turn off to indicate the releasing is complete. Use these procedures again for each function release. Or you can
unplug
Wireless Trio Racer
to release the KeyMapping function.
3. The hardware function of the wheel buttons may vary in different games. Before proceeding to game settings from the
OPTION inside the game, always read your game’s manual carefully to set the best game settings.
Important Information:
1. Please use AA Size Alkaline Batteries. And, replace the batteries at the same time with same types of batteries. Due to the
output voltatge of rechargeable battery is much lower than Alkaline’s, the racing wheel may detect the power voltage is too
low and responds with low power signal with Green LED flashing. It is normal. Use can continue playing the wheel till it is
running out of power.
2. To save power, turn the power switch to OFF position whenever you do not want to play it.
РУССКИЙ
3
Требования к системе:
для ПК
-Pentium 166МГц и выше
Microsoft Windows 2003/XP/2000/ME/98
Дисковод компакт- или DVD-дисков для установки
программного обеспечения
для PlayStation
PlayStation
2
PlayStation
3
Установка оборудования
Подключите руль к порту USB на компьютере или приставке PlayStation
3. Подключите педали к основному блоку
(кабель входит в комплект поставки). После этого откроется окно «Найдено новое оборудование» и будет произведена
установка этого оборудования.
1. Вставьте компакт-диск с драйвером в дисковод компакт-дисков. Подождите несколько секунд, чтобы диск
загрузился.
2. Если система автоматически прочтет установленный компакт-диск, откроется окно установки. Следуйте
инструкциям.
Установка устройства
1. Подключите шнур USB к устройству и к порту USB на компьютере или PlayStation
3, либо к концентратору USB.
Затем подключите педаль к основному модулю, используя шнур из комплекта поставки. После этого откроется окно
«Найдено новое оборудование» и будет произведена установка этого оборудования.
2. Если пульт правильно подключен к компьютеру, но не работает в конкретной игре, перейдите на страницу
«Игровые контроллеры» и выберите «Дополнительно», а затем проверьте, выбран ли для параметра «wheel»
Настройка беспроводной работы
По окончании установки беспроводного комплекта Trio Racer произойдет автоматическое обнаружение приемника и
установка связи с ним. На руле загорится зеленый сигнал индикатора. Если соединение установлено, через пять секунд
он погаснет.
Режим связи Выход из режима
приостановки
Режим приостановки Индикатор разряда
батареи
START, кнопки 10 + 11, кнопка Fn на руле
Кнопка Connect на приемнике
START, кнопка 10 или
SELECT, кнопка 9.
Если в течение двух
минут не нажимаются
никакие кнопки.
Зеленый медленно
мигающий сигнал
индикатора.
Функция «Турбо»
1. Включение и отключение функции «Турбо». Нажмите и удерживайте кнопку TURBO, затем нажмите любую кнопку
действия, кроме кнопок 9-10, или педаль тормоза, чтобы настроить для этой кнопки или педали функцию «Турбо».
Индикатор режима «Турбо» будет мигать. Для отключения функции «Турбо» повторите те же процедуры.
2. Настройка скорости работы функции «Турбо»: удерживайте нажатой кнопку TURBO, затем нажмите только на
кнопку START. При каждом нажатии на кнопку START скорость работы функции «Турбо» циклически
переключается: 2->4->8->16->2 Гц.
Turbo Speed Setting
Key Remapping Setting
PS3 Mode Select_Key Start_Key
PS_Key
Turbo+Key10/Start Key_10/START + Turbo
Switch to PS Position
Key_9 Key_10 Key_Fn at PS mode
Функция выбора направления на странице настройки игры
1. Удерживайте нажатой кнопку Select в течение двух секунд. Загорится индикатор Turbo (означает, что функция
выбора направления включена).
Направление выбирается следующим образом: кнопка 5 = ВВЕРХ, кнопка 6 = ВНИЗ, поворот руля вправо =
Беспроводной комплект Trio Racer
H
ook
C
-
Clamp to
inner
stopper.
Brake
Acceleration
Выключатель
Компьютер/PS3
Порт USB
Индикатор
приема
Связь
Индикатор питания
Алкалинов
ые батарейки ти
поразмера AA
PS2
Key1
Key3
Key10/Start
Key8
DC 5V
Key7
Key4
Key2
Key5
Key9/Select
Turbo
L
ED
Pedal Connector
Turbo Key
Key6
Key11/Fn
Power
Switch
РУССКИЙ
4
ВПРАВО, поворот руля влево = ВЛЕВО.
2. Для отключения функции выбора направления вновь удерживайте нажатой кнопку Select в течение двух секунд.
Индикатор Turbo вернется в обычное состояние.
Функции назначения кнопок
В некоторых играх функции тормоза и газа не могут возлагаться на соответствующие педали. Назначение кнопок
позволяет переложить эти функции на другие кнопки.
Помните, что в серии Беспроводной комплект Trio Racer функции можно назначать только кнопкам 5, 6, 7 и 8, а также
педалям газа и тормоза. Операции назначения кнопок позволяют дублировать функции кнопок.
1. Включение функции назначения кнопок. Нажмите и удерживайте кнопку 10/Start, одновременно нажмите кнопку
Turbo. Индикатор TURBO начнет быстро мигать. Это означает, что функция назначения кнопок включена. Нажмите
целевую кнопку, которой необходимо назначить функцию. Индикатор «Турбо» начнет медленно мигать. Затем
нажмите исходную кнопку, функции которой нужно назначить целевой. Индикатор TURBO выключится,
дублирование функций кнопок завершено. Для назначения других функций этой или другой кнопке повторите
процедуру.
2. Выключение функции назначения кнопок. Нажмите и удерживайте кнопку 10/Start, одновременно нажмите
кнопку Turbo. Индикатор TURBO начнет быстро мигать. Нажмите целевую кнопку, функцию которой необходимо
отключить. Индикатор «Турбо» начнет медленно мигать. Для отключения функции нажмите и удерживайте кнопку
10/Start, одновременно нажмите кнопку Turbo. Индикатор TURBO выключится, функция кнопки выключена. Для
выключения других функций повторите процедуру. Кроме того, для отключения назначенных функций можно
просто выключить устройство серии Беспроводной комплект Trio Racer.
3. Функции кнопок на руле в разных играх могут различаться. Перед настройкой параметров в меню игры
проконсультируйтесь с руководством по игре и выберите оптимальные параметры.
Важная информация:
1. Питание системы осуществляется от трех алкалиновых батареек типоразмера AA. Заменяйте батарейки
одновременно, используйте батарейки одного типа. Поскольку вхыодное напряжение аккумуляторов значительно
ниже, чем у алкалиновых батареек, руль может реагировать медленнее, а зеленый индикатор может мигать. Это
норально. Рулем можно пользоваться до полного разряда батареек.
2. В целях экономии заряда батареек переводите выключатель питания в положение «OFF», когда не пользуетесь
рулем.
DEUTSCH
5
PS2
Alkalinebatterie der Größe AA
SCHALTER
SCHALTER
PC/PS3
USB-Port
RX-LED Power-LED
Verbindung
Systemvoraussetzungen:
PC
IBM PC Pentium 166MHz kompatibel oder höher
Microsoft Windows VISTA/XP/ME/2000/98
CD-/DVD-ROM-Laufwerk zur Treiberinstallation
PlayStation
PlayStation
2
PlayStation
3
Software-Installation
Verbinden Sie das Lenkrad über den USB-Anschluss mit dem PC/ PlayStation
3. Verbinden Sie dann das Pedal mithilfe des
mitgelieferten Kabels mit der Haupteinheit. Sobald eine Verbindung hergestellt wurde, wird vom System „neue Hardware
gefunden“, und die Installation wird abgeschlossen.
1. Legen Sie die Wireless Trio Racer CD-ROM in das Laufwerk ein; warten Sie einige Sekunden, bis Ihr Computer das
Installationsprogramm startet.
2. Ist Ihr Betriebssystem so eingerichtet, dass es eine neu eingelegte CD-ROM automatisch liest, wird das Autorun-Programm
gestartet und das Installationsfenster öffnet sich. Folgen Sie den Installationsanweisungen auf dem Bildschirm..
Installation der Hardware
1. Schließen Sie das USB-Kabel an und stecken Sie es in einen USB-Port von PC/PlayStation
3 oder einen USB-Hub an.
Verbinden Sie dann das Pedal mithilfe des mitgelieferten Kabels mit der Haupteinheit. Sobald eine Verbindung hergestellt
ist, wird vom System "neue Hardware gefunden" angezeigt und die Installation wird abgeschlossen.
2. Wenn die Spielkonsole korrekt an Ihren PC angeschlossen ist, aber mit Ihrem Spiel nicht arbeitet, gehen Sie zur Game
Controller-Seite. Wählen Sie „Advanced“ und prüfen Sie, ob die „Wheel“ definiert ist.
Einstellen der Drahtlosfunktion:
Sobald die Installation des Wireless Trio Racer abgeschlossen ist, sucht es automatisch den Empfänger und verbindet sich mit
ihm. Bei einer erfolgreichen Verbindung leuchtet die grüne LED am Lenkrad für fünf Sekunden auf und geht dann aus.
Verbindungs-Modus
Stromspar-Modus
beenden
Stromspar-Modus
Anzeige für schwache
Batterie
START/Taste 10+Taste11/Fn-Taste am Lenkrad
Verbindungstaste am Empfänger-Dongle
START/Taste 10 oder
SELECT/Taste 9.
Nach 2 Minuten ohne
Tastenbetätigung.
Die grüne LED blinkt
langsam.
Turbo-Funktion:
1. Festlegen/Löschen der Turbo-Funktion: Halten Sie die TURBO-Taste gedrückt und drücken Sie dann eine der
Aktionstasten, mit Ausnahme der Tasten 9-10, oder das Bremspedal, um dafür die Turbo-Funktion festzulegen. Die LED für
die Turbo-Funktion blinkt entsprechend. Um die Turbo-Funktion wieder zu löschen, wiederholen Sie die gleichen
Prozeduren.
2. Geschwindigkeit einer Turbofunktion einstellen: Halten Sie die TURBO-Taste gedrückt. Dann drücken Sie die START-Taste
einmal. Jedes Mal, wenn Sie die START-Taste drücken, wird die Turbo-Geschwindigkeit verändert in der Reihenfolge
2 4 8 16 2 Hz.
Turbo Speed Setting Key Remapping Setting PS3 Mode Select_Key Start_Key PS_Key
Turbo+ Key10/Start Key_10/START + Turbo Switch to PS Position Key_9 Key_10 Key_Fn at PS mode
Aktive Richtungsfunktion für Spieleinrichtungsseite:
1. Drücken Sie zwei Sekunden lang auf die Auswahltaste. Die LED für die Turbo-Funktion leuchtet, und zeigt so die
Aktivierung der Richtungsfunktion an.
Wireless Trio Racer
Key1
Key3
Key10/Start
Key8
DC 5V
Key7
Key4
Key2
Key5
Key9/Select
Turbo
L
ED
Pedal Connector
Turbo Key
Key6
Key11/Fn
Power
Switch
H
ook
C
-
Clamp to
inner
stopper.
Brake
Acceleration
DEUTSCH
6
Die Richtung wird folgendermaßen gesteuert: Taste 5=Nach oben; Taste 6 =Nach unten; Mit Lenkrad nach rechts lenken
=Nach rechts; Mit Lenkrad nach links lenken =Nach links.
2. Drücken Sie erneut zwei Sekunden lang auf die Auswahltaste, um die Richtungsfunktion zu deaktivieren. Die LED für die
Turbo-Funktion befindet sich wieder im Ausgangszustand.
Tastaturbelegung
Bei bestimmten Rennspielen sind die Funktionen r Bremse und Gas möglicherweise nicht auf das Brems- oder Gaspedal
gelegt. Mithilfe der Funktion für die Tastaturbelegung können Sie die Funktion auf Ihre Lieblingstasten legen.
Beachten Sie, dass bei der Reihe Wireless Trio Racer nur die Tasten 5/6/7/8 sowie Brems- und Gaspedal mit Funktionen
belegt werden können. Der Vorgang muss für jede Taste einzeln durchgeführt werden.
1. Einstellen der Tastaturbelegung: Halten Sie die Taste 10/Start gedrückt, und drücken Sie gleichzeitig auf die Turbo-Taste.
Die LED für die Turbo-Funktion blinkt schnell und zeigt so die Aktivierung der Tastaturbelegung an. Drücken Sie auf die
ZIEL-Taste, auf die Sie diese Funktion kopieren möchten. Die LED für die Turbo-Funktion blinkt jetzt langsam. Drücken Sie
nun auf die AUSGANGS-Taste, um deren Funktion auf die ZIEL-Taste zu kopieren. Die LED für die Turbo-Funktion leuchtet
nicht mehr. Der Vorgang ist abgeschlossen. Gehen Sie wie beschrieben vor, um weitere Funktionen zu duplizieren.
2. Aufheben der Tastaturbelegung: Halten Sie die Taste 10/Start gedrückt, und drücken Sie gleichzeitig auf die Turbo-Taste.
Die LED für die Turbo-Funktion blinkt schnell. Drücken Sie auf die ZIEL-Taste, deren Belegung Sie aufheben möchten. Die
LED für die Turbo-Funktion blinkt jetzt langsam. Halten Sie die Taste 10/Start gedrückt, und drücken Sie gleichzeitig auf die
Turbo-Taste, um die Funktion aufzuheben. Die LED für die Turbo-Funktion leuchtet nicht mehr. Der Vorgang ist
abgeschlossen. Gehen Sie wie beschrieben vor, um weitere Funktionen aufzuheben. Alternativ können Sie das Gerät der
Reihe Wireless Trio Racer auch ausstecken, um die Tastaturbelegung aufzuheben.
3. Die Hardware-Funktionen der Lenkradtasten können sich je nach Spiel unterscheiden. Informieren Sie sich immer in der
Spieleanleitung über die besten Spieleinstellungen, bevor Sie diese über die Optionen im Spiel ändern.
Wichtige Information:
1. Verwenden Sie drei AA Alkalinebatterien. Ersetzen Sie alle Batterien gleichzeitig durch gleichartige Batterien. Da die
Ausgangsspannung eines wiederaufladbaren Akkus viel geringer ist als die einer Alkalinebatterie, kann das Lenkrad
feststellen, dass die Spannung zu gering ist und mit dem Signal für schwache Batterien (blinkende grüne LED) reagieren.
Dies ist normal. Sie können das Lenkrad weiter benutzen, bis der Strom verbraucht ist.
2. Um Energie zu sparen, schalten Sie immer den Stromschalter in die OFF (AUS)-Position, wenn Sie nicht mit dem Lenkrad
spielen.
Français
7
PS2
Piles alcalines type AA
Interrupteur
PC/PS3
Port USB
DEL RX DEL Connexion alimentation
Pour PC
Compatibilité IBM PC Pentium 166MHz ou supérieur
Microsoft Windows VISTA/XP/ME/2000/98
Lecteur CD/DVD-ROM pour l’installation du pilote
Pour PlayStation
PlayStation
2
PlayStation
3
Installation du matériel
Branchez le volant sur un port USB de votre PC/ PlayStation
3. Reliez ensuite le pédalier à l’appareil principal à l’aide du câble
fourni. Une fois ces branchements effectués, votre système affichera le message « nouveau matériel détecté » et parachèvera
automatiquement l’installation.
1. Insérez le CD du pilote Wireless Trio Racer dans votre lecteur CD-ROM ; patientez quelques instants pendant que votre
PC charge le disque.
2. Si votre système est compatible avec la lecture automatique d’un nouveau CD, le programme d’installation s’exécute et
l’écran de bienvenue s’affiche. Suivez alors les instructions données.
Installation du matériel
1. Insérez le câble USB et branchez-le sur un port USB du PC/PlayStation
3 ou sur un concentrateur USB. Reliez ensuite le
pédalier à l’appareil principal à l’aide du câble fourni. Une fois ce branchement effectué, le système « détectera un
nouveau périphérique » et parachèvera l’installation.
2. Si votre manette de jeu est correctement reliée à votre PC mais qu’il est impossible de démarrer un jeu, ouvrez la fenêtre
Contrôleurs de jeu sur votre ordinateur et sélectionnez-y « Avancé » afin de vérifier si l’ID de la manette de jeu « Wheel »
ou non.
Configuration de la fonction sans-fil :
Une fois l’installation de votre Wireless Trio Racer parachevée, celui-ci recherchera automatiquement le récepteur afin
d’établir une connexion. Le voyant DEL vert situé sur le volant restera allumé pendant cinq secondes avant de s’éteindre une
fois la connexion correctement établie.
Mode connexion Reprise depuis le mode
veille
Mode veille Indicateur de faible niveau
des piles
START/touche 10+touche 11/Fn sur le volant
Bouton Connexion sur le récepteur
START/touche 10 ou
SELECT/touche 9.
Après 2 minutes
d’inactivité.
Le voyant DEL vert clignote
lentement en continu.
Fonction Turbo :
1. Assigner/Ôter la fonction Turbo : Tout en maintenant enfoncé le bouton TURBO, appuyez sur n’importe quelle touche
d’action, à l’exception des touches 9-10 ou de la pédale de frein, afin de lui assigner la fonction Turbo. Le voyant DEL
Turbo se met simultanément à clignoter. Pour ôter la fonction Turbo, répétez cette même procédure.
2. Configurer la vitesse Turbo : appuyez plusieurs fois sur le bouton TURBO, puis appuyez sur le bouton START. A chaque
pression sur le bouton START, les vitesses Turbo défileront comme suit : 2->4->8->16->2 Hz.
Turbo Speed Setting
Key Remapping Setting PS3 Mode Select_Key
Start_Key PS_Key
Turbo+ Key10/Start Key_10/START + Turbo Switch to
PS Position
Key_9 Key_10 Key_Fn at PS mode
Activation de la fonction Direction pour configuration du jeu :
1. Appuyez sur le bouton ‘Select’ (sélection) pendant deux secondes ; le voyant LED Turbo s’allume alors pour vous indiquer
l’activation de la fonction « Direction ».
La configuration s’établit comme suit : bouton 5 = HAUT ; bouton 6 = BAS ; coup de volant à droite = DROITE ; coup de
volant à gauche = GAUCHE.
Wireless
Trio Racer
Key1
Key3
Key10/Start
Key8
DC 5V
Key7
Key4
Key2
Key5
K
ey9/Select
Turbo
LED
Pedal Connector
Turbo Key
Key6
Key11/Fn
Power
Switch
H
ook
C
-
Clamp to
inner
stopper.
Brake
Acceleration
Français
8
2. Pour supprimer la fonction « Direction », appuyez une nouvelle fois pendant deux secondes sur le bouton Select. Le
voyant LED Turbo s’éteint.
Fonction mappage des boutons
Dans le cas de certains jeux, il peut arriver que les fonctions d’accélération et de freinage ne correspondent pas à la pédale
FREIN ou ACCÉLÉRATEUR de votre pédalier. Grâce à la fonction de mappage, vous pouvez attribuer ces fonctions aux
boutons de votre choix.
Notez que pour le Wireless Trio Racer, la fonction de mappage ne peut se faire que sur les boutons 5/6/7/8, la pédale de frein
et l’accélérateur. L’opération de mappage ne fait que dupliquer la fonction d’un bouton vers un autre.
1. Configuration de la fonction mappage : appuyez sur le bouton 10/Start et tout en le maintenant enfoncé, appuyez sur le
bouton Turbo. Le voyant LED TURBO se met à clignoter rapidement pour vous indiquer l’activation de la fonction mappage.
Appuyez maintenant sur le bouton CIBLE – celui auquel vous désirez attribuer la fonction. Le voyant LED TURBO se met
à clignoter plus lentement. Appuyez ensuite sur le bouton SOURCEcelui dont vous désirez dupliquer la fonction vers le
bouton CIBLE. Le voyant LED TURBO s’éteint pour vous indiquer que l’opération de mappage est terminée. Répétez cette
même procédure pour dupliquer d’autres fonctions.
2. Désactivation de la fonction mappage : appuyez sur le bouton 10/Start et tout en le maintenant enfoncé, appuyez sur le
bouton Turbo. Le voyant LED TURBO se met à clignoter rapidement. Appuyez maintenant sur le bouton CIBLE celui
duquel vous désirez supprimer la fonction précédemment dupliquée. Le voyant LED TURBO se met à clignoter plus
lentement. Appuyez de nouveau sur le bouton 10/Start et tout en le maintenant enfoncé, appuyez sur le bouton Turbo pour
confirmer la désactivation. Le voyant LED TURBO s’éteint pour vous indiquer que la fonction précédemment dupliquée sur
ce bouton a bien été supprimée. Répétez cette même procédure pour supprimer la duplication d’autres boutons. Vous
pouvez également débrancher votre Wireless Trio Racer pour désactiver la fonction mappage.
3. Les fonctions attribuées aux boutons de votre volant peuvent changer selon les jeux. Avant de configurer votre jeu depuis
la page OPTION de celui-ci, pensez à lire son manuel pour déterminer la configuration la plus appropriée.
Informations importantes :
1. Utilisez trois piles alcalines de type AA. Remplacez simultanément toutes les piles par des piles neuves de même type. La
tension en sortie d’une pile rechargeable étant inférieure à celle d’une pile alcaline, votre volant pourrait détecter une
alimentation trop faible et déclencher le clignotement du voyant DEL vert. Ceci est normal. Vous pouvez continuer à jouer
jusqu’à ce que l’alimentation devienne réellement insuffisante.
2. Pour préserver l’autonomie des piles, placez l’interrupteur d’alimentation en position OFF (éteint) dès que vous n’utilisez
pas l'appareil.
Italiano
9
PS2
Batterie Alkaline Dim. AA
INTERRUTTORE
PC/PS3
USB Port
RX LED Link Power LED
Requisiti del Sistema:
Per PC
IBM PC Pentium 166MHz compatibili o piu’ avanzati.
Microsoft Windows VISTA/XP/ME/2000/98
CD/DVD-ROM Drive per l’installazione del driver.
Per PlayStation
PlayStation
2
PlayStation
3
Installazione software
Collegare il Wheel a un USB port sul PC/PlayStation
3. E collegare il Pedal all’unita’ principale unit con il cavo incluso. Dopo
che la connessione e’ stata effettuata, il sistema “Trova un nuovo hardware” e completa l’ installazione.
1. Inserire il CD di installazione di Wheel nell’unità CD-ROM; attendere alcuni secondi affinché il PC carichi il disco.
2. Se il vostro sistema operativo è impostato per leggere automaticamente ogni CD nuovo, sarà lanciato il programma di
esecuzione automatica e verrà visualizzata la schermata iniziale dell’installazione. Seguire le istruzioni riportate a schermo.
Installazione Hardware
1. Collegare il cavo USB ed inserirlo in un USB port sul PC/PlayStation
3 o un USB Hub. Poi collegare il Pedale all’unita’
principale con il cavo incluso. Dopo la connessione, il sistema “trovera’ un nuovo hardware” e completera’ l’ installazione.
2. Se il game pad è collegato correttamente al PC, ma non funziona con il gioco prescelto, andare alla pagina Game
Controllers e selezionare “Avanzate” (Advanced) per verificare se l’ID “Wheel” o no.
Impostare la Funzione wireless:
Una volta completata l’ installazione del Wireless Trio Racer, cerchera’ automaticamente e si colleghera’ con il ricevitore. Il
LED verde sul volante si accendera’ per cinque secondi e poi si spegnera’ se avrete ottenuto una connessione.
Modalita’ Link Disattiva modalita’
sospensione
Modalita’ Sospensione Indicatore Batteria
scarica
START/Tasto 10+Tasto11/ pulsante Fn sul
Volante
Collegare il pulsante al Ricevitore
START/Tasto 10 pulsante
o SELEZIONARE/Tasto 9
pulsante.
Dopo 2 minuti senza
nessuna attivita’ del
pulsante.
LED verde continua a
lampeggiare
lentamente.
Funzione Turbo:
1. Imposta/Annulla Funzione Turbo: Premere e tenere premuto il pulsante TURBO, poi premere qualsiasi Tasto di azione
eccetto i pulsanti 9-10, o il Pedale del Freno per impostare la funzione turbo per esso. Il Turbo LED lampeggera’ in accordo.
Per annullare la funzione Turbo, ripetere la stessa procedura.
2. Configurare la velocità Turbo: Premere continuamente il tasto TURBO, puoi premere solo il tasto START. La velocità
Turbo sarà adattata ciclicamente da 2->4->8->16->2 Hz, ciascuna volta che si preme il tasto START.
Turbo Speed Setting
Key Remapping Setting
PS3 Mode Select_Key Start_Key
PS_Key
Turbo+ Key10/Start Key_10/START + Turbo
Switch to PS Position
Key_9 Key_10 Key_Fn at PS mode
Attivare la Funzione di Direzione per la Pagina d’ Impostazione Gioco:
1. Premere il pulsante di Selezione per due secondi, Il Turbo LED si accendera’ per l’attivazione della “Funzione di
Direzione”.
I seguenti agiranno come controllo di ciascuna direzione: Pulsante 5=SU; Pulsante 6 = GIU; Volante a destra= DESTRA;
Volante A SINISTRA= SINISTRA.
2. Premere Seleziona per due secondi di nuovo per disattivare la funzione Direzione. Il Turbo LED tornera allo status
normale.
Wireless
Trio Racer
Key1
Key3
Key10
/Start
Key8
DC 5V
Key7
Key4
Key2
Key5
Key9/Select
Turbo
LED
Pedal Connector
Turbo Key
Key6
Key11/Fn
Power
Switch
H
ook
C
-
Clamp to
inner
stopper.
Brake
Acceleration
Italiano
10
Mappa della Funzioni dei Tasti
Per alcuni giochi di corsa, la funzione del freno e dell’ accelerazione potrebbero anche non essere collegate al pedale del
FRENO o al pedale dell’ACCELERAZIONE. Con l’aiuto della Mappa dei Tasti, potete duplicare la funzione sui vostri pulsanti
preferiti.
Tenete nota del fatto che Wireless Trio Racer series puo’ solamente impostare la funzione di Mappa dei Tasti sui pulsanti
5/6/7/8, pedale Freno e pedale Accelerazione. Ogni operazione Mappa dei Tasti puo’ duplicare solamente un tasto con un altro.
1. Imposta la Funzione Mappa dei Tasti: Premere per un tempo prolungato il Pulsante 10/Avvia e premere il pulsante
Turbo allo stesso tempo. Il TURBO LED lampeggera’ velocemente per indicare l’attivazione della funzione Mappa dei Tasti.
Premere il vostro pulsante TARGET preferito sul quale vorreste copiare quella funzione. Il TURBO LED ora lampeggera’
lentamente. Poi, premere il pulsante SOURCE per duplicare questa funzione sul pulsante TARGET per completare la
procedura. Il TURBO LED si spegnera’ per indicare che la duplicazione della funzione e’ stata completata. Utilizzare
queste procedure di nuovo per la duplicazione di altre funzioni.
2. Disattivare la Funzione, Mappa dei Tasti: Premere per un tempo prolungato il Pulsante 10/Avvia e premere il pulsante
Turbo allo stesso tempo. Il TURBO LED lampeggera’ velocemente. Premere il pulsante TARGET dal quale vorreste
disattivare la funzione. Il TURBO LED lampeggera’ lentamente. Poi, premere per un tempo prolungato il Pulsnate 10/Avvia,
e premere Turbo allo stesso tempo per disattivare la funzione. Il TURBO LED si spegnera’ per indicare che la
distattivazione e’ stata completata. Utilizzare queste procedure di nuovo per ogni funzione che deve essere disattivata. O
altrimenti potete scollegare Wireless Trio Racer series per disattivare la funzione Mappa dei Tasti.
3. La funzione hardware dei pulsanti volante potrebbero variare a secondo del gioco. Prima di procedere con le impostazioni
del gioco dale OPZIONI dentro il gioco, sempre leggere il manuale del vostro gioco attentamente per inserire le migliori
impostazioni di gioco.
Informazione Importante:
1. Utilizzare tre batterie Alkaline Dim. AA. Rimpiazzare le batterie allo stesso tempo con lo stesso tipo di batterie. Per via del
fatto che il voltatggio di una batteria ricaricabile e’ molto piu’ basso di quello di una batteria Alkalina, il volante potrebbe
individuare che il voltaggio e’ troppo basso e potrebbe rispondere con un segnale di batteria scarica con il LED Verde
lampeggiante. Questo e‘ normale. Potete continuare a giocare finche’ non si carica completamente.
2. Per risparmiare sull’ energia, mettere l’interruttore sulla posizione OFF tutte le volte che non giocate con esso.
ESPAÑOL
11
PS2
Pila alcalina tipo AA
Interruptor
PC/PS3
Puerto USB
Indicador LED de rayos X Enlace Indicador LED de carga
Requisitos del sistema:
Para PC
IBM PC Pentium 166MHz compatible o superior
Microsoft Windows VISTA/XP/ME/2000/98
Unidad de CD/ DVD-ROM para instalación del
controlador
Para PlayStation
PlayStation
2
PlayStation
3
Instalación del software
Conecte el volante a un puerto USB del PC/ PlayStation
3, y el Pedal a la unidad principal con el cable incluido. Una vez
conectados, el sistema mostrará el recuadro “Se ha encontrado nuevo hardware” y completará la instalación.
1. Introduzca el CD de controlador del Wheel en su CD-ROM; espere unos segundos hasta que su PC cargue el disco.
2. Si su sistema está configurado para leer automáticamente un CD nuevo, el programa de autoejecución se pondrá en
marcha y aparecerá la pantalla de instalación. Siga las instrucciones que aparecen en pantalla.
3. Si su sistema no ejecuta el software de instalación automáticamente, puede localizar el archivo en el directorio de su unidad
de CD y hacer clic en él y a continuación seguir las instrucciones que aparecen en pantalla para instalar el software de
Wheel.
4. Después de completar la instalación del software, reinicie su PC.
Instalación del hardware
1. Conecte el cable USB en el puerto USB de la PC / PlayStation
3 ó concentrador USB. A continuación conecte el Pedal al
aparato principal con el cable incluido. Una vez que todo esté conectado, el sistema abrirá la ventana “Encontrar nuevo
hardware” y completará la instalación.
2. Si el pad de juego está correctamente conectado al PC pero no funciona con su juego, vaya a la página de controladores de
juego y seleccione la página “Avanzado” para comprobar si el ID de pad de juego “Wheel”.
Configuración de la función inalámbrica:
Una vez haya completado la instalación del Wireless Trio Racer, el mismo buscará y se conectará al receptor de forma
automática. Si la conexión ha tenido éxito, el indicador LED verde que encontrará en el volante se encenderá durante cinco
segundos y luego se apagará.
Modo Enlace
Activar tras modo en
espera
Modo en espera
Indicador de baja carga
START/Teclas 10 y 11/ Botón Fn del volante
Botón de conexión del receptor de llave
START/ Tecla 10 ó
SELECT/tecla 9.
Tras dos minutos sin
presionar ningún botón.
El indicador LED verde
sigue parpadeando
lentamente.
Función Turbo:
1. Activar/Desactivar función Turbo: Presione y mantenga presionado el botón TURBO, luego presione cualquier tecla de
acción, salvo la 9 y la 10, o el pedal de freno para activar la función turbo. El indicador LED de la función Turbo parpadeará
según corresponda. Para desactivar la función Turbo, repita el mismo procedimiento.
2. Configurar velocidad turbo: Pulse continuamente el botón TURBO y a continuación pulse únicamente el botón START. La
velocidad turbo se ajustará cíclicamente en el orden 2->4->8->16->2 Hz cada vez que pulse el botón START.
Turbo Speed Setting
Key Remapping Setting
PS3 Mode Select_Key Start_Key
PS_Key
Turbo+ Key10/Start Key_10/START + Turbo
Switch to PS Position
Key_9 Key_10 Key_Fn at PS mode
Activar función de dirección de la página de configuración de juego:
1. Pulse el botón Select durante dos segundos, el piloto LED Turbo se encenderá para mostrar que se ha activado la “función
Dirección”.
Wireless Trio Racer
Key1
Key3
Key10/Start
Key8
DC 5V
Key7
Key4
Key2
Key5
Key9/Select
Turbo
L
ED
Pedal Connector
Turbo Key
Key6
Key11/Fn
Power
Switch
H
ook
C
-
Clamp to
inner
stopper.
Brake
Acceleration
ESPAÑOL
12
Los botones siguientes funcionarán como las distintas direcciones: Botón 5=ARRIBA; Botón 6 = ABAJO; Volante hacia la
derecha = DERECHA; Volante hacia la izquierda = IZQUIERDA.
2. Pulse Select de nuevo dos segundos para soltar la función de dirección. Ahora el piloto LED de Turbo volverá al estado
normal.
Funciones de asignación de botones
En algunos juegos de carreras, la función de freno y aceleración podría no coincidir con el FRENO o el ACELERADOR.
Mediante la función de asignación de botones, podrá duplicar la función y asignarla a los botones que quiera.
Tenga en cuenta que Wireless Trio Racer solamente puede asignar la función a los botones 5/6/7/8, freno y acelerador. Cada
operación de asignación de botones solamente puede duplicar un botón en otro.
1. Iniciar función de asignación de botones: Pulse el botón 10/Inicio y manténgalo pulsado, pulsando el botón Turbo al
mismo tiempo. El piloto LED TURBO parpadeará rápidamente para mostrar que se ha activado la función de asignación de
botones. Pulse el botón OBJETIVO al cual quiera copiar la función. Ahora el piloto LED de Turbo parpadeará lentamente. A
continuación pulse el botón FUENTE para duplicar su función en el botón OBJETIVO y completar el proceso. El indicador
LED se apagará para indicar que la función de duplicación se ha completado. Repita el proceso para duplicar otra función.
2. Finalizar función de asignación de botones: Pulse el botón 10/Inicio y manténgalo pulsado, pulsando el botón Turbo al
mismo tiempo. Ahora el piloto LED de Turbo parpadeará rápidamente. Pulse el botón OBJETIVO cuya función quiera
finalizar. Ahora el piloto LED de Turbo parpadeará lentamente. Pulse el botón 10/Inicio y manténgalo pulsado, pulsando el
botón Turbo al mismo tiempo para finalizar la función. El indicador LED se apagará para indicar que la función se ha
cancelado. Repita el proceso para cancelar otra función, o desconecte Wireless Trio Racer para que se cancele la función
de asignación de botones.
3. La función hardware de los botones del volante puede variar según el juego. Antes de proceder a los ajustes del juego
desde el menú de OPCIONES del juego, lea detenidamente el manual del juego para configurar los ajustes del juego.
Información importante:
1. Utilice tres pilas alcalinas tipo AA. Cambie todas las pilas al mismo tiempo y utilice siempre el mismo tipo de pilas. Dado que
el voltaje de salida de una pila recargable es notablemente inferior que el de una pila alcalina, es posible que el volante de
carreras detecte que el voltaje es demasiado bajo y emita una señal de respuesta de baja potencia haciendo parpadear el
indicador LED verde. Esto es normal. Podrá continuar jugando con el volante hasta que se agote la carga.
2. Para ahorrar energía, coloque el interruptor en la posición OFF cuando no lo esté utilizando.
PORTUGUÊS
13
PS2
Pilhas alcalinas AA
INTERRUPTOR
PC/PS3
Porta USB
RX LED Link LED de alimentação
Requisitos do sistema:
Para PC
IBM PC Pentium 166MHz compatível ou superior.
Microsoft Windows VISTA/XP/ME/2000/98
Unidade de CD/DVD-ROM para a instalação do
controlador.
Para PlayStation
PlayStation
2
PlayStation
3
Instalação do software
Conecte o volante a uma porta USB do PC/ PlayStation
3. E conecte o pedal à unidade principal com o cabo incluído. Depois
das ligações estabelecidas, o sistema irá detectar “Novo hardware encontrado” e completar a instalação.
1.
Introduza o CD do controlador Wheel na unidade de CD-ROM; aguarde alguns segundos para que o seu PC
carregue o disco.
2.
Se o seu sistema estiver configurado para ler automaticamente um novo CD inserido, o programa de execução
automática é executado e o ecrã de instalação aparece. Por favor siga as instruções que aparecem no ecrã.
Instalação do hardware
1. Conecte o cabo USB a uma porta USB do PC/PlayStation
3 ou a um Hub USB. De seguida, conecte o pedal à unidade
principal com o cabo incluído. Depois das ligações estabelecidas, o sistema irá detectar “Novo hardware encontrado” e
completar a instalação.
2.
Se o seu game pad estiver correctamente conectado ao seu computador mas não funcionar, vá á página dos
controladores de jogos e seleccione a página “Advanced “ para verificar se o é “Wheel” ou não.
Configurar a função sem fios:
Assim que completar a instalação do Wireless Trio Racer é automaticamente efectuada a procura e ligação ao receptor. O
LED verde no volante acende durante cinco segundos e desliga assim que a ligação for estabelecida com sucesso.
Modo Link Modo desactivar
suspensão
Modo Suspensão Indicador de pouca
carga
START/tecla 10+tecla11/tecla Fn no
volante
Botão de conexão no dongle do receptor
START/tecla 10 botão ou
SELECT/tecla 9 botão.
Após 2 minutos sem
qualquer actividade do
botão.
LED verde continua
intermitente.
Função Turbo:
1. Ajustar/anular a função Turbo: Pressione o botão TURBO durante alguns segundos e, de seguida, pressione qualquer
tecla de acção, excepto os botões 9-10, ou o pedal do travão para ajustar a função turbo para o mesmo. O LED Turbo
pisca de acordo. Para anular a função Turbo repita novamente os mesmos procedimentos.
2.
Ajustar velocidade turbo: prima continuamente o botão TURBO e, de seguida, prima apenas o botão INICIAR.
A velocidade turbo é ajustada ciclicamente em 2->4->8->16->2 Hz sempre que premir o botão INICIAR.
Turbo Speed Setting
Key Remapping Setting
PS3 Mode Select_Key Start_Key
PS_Key
Turbo+ Key10/Start Key_10/START + Turbo
Switch to PS Position
Key_9 Key_10 Key_Fn at PS mode
Função direcção activa para a página de configuração do jogo:
1. Prima o botão Select durante dois segundos, o LED Turbo acende indicando a activação da “função Direcção”.
O controlo da direcção irá funcionar do seguinte modo: Botão 5=CIMA; Botão 6 = BAIXO; Volante para a direita = DIREITA;
Volante para a esquerda = ESQUERDA.
2. Prima Select novamente durante dois segundos para anular a função Direcção. O LED Turbo volta ao seu estado normal.
Wireless Trio Racer
Hook C-Clamp to inner stopper
Brake
Acceleration
Key1
Key3
Key10/Start
Key8
DC 5V
Key7
Key4
Key2
Ke
y5
Key9/Select
Turbo
LED
Pedal Connector
Turbo Key
Key6
Key11/Fn
Power
Switch
PORTUGUÊS
14
Funções de atribuição das teclas
Para alguns jogos de corridas, a função de travagem e de aceleração pode não estar associada ao pedal TRAVÃO ou ao pedal
ACELERAÇÃO. Com a ajuda da atribuição de teclas pode duplicar a função nos seus botões favoritos.
Tenha em atenção que o Wireless Trio Racerpermite ajustar a função de atribuição de teclas aos botões 5/6/7/8, pedal de
travão e pedal de aceleração. Cada execução da atribuição de teclas só pode duplicar uma tecla para outra.
1. Ajustar a função de atribuição de teclas: Prima durante alguns segundos o botão 10/Start e prima o botão Turbo ao
mesmo tempo. O LED TURBO irá começar a piscar rapidamente indicando a activação da função de atribuição das teclas.
Prima o seu botão ALVO favorito para o qual gostaria de copiar esta fuão. O LED TURBO passa a piscar lentamente. De
seguida, prima o botão ORIGEM para duplicar a sua função para o botão ALVO para completar o procedimento. O LED
TURBO apaga indicando que a função de duplicação está concluída. Utilize novamente este procedimento para duplicar
outras funções que pretenda.
2. Anular a função de atribuição de teclas: Prima durante alguns segundos o botão 10/Start e prima o botão Turbo ao
mesmo tempo. O LED TURBO irá piscar rápido. Prima o botão ALVO de onde pretende anular esta função. O LED TURBO
passa a piscar lentamente. De seguida, mantenha o botão 10/Start premido e prima o botão Turbo ao mesmo tempo para
anular a função. O LED TURBO apaga indicando que a anulação está concluída. Utilize novamente este procedimento
para anular outras funções que pretenda. Ou desconecte o Wireless Trio Racer para anular a função de atribuição de
teclas.
3. A função de hardware dos botões do volante pode variar em diferentes jogos. Antes de proceder às definições de jogo nas
OPÇÕES do jogo, leia o manual do jogo atentamente para configurar as melhores definições para o mesmo.
Informação importante:
1. Utilize três pilhas alcalinas AA. Substitua as pilhas ao mesmo tempo e utilize o mesmo tipo de pilhas. Devido à voltagem
de saída de uma pilha recarregável ser inferior a uma pilha alcalina, o volante de corrida pode detectar que a voltagem de
alimentação é muito baixa e responder com um sinal de potência baixo com o LED verde intermitente. Isto é normal. Pode
continuar a jogar até o volante até ficar sem carga.
2. Para poupar energia, coloque o interruptor de alimentação em OFF sempre que não estiver a jogar.
BRASIL
15
PS2
AA Size Alkaline Battery
SWITCH
PC/PS3
USB Port
RX LED Link Power LED
Requisitos do Sistema:
Para PC
IBM PC Pentium 166MHz compatível ou superior
Microsoft Windows VISTA/XP/ME/2000/98
CD/DVD-ROM Drive para instalação dos drivers
Para PlayStation
PlayStation
2
PlayStation
3
Instalação do Software
Conecte o Volante numa porta USB no PC/ PlayStation
3. E conecte o Pedal na unidade principal com o cabo que vem incluído.
Após a conexão, o sistema irá “Encontrar um novo hardware” e completar a instalação.
1.
Coloque o CD driver Wheel no seu CD-ROM, e espere alguns segundos para seu PC carregar o disco
2.
Se o seu sistema estiver configurado para ler automaticamente um novo CD, então o programa de auto-run é
executado e a tela de abertura de instalação aparece. Siga as instruções da tela.
Instalação do Hardware
1. Conecte o cabo USB e conecte-o na porta USB no PC/PlayStation
3 ou um Hub USB . Depois conecte o Pedal na unidade
principal com o cabo que vem incluído. Após a conexão, o sistema irá “Encontrar um novo hardware” e completar a
instalação.
2.
Se o Wheel estiver conectado corretamente ao seu PC, mas não funciona no seu game, até a página de
Game Controllers e selecione página “Advanced" para verificar se a ID do é “Wheel” ou não.
Ajustar função wireless (sem fio):
Uma vez completada a instalação do Wireless Trio Racer , ele irá automaticamente buscar e ligar com receptor. O LED verde
no volante acenderá por cinco segundos e depois desligar se você tiver uma conexão bem sucedida.
Modo Link
Modo suspender acordar
Modo Suspender
Indicador de Bateria
fraca
INICIAR/tecla 10+tecla1/botão Fn no volante
Conectar o botão no Dongle Receptor
INICIAR/tecla 10 botão ou
SELEC/Tecla 9 botão.
Após 2 minutos sem
atividade do botão.
LED verde continua a
piscar lentamente.
Função Turbo:
1. Ajustar/Limpar Função Turbo: Pressione e segure o botão TURBO, e pressione qualquer tecla de ação 9-10, ou Pedal do
Freio para ajustar a função turbo. O LED Turbo irá piscar de acordo. Para liberar a função Turbo, repita o mesmo
procedimento.
2.
Ajustar Velocidade do Turbo: Pressione continuamente o botão TURBO, e então pressione somente o botão
START. A velocidade do Turbo será ajustada ciclicamente de 2->4->8->16->2 Hz, cada vez que você
pressionar o botão START.
Turbo Speed Setting
Key Remapping Setting
PS3 Mode Select_Key Start_Key
PS_Key
Turbo+ Key10/Start Key_10/START + Turbo
Switch to PS Position
Key_9 Key_10 Key_Fn at PS mode
Função Direção Ativa para Página de Montagem do Game:
1. Pressione o botão Selecionar por dois segundos, o LED do Turbo irá acender para mostrar a ativação da “função Direção”.
Vai ocorrer o seguinte em cada controle de direção: Botão 5=SOBE; Botão 6 = DESCE; Torcer Volante para direita =
DIREITA; Torcer volante para esquerda = ESQUERDA.
2. Pressione novamente Selecionar por dois segundos para liberar a função Direção. O LED Turbo iretornar ao status
normal.
Wireless Trio Racer
Key1
Key3
Key10/Start
Key8
DC 5V
Key7
Key4
Key2
Key5
Key9/Select
Turbo
L
ED
Pedal Connector
Turbo Key
Key6
Key11/Fn
Power
Switch
H
ook
C
-
Clamp to
inner
stopper.
Brake
Acceleration
BRASIL
16
Funções Mapeamento de Teclas
Para alguns games de corrida, a função de freio e acelerador pode não estar relacionada com os pedais de FREIO E
ACELERADOR. Com a ajuda do Mapeamento de Teclas, você pode duplicar a função nos seus botões favoritos.
Note que a série Wireless Trio Racer só pode montar a função Mapeamento de Tecla nos botões 5/6/7/8, Pedal de Freio e
Acelerador. Cada operação do Mapeamento de Teclas só pode duplicar uma tecla à outra.
1. Montar Função Mapeamento de Teclas: Pressione e segure o Botão 10/Iniciar e pressione o botão Turbo ao mesmo
tempo. O LED TURBO irá piscar rapidamente para mostrar a ativação da função Mapeamento de Teclas. Pressione seu
botão ALVO favoritO onde gostaria de copiar esta função. O LED TURBO irá piscar lentamente. Depois, pressione o botão
FONTE para duplicar sua função para o botão ALVO para completar o procedimento. O LED TURBO irá desligar para
indicar que a duplicação da função está terminada. Use estes procedimentos novamente para outras duplicações de
funções.
2. Liberar Função Mapeamento de Teclas: Pressione e segure o Botão 10/Iniciar e pressione o botão Turbo ao mesmo
tempo. O LED TURBO irá piscar rapidamente. Pressione o botão ALVO No qual deseja liberar esta função. O LED TURBO
irá piscar lentamente. Depois, pressione e segure o Botão 10/Iniciar, e pressione Turbo ao mesmo tempo para liberar a
função. O LED TURBO irá desligar para indicar que a liberação está terminada. Use estes procedimentos novamente para
outras liberações de funções. Ou você pode desconectar a série Wireless Trio Racer para liberar a função Mapeamento
de Teclas.
3. A função hardware dos botões do volante pode variar em games diferentes. Antes de continuar as configurações do game
da OPÇÃO dentro do game, sempre leia com cuidado o manual do seu game para ajustar as melhores configurações.
Informações Importantes:
1. Use três baterias alcalinas AA . Substitua as baterias ao mesmo tempo com o mesmo tipo de baterias. Devido a voltagem
de saída de uma bateria recarregável ser muito menor do que uma alcalina, o volante pode detectar que a voltagem está
muto baixa e responder com um sinal de energia fraco com o LED verde piscando. Isto é normal. Você pode continuar a
jogar com volante até ele ficar sem bateria.
2. Para economizar energia, ponha a chave de energia na posição OFF sempre que não estiver jogando.
NEDERLANDS
17
r
PS2
AA alkaline batterij
SCHAKELAAR
PC/PS3
USB poort
RX LED Link LED aan/uit
Systeemvereisten:
Voor PC
IBM PC Pentium 166MHz compatible of hoger
Microsoft Windows VISTA/XP/ME/2000/98
CD/DVD-ROM drive voor installeren driver
Voor PlayStation
PlayStation
2
PlayStation
3
Installeren van de software
Plug het stuurwiel in een USB-poort van de PC/ PlayStation
3, en sluit de pedaal met behulp van de meegeleverde kabel aan
op de hoofdeenheid. Na het aansluiten meldt het systeem “Nieuwe hardware gevonden” en wordt de installatie uitgevoerd.
1. Stop de cd met het Wheel stuurprogramma in uw cd rom-station; wacht enkele seconden tot uw pc de cd geladen heeft.
2. Indien uw systeem er op is ingesteld automatisch een nieuwe cd te lezen, wordt het auto run-programma uitgevoerd, en
wordt het openingsscherm van de installatie zichtbaar. Volg de instructies op het scherm.
Hardware installatie
1. Sluit de USB-kabel aan en plug hem in de USB-poort van PC/PlayStation
3 of een USB hub. Sluit daarna het pedaal met
de meegeleverde kabel aan op de hoofdeenheid. Na het aansluiten zal het systeem “Nieuwe hardware aangetroffen”
melden en de installatie voltooien.
2. Indien het Wheel correct in uw pc is geplugd, maar toch niet werkt in combinatie met uw spel, naar de pagina
Spelbesturingen gaan, en de pagina “Geavanceerd “ om na te gaan op ID i “Wheel” is of niet.
Instellen draadloze functie:
Eens de installatie van de Wireless Trio Racer voltooid, zal hij automatisch gaan zoeken en koppelen met de ontvanger. De
groene LED op het stuurwiel licht vijf seconden op en dooft daarna als de koppeling slaagde.
Link-mode Waken-mode
onderbreken
Onderbreken mode Batterij leeg-indicator
START/toets 10+toets11/functietoets bij het
stuur
Connect-knop op de ontvanger-dongle
START/toets 10 knop of
SELECT/toets 9 knop.
Na 2 minuten zonder op
een toets te drukken.
De groene LED blijft
traag knipperen.
Turbofunctie:
1. De Turbo-functie instellen/wissen: hou de TURBO-toets ingedrukt, en druk daarna op om het even welke actie-toets
behalve knoppen 9-10, of het rempedaal om de Turbo-functie in te stellen. De Turbo-LED zal gaan knipperen. Om de
Turbo-functie te stoppen, dezelfde procedure herhalen.
2. De turbo-snelheid instellen: hou de TURBO-knop ingedrukt, en druk op de START-knop. De turbo-snelheid wordt cyclisch
ingesteld van 2->4->8->16->2 Hz, telkens u drukt op de START-knop.
Turbo Speed Setting
Key Remapping Setting
PS3 Mode Select_Key Start_Key
PS_Key
Turbo+ Key10/Start Key_10/START + Turbo
Switch to PS Position
Key_9 Key_10 Key_Fn at PS mode
Actieve richting-functie voor de Game setup-pagina:
1. Druk gedurende twee seconden op de knop Select. De Turbo-LED zal oplichten om het inschakelen van de richtingsfunctie
aan te geven.
Op de volgende manier bestuurt u de richting: toets 5=OMHOOG; toets 6 = OMLAAG; naar rechts = RECHTES; naar links
= LINKS.
2. Druk op nieuw twee seconden om de richtingsfunctie uit te schakelen. De Turbo-LED keert terug naar zijn normale
toestand.
Draadloze
Trio Racer
H
ook
C
-
Cla
mp to
inner
stopper.
Brake
Acceleration
Key1
Key3
Key10/Start
Key8
DC 5V
Key7
Key4
Key2
Key5
Key9/Select
Turbo
LED
Pedal Connector
Turbo Key
Key6
Key11/Fn
Power
Switch
NEDERLANDS
18
Toets-mapping functies
Voor bepaalde race-spellen, staan het rem- en het gaspedaal niet in verband met resp. de BRAKE- of de
ACCELERATION-pedaal. Met behulp van toets-mapping kunt u deze functie overhalen naar uw favoriete toetsen.
Merk op dat u bij de Wireless Trio Racer-reeks de toets-mapping functie alleen kunt gebruiken bij de toetsen 5/6/7/8, het rrem-
en het gaspedaal. Elke toets-mapping bewerking kan slechts één toets naar een andere dupliceren.
1. De toets-mapping functie inschakelen: hou de toets 10/Start ingedrukt en druk tegelijk op de Turbo-toets. De
TURBO-LED zal snel gaan knipperen om het inschakelen van de toets-mapping functie aan te geven. Druk op de
gewenste DOEL-toets waaraan u een functie wilt kopiëren. De TURBO-LED knippert nu traag. Druk nu op de BRON-toets
om de functie ervan te kopiëren naar de DOEL-knop om de procedure af te rond. De TURBO-LED zam doven om aan te
geven dat het dupliceren van de functie voltooid is.
2. De toets-mapping functie uitschakelen: hou de toets 10/Start ingedrukt en druk tegelijk op de Turbo-toets. De
TURBO-LED zal snel gaan knipperen. Druk op de TOETS –functie waarvan u de functie wilt wissen. De TURBO-LED gaat
nu traag knipperen. Hou nu de Button 10/Start-toets ingedrukt, en druk tegelijk op de Turbo-toets om de functie te wissen.
De TURBO-LED zam doven, om aan te geven dat het wissen gebeurd is. Herhaal deze procedure voor elke te wissen
functie. U kunt ook de Wireless Trio Racer-series uitpluggen om de toets-mapping functie te wissen.
3. De hardware-functie van de wieltoetsen kan voor verschillende spellen onderling verschillen. Mees altijd aandachtig de
handleiding van uw spel voor de beste spelinstellingen, voor u deze met behulp van de OPTION-menu in het spel zelf gaat
veranderen.
Belangrijke informatie:
1. Gebruik drie AA alkaline batterijen. Vervang de batterijen telkens door hetzelfde type. Omdat de spanning van accu’s veel
lager is dan die van batterijen, kan het race-stuur aangeven dat de spanning te laag is, en de groene LED gaan knipperen.
Dit is normaal. U kunt doorgaan met spelen tot het stuur zonder stroom valt.
2. Zet de aan/uit-schakelaar om energie te sparen als u niet speelt in de OFF-stand.
ČESKY
19
PS2
Alkalická baterie typu AA
PŘEPÍNAČ
PC/PS3
USB Port
LED RX Spojení Kontrolka zapnutí
Požadavky na systém:
Pro osobní počítač
PC kompatibilní s IBM Pentium 166 MHz či rychlejší
Microsoft Windows VISTA/XP/ME/2000/98
Mechanika CD-ROM/DVD pro instalaci ovladačů
Pro PlayStation
PlayStation
2
PlayStation
3
Instalace technického vybave
Volant zapojte do USB portu na PC/ PlayStation
3. Dodaným kabelem připojte pedál k hlavní jednotce. Po připojení systém
oznámí „Nalezen nový hardware“ a instalace je dokončena.
1. Vložte disk CD s ovladači herního zařízení Wheel do jednotky CD-ROM a několik sekund počkejte, než počítač načte disk.
2. Pokud je v počítači nastavena funkce automatického spuštědisku CD, bude spuštěn automatický program a zobrazí se
instalační obrazovka. Postupujte podle zobrazených pokynů.
Instalace hardwaru
1. Připojte kabel USB Cable a připojte ho do portu USB na PC/PlayStation
3 nebo vstupu USB. Pak k hlavní jednotce
s pomocí přiloženého kabelu připojte pedál. Po připojení systém zobrazí vzkaz „Find a new hardware“ (Nalezeno nové
hardware) a dokončí instalaci.
2. Pokud je herní zařízení řádně připojeno k počítači, ale nespolupracuje s vaší hrou, přejděte na stránku Herní zařízení, dále
na stránku “Upřesnit“ a zkontrolujte, zda ID je “Wheel” či nikoli.
Nastavte bezdrátovou funkci:
Po ukončení instalace Bezdrátového Trio Racer automaticky proběhne vyhledávání a spojení s přijímačem. Jestliže došlo
k úspěšnému připojení, zelená kontrolka na volantu se rozsvítí po dobu pěti sekund a pak zase zhasne.
Režim spojení Aktivovat přerušený režim
Deaktivovat režim Ukazatel nízké baterie
START/klávesa 10 + klávesa11/ Tlačítko
funkce na volantu
Tlačítko připojeno ke klíči přijímače
START/Klávesa 10 button
nebo SELECT/Klávesa 9.
Po dvou minutách bez
aktivity tlačítka.
Zelená kontrolka nadále
pomalu bliká.
Funkce Turbo:
1. Nastavení/Zrušení funkce Turbo: Stiskněte a držte tlačítko TURBO, pak stiskněte jakékoli tlačítko (kromě tlačítek 9 –10)
nebo pedál brzdy k nastavení funkce turbo. Bude blikat kontrolka Turbo. K uvolnění funkce Turbo opakujte stejný postup.
2. Opět po dobu dvou sekund podržte stisknuté tlačítko Select, chcete-li funkci Direction (Směr) opět uvolnit. Indikátor Turbo
se opět navrátí do původního stavu.
Turbo Speed Setting
Key Remapping Setting
PS3 Mode Select_Key Start_Key
PS_Key
Turbo+ Key10/Start Key_10/START + Turbo
Switch to PS Position
Key_9 Key_10 Key_Fn at PS mode
Funkce obsazení tlačítek
U určitých závodních her se funkce brzdy a plynu nemusí vztahovat k pedálu BRZDY nebo PLYNU. Pomocí funkce Key Mapping
(Obsazení tlačítek) můžete duplikovat funkci podobných tlačítek.
Všimněte si, že řada Bezdrátového Trio Racer může nastavit funkci Key Mapping pouze u tlačítek 5/6/7/8, brzdového pedálu a
pedálu plynu. Každá operace obsazení tlačítek může pouze duplikovat jedno tlačítko na druhé.
1. Nastavení funkce obsazení tlačítek: Podržte stisknuté tlačítko 10/Start a současně stiskněte tlačítko Turbo. Indikátor
TURBO se rychle rozbliká, a tím upozorní na aktivaci funkce Key Mapping (Obsazení tlačítek). Stiskněte CÍLOVÉ tlačítko,
na které chcete tuto funkci zkopírovat. Indikátor TURBO bude nyní pomalu blikat. Potom stiskněte ZDROJOVÉ tlačítko,
jehož funkci chcete zkopírovat na CÍLOVÉ tlačítko. Tím postup........................................................... dokončíte. Indikátor
TURBO nyní zhasne, a tím signalizuje, že je funkce duplikování dokončena. Stejný postup použijte pro další duplikaci
Bezdrátové
Trio Racer
Key1
Key3
Key10/Start
Key8
DC 5V
Key7
Key4
Key2
Key5
Key9/Select
Turbo
L
ED
Pedal Connector
Turbo Key
Key6
Key11/Fn
Power
Switch
H
ook
C
-
Clamp to
inner
stopper.
Brake
Acceleration
  • Page 1 1
  • Page 2 2
  • Page 3 3
  • Page 4 4
  • Page 5 5
  • Page 6 6
  • Page 7 7
  • Page 8 8
  • Page 9 9
  • Page 10 10
  • Page 11 11
  • Page 12 12
  • Page 13 13
  • Page 14 14
  • Page 15 15
  • Page 16 16
  • Page 17 17
  • Page 18 18
  • Page 19 19
  • Page 20 20
  • Page 21 21
  • Page 22 22
  • Page 23 23
  • Page 24 24
  • Page 25 25
  • Page 26 26
  • Page 27 27
  • Page 28 28
  • Page 29 29
  • Page 30 30
  • Page 31 31
  • Page 32 32
  • Page 33 33
  • Page 34 34
  • Page 35 35
  • Page 36 36
  • Page 37 37
  • Page 38 38
  • Page 39 39
  • Page 40 40
  • Page 41 41
  • Page 42 42
  • Page 43 43
  • Page 44 44
  • Page 45 45
  • Page 46 46
  • Page 47 47
  • Page 48 48
  • Page 49 49

Genius WIRELESS TRIO RACER Návod na obsluhu

Typ
Návod na obsluhu
Táto príručka je tiež vhodná pre