Gorenje 8260.2161 Návod na obsluhu

Kategória
Odsávače pár
Typ
Návod na obsluhu
Instructions for use / Cooker hood
Návod k obsluze / Odsavač par
Használati utasítás / Elszívóernyő
Instrukcja obsługi / Okapu kuchennego
Instrucțiuni de utilizare / Hotă de bucătărie
Návod na použitie / Odsávač pár
Инструкции за употреба / Кухненски аспиратор
Pictograms used - Použité piktogramy - Alkalmazott piktogramok - Stosowane symbole
Pictograme utilizate - Použité piktogramy - Използвани пиктограми
Important information - Důležité informace - Fontos tudnivaló - Ważne informacje
Informații importante - Dôležité informácie - Важна информация
Tip - Tip - Tipp - Wskazówka - Sfat - Tip - Полезен съвет
EN Instructions for use EN 3 - EN 12
CS Návod k obsluze CS 3 – CS 12
HU Használati útmutató HU 3 - HU 12
PL Instrukcja obsługi PL 3 – PL 12
RO Instrucțiuni de utilizare RO 3 - RO 12
SK Návod na použitie SK 3 – SK 12
BG Инструкции за употреба BG 3 – BG 12
EN 3
Your cooker hood
Introduction 4
Description 5
Extraction systems 5
Operation
Control knob (depending on the model) 6
Start/stop the extraction manually 6
Automatic level (depending on the model) 6
Lighting 7
Maintenance
Cleaning the appliance 8
Cleaning the metal grease filter 8
Replacing the carbon filter 9
Replacing the lights 10
Ordering accessories
Ordering accessories 11
Environmental aspects
Disposal of packaging and appliance 12
TABLE OF CONTENTS
EN 4
Introduction
Congratulations on your choice of this Gorenje cooker hood. This product was designed with
simple operation and optimum comfort in mind.
This manual describes the best way to use this cooker hood. In addition to information on
operation, you will also find background information that may come in handy when using
theappliance.
Please read the separate safety instructions carefully before
using the appliance!
Read this manual before using the appliance and keep it in a safe place for future use.
Technical data and Installation instructions are supplied separately.
YOUR COOKER HOOD
EN 5
Description
1. Control knob
2. Cooker hood
3. Telescopic chimney
4. Grease filter
5. Carbon filter
Extraction systems
There are two configurations of this hood.
Ducted (or vented) application
The cooking vapours extracted by suction are carried outside, once the
grease particles have been filtered. This is the best method.
Ductless (or recirculating) application
The grease particles and the smell in the extracted vapours are filtered.
The air that has been sucked in is not carried outside but recirculates in
the kitchen. In this case you must have a carbon filter fitted.
Attention! The carbon filter needs to be ordered separately.
YOUR COOKER HOOD
1
2
4
4
5
3
3
EN 6
OPERATION
Control knob (depending on the model)
1. Off
2. Light
3. Level Auto and lighting
4. Level 1 and lighting
5. Level 2 and lighting
6. Level 3 and lighting
7. Level 3
8. Level 2
9. Level 1
10. Level Auto
Start/stop the extraction manually
The hood is equipped with three levels, with or without lighting.
1. Turn the control knob to the desired level.
The hood starts.
2. To stop the hood, turn the control knob to ‘Off’.
Attention!
The cooker hood is equipped with a safety function. If the control knob is turned to
amanually level and is not changed during a week, the hood stops automatically.
Automatic level (depending on the model)
The hood is equipped with an automatic level, with or without lighting.
1. Turn the control knob to the automatic level.
The hood starts.
For 60 seconds the hood is operating (level 1). During this time, a sensor is heating up.
Then, this sensor measures continuously the pollution level of the air. Automatically the
corresponding extraction level is activated.
Attention!
In recirculation mode, the reaction time of the sensor will be longer.
2. To stop the hood, turn the control knob to ‘Off’.
1
5
3
7
2
8
9
10
4
6
1
6
48
29
5
7
EN 7
Attention!
The cooker hood electronics regulate the capacity levels corresponding to gas and
vapor concentration level measured with the sensor. This regulation can differ from
expectations derived from visual monitoring of vapor occurrence. At recirculation
mode, the air in the room is not exchanged, so the humidity and pollution of the air
isnot decreased. So the cooker hood in automatic regime and in extreme cases,
canconstantly measure a higher level of air pollution; the hood will not stop.
Attention!
The best use of this automatic function can be achieved by selecting the automatic level
at the beginning of the cooking and manually stop it after finishing cooking.
Lighting
You can always make the lighting come on, even if the hood isn’t operating.
1. Turn the control knob to ‘Light’.
The lighting comes on.
2. Turn the control knob to ‘Off’.
The lighting goes off.
OPERATION
EN 8
Cleaning the appliance
Attention!
For all maintenance first switch off the mains power to the cooker hood by pulling the
plug out of the socket or by turning off the home’s master switch.
The hood needs to be cleaned regularly, both inside as well as outside. Do not use
abrasive cleaners. Do not use alcohol!
Attention!
If the instructions regarding cleaning the appliance or replacing the filters are not followed,
this can cause a fire. These instructions should be followed! The manufacturer is not liable
for damage to the hood or fire damage resulting from incompetent maintenance or from
non-adherence to the recommendations above and delivered safety instructions.
Clean the hood with soapy water and a soft cloth. Then wash off with clean water. Do not use
aggressive cleaning agents such as caustic soda and do not use scouring pads. Finish with
anon-abrasive, non-polishing agent and buff the stainless steel in the direction of the grain.
Cleaning the metal grease filter
The grease filter must be cleaned once a month, using non aggressive detergents, either by hand
or in the dishwasher, which must be set to a low temperature and a short cycle. The opening
must be placed downwards to let the water run out of the filter. The cleaning agents will make
the aluminium filter turn dull, this is normal.
1. Press the release catch towards the rear of the hood.
2. Lower the filter and remove it out of the hood.
3. Clean the filter.
4. Let the filter dry thoroughly before replacing it.
When replacing the filter, ensure that the release
catch faces forwards.
MAINTENANCE
EN 9
Replacing the carbon filter
Attention!
A carbon filter must always be installed if the cooker hood is used as a recirculation hood.
Attention!
Carbon filters cannot be cleaned to use again.
Attention!
The carbon filter must be replaced at least twice a year, depending on how much the
cooker hood is used.
Attention!
Saturated carbon is harmful to the environment, replace the filter regularly.
1. Remove the grease filter.
2. Remove the old carbon filter.
3. Position a new carbon filter behind the grease filter.
4. Replace the grease filter.
MAINTENANCE
EN 10
MAINTENANCE
Replacing the lights
Attention!
The lamp in this household appliance is only suitable for illumination of this appliance.
The lamp is not suitable for household room illumination.
The light bulb (Technical data) is a consumer item and therefore not covered by warranty.
1. Carefully remove the ring with the glass cover with a small screwdriver.
2. Remove the old bulb and insert a new one.
Attention!
Use a cloth or tissue to insert the new bulb.
3. Put the ring with the glass cover back in its initial position.
EN 11
ORDERING ACCESSORIES
Ordering accessories
When contacting the service department to order accessories, have the complete article number
of the appliance to hand.
Carbon filter - set.
Exhaust extraction hose ø 120mm or ø 150mm + fastening clip.
Recirculation set.
EN 12
Disposal of packaging and appliance
Sustainable materials have been used during manufacture of this appliance. This appliance
must be disposed of responsibly at the end of its service life. Ask your local authorities for more
information about how to do this.
The appliance packaging is recyclable. The following materials may have been used:
cardboard;
polyethylene film (PE);
CFC-free polystyrene (PS rigid foam).
Dispose of these materials in a responsible manner and in accordance with government regulations.
The product has been marked with a crossed-out dustbin symbol
to remind you of the obligation to dispose of electrical household
appliances separately. This means that the appliance may not be
included with normal domestic refuse at the end of its service life.
The appliance must be taken to a special municipal centre for
separated waste collection or to a dealer providing this service.
Separate collection of household appliances helps to prevent any
potential negative impact on the environment and on human health
caused by improper disposal. It ensures that the materials of which the
appliance is composed can be recovered to obtain significant savings
in energy and raw materials.
Declaration of Conformity
We hereby declare that our products satisfy the applicable European
Directives, Orders and Regulations, as well as the requirements stated
in the referenced standards.
ENVIRONMENTAL ASPECTS
CS 3
Váš kuchyňský odsavač par
Úvod 4
Popis 5
Odsávací systémy 5
Provoz
Ovládací kolečko (vzávislosti na modelu) 6
Ruční spuštění/vypnutí odsávání 6
Automatická úroveň (vzávislosti na modelu) 6
Osvětlení 7
Údržba
Čištění spotřebiče 8
Čištění kovového filtru proti mastnotám 8
Výměna uhlíkového filtru 9
Výměna světel 10
Objednávka příslušenství
Objednávka příslušenství 11
Otázky ochrany životního prostředí
Likvidace obalu aspotřebiče 12
OBSAH
CS 4
Úvod
Blahopřejeme, že jste si vybrali tento kuchyňský odsavač par Gorenje. Tento produkt byl vyvinut
sdůrazem na jednoduchý provoz a optimální pohodlí.
Tento návod popisuje nejlepší způsob použití tohoto kuchyňského odsavače par. Kromě
informací o provozu zde najdete také základní informace, které mohou být užitečné při používání
tohoto spotřebiče.
ed použitím přístroje si pečlivě přečtěte samostatné
bezpečnostní pokyny!
Před použitím přístroje si přečtěte tuto příručku auchovejte ji na bezpečném místě pro
budoucí použití.
Technické údaje apokyny kinstalaci jsou dodávány samostatně.
VÁŠ KUCHYŇSKÝ ODSAVAČ PAR
CS 5
Popis
1. Ovládací kolečko
2. Kuchyňský odsavač par
3. Výsuvný komín
4. Filtr proti mastnotám
5. Uhlíkový filtr
Odsávací systémy
Tento odsávač má dvě konfigurace.
Použití svývodem (nebo ventilací)
Výpary zvaření extrahované sáním jsou po odfiltrování mastných částic
odváděny ven. To je nejlepší metoda.
Použití bez vývodu (recirkulační)
Zodsávaných výparů jsou odfiltrovány mastné částice a pachy.
Nasávaný vzduch není odváděn ven, ale cirkuluje stále vkuchyni.
Vtomto případě je třeba použít uhlíkový filtr.
Upozornění! Uhlíkový filtr je nutno objednat samostatně.
VÁŠ KUCHYŇSKÝ ODSAVAČ PAR
1
2
4
4
5
3
3
CS 6
PROVOZ
Ovládací kolečko (vzávislosti na modelu)
1. Vypnuto
2. Osvětlení
3. Automatická aktivace úrovně a osvětlení
4. Úroveň 1 a osvětlení
5. Úroveň 2 a osvětlení
6. Úroveň 3 a osvětlení
7. Úroveň 3
8. Úroveň 2
9. Úroveň 1
10. Automatická aktivace úrovně
Ruční spuštění/vypnutí odsávání
Odsavač je vybaven třemi úrovněmi s možností osvětlení nebo bez ní.
1. Otočte ovládacím kolečkem na požadovanou úroveň.
Odsavač se spustí.
2. Chcete-li odsavač vypnout, otočte ovládací kolečko do polohy „Vypnuto“.
Upozornění!
Kuchyňský odsavač par je vybaven bezpečnostní funkcí. Pokud je ovládací kolečko
nastaveno na ruční úroveň a během týdne nedojde ke změně, odsavač se automaticky
zastaví.
Automatická úroveň (vzávislosti na modelu)
Odsavač je vybaven automatickou aktivací úrovně s možností osvětlení nebo bez ní.
1. Otočte ovládací kolečko na automatickou aktivaci úrovně.
Odsavač se spustí.
Odsavač pracuje po dobu 60sekund (úroveň1). Během této doby se zahřívá snímač.
Následně tento snímač nepřetržitě měří úroveň znečištění vzduchu. Automaticky se
aktivuje požadovaná úroveň odsávání.
Upozornění!
Vrežimu recirkulace bude reakční doba snímače delší.
2. Chcete-li odsavač vypnout, otočte ovládací kolečko do polohy „Vypnuto“.
1
5
3
7
2
8
9
10
4
6
1
6
48
29
5
7
CS 7
Upozornění!
Elektronika kuchyňského odsavače par reguluje úroveň objemu vzávislosti na
koncentraci plynů a výparů naměřené snímačem. Tato regulace nemusí odpovídat
očekáváním vycházejícím ze sledování výskytu par. Vrežimu recirkulace nedochází
kvýměně vzduchu vmístnosti, proto neklesá vlhkost ani znečištění vzduchu. Proto
kuchyňský odsavač par vautomatickém režimu může ve výjimečných případech
neustále měřit vyšší úroveň znečištění vzduchu a nemusí se nikdy zastavit.
Upozornění!
Nejlepšího využití této automatické funkce dosáhnete tak, že na začátku vaření vyberete
automatickou aktivaci úrovně a po dokončení vaření ji vypnete ručně.
Osvětlení
Osvětlení lze rozsvítit kdykoli, dokonce ivpřípadě, že odsavač není spuštěn.
1. Otočte ovládací kolečko do polohy „Osvětlení“.
Osvětlení se rozsvítí.
2. Otočte ovládací kolečko do polohy „Vypnuto“.
Osvětlení zhasne.
PROVOZ
CS 8
Čištění spotřebiče
Upozornění!
Při jakékoli údržbě nejprve odpojte elektrické napájení kuchyňského odsavače par
vytažením zástrčky ze zásuvky nebo vypnutím hlavního vypínače elektrického rozvodu.
Odsavač je třeba pravidelně čistit zevnitř i zvenčí. Nepoužívejte abrazivní čisticí
prostředky. Nepoužívejte alkohol!
Upozornění!
Vpřípadě nedodržení návodu kčištění spotřebiče nebo výměny filtrů hrozí nebezpečí
požáru. Tento návod je třeba dodržovat. Výrobce není odpovědný za poškození odsavače
nebo poškození ohněm, k němuž dojde kvůli nekompetentní údržbě nebo nedodržení
výše uvedených doporučení a dodaných bezpečnostních pokynů.
Odsavač očistěte mýdlovou vodou a měkkým hadříkem. Potom jej opláchněte čistou vodou.
Nepoužívejte agresivní čisticí prostředky, např. louh sodný, a nepoužívejte drátěnky. Dočistěte
neabrazivním, neleštícím prostředkem a nerezovou ocel vyleštěte ve směru její struktury.
Čištění kovového filtru proti mastnotám
Filtr proti mastnotám je nutno čistit jednou měsíčně pomocí jemných čisticích prostředků, buď
ručně, nebo vmyčce, kterou je třeba nastavit na nízkou teplotu a krátký cyklus. Otvor musí
směřovat dolů, aby mohla zfiltru vytéct voda. Při použití čisticích prostředků dojde ke zmatnění
hliníkového filtru, jedná se oběžný jev.
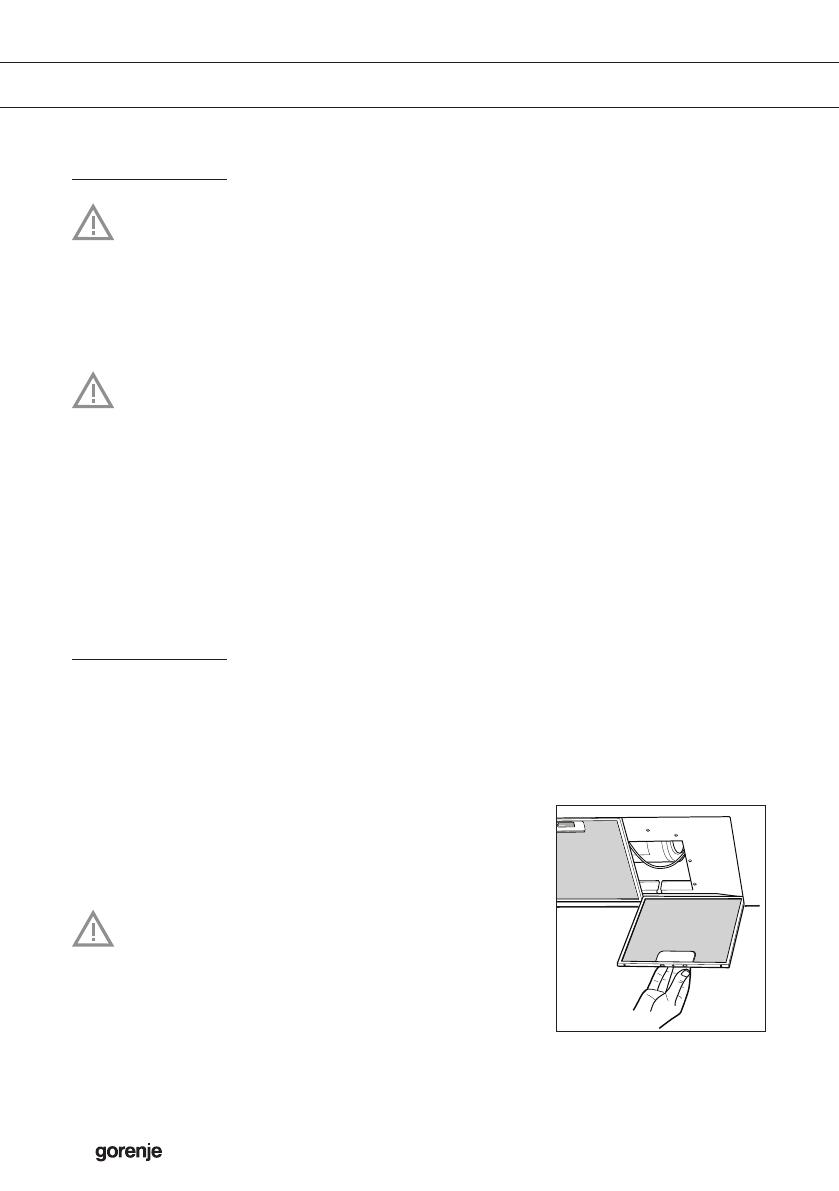
1. Stiskněte uvolňovací západku směrem kzadní části odsavače.
2. Filtr spusťte dolů a vyjměte jej zodsavače.
3. Vyčistěte filtr.
4. Než filtr vrátíte na místo, nechte jej důkladně vyschnout.
Při výměně filtru se ujistěte, že uvolňovací západka směřuje
dopředu.
ÚDRŽBA
CS 9
Výměna uhlíkového filtru
Upozornění!
Pokud se kuchyňský odsavač par používá jako recirkulační odsavač, je vždy třeba
nainstalovat uhlíkový filtr.
Upozornění!
Uhlíkové filtry nelze čistit a použít opakovaně.
Upozornění!
Uhlíkový filtr je třeba vyměnit alespoň dvakrát ročně vzávislosti na četnosti používání
kuchyňského odsavače par.
Upozornění!
Nasycený uhlík je škodlivý pro životní prostředí. Filtr pravidelně vyměňujte.
1. Vyjměte filtr proti mastnotám.
2. Vyjměte starý uhlíkový filtr.
3. Nový uhlíkový filtr umístěte za filtr proti mastnotám.
4. Vraťte na místo filtr proti mastnotám.
ÚDRŽBA
CS 10
ÚDRŽBA
Výměna světel
Upozornění!
Světelný zdroj vtomto domácím elektrickém spotřebiči je vhodný pouze kosvětlení
tohoto spotřebiče.
Tento světelný zdroj není vhodný kosvětlení místnosti vdomácnosti.
Žárovka je spotřební materiál (technické údaje), na který se nevztahuje záruka.
1. Pomocí malého šroubováku opatrně sejměte prstenec se skleněným krytem
2. Demontujte starou žárovku a namontujte novou.
Upozornění!
Kmontáži nové žárovky použijte hadřík nebo papírový kapesník.
3. Nasaďte prstenec se skleněným krytem zpět na původní místo.
  • Page 1 1
  • Page 2 2
  • Page 3 3
  • Page 4 4
  • Page 5 5
  • Page 6 6
  • Page 7 7
  • Page 8 8
  • Page 9 9
  • Page 10 10
  • Page 11 11
  • Page 12 12
  • Page 13 13
  • Page 14 14
  • Page 15 15
  • Page 16 16
  • Page 17 17
  • Page 18 18
  • Page 19 19
  • Page 20 20
  • Page 21 21
  • Page 22 22
  • Page 23 23
  • Page 24 24
  • Page 25 25
  • Page 26 26
  • Page 27 27
  • Page 28 28
  • Page 29 29
  • Page 30 30
  • Page 31 31
  • Page 32 32
  • Page 33 33
  • Page 34 34
  • Page 35 35
  • Page 36 36
  • Page 37 37
  • Page 38 38
  • Page 39 39
  • Page 40 40
  • Page 41 41
  • Page 42 42
  • Page 43 43
  • Page 44 44
  • Page 45 45
  • Page 46 46
  • Page 47 47
  • Page 48 48
  • Page 49 49
  • Page 50 50
  • Page 51 51
  • Page 52 52
  • Page 53 53
  • Page 54 54
  • Page 55 55
  • Page 56 56
  • Page 57 57
  • Page 58 58
  • Page 59 59
  • Page 60 60
  • Page 61 61
  • Page 62 62
  • Page 63 63
  • Page 64 64
  • Page 65 65
  • Page 66 66
  • Page 67 67
  • Page 68 68
  • Page 69 69
  • Page 70 70
  • Page 71 71
  • Page 72 72
  • Page 73 73
  • Page 74 74
  • Page 75 75
  • Page 76 76

Gorenje 8260.2161 Návod na obsluhu

Kategória
Odsávače pár
Typ
Návod na obsluhu