Gorenje 8140.0461 Návod na obsluhu

Kategória
Odsávače pár
Typ
Návod na obsluhu

Táto príručka je tiež vhodná pre

Cooker hood
Odsavač par
Elszívóernyő
Okapu kuchennego
Hotă de bucătărie
Odsávač pár
кухненски аспиратор
DVG 6565
EN CS HU PL SKRO
BG
EN 2
EN Instructions for use EN 3 - EN 13
CS Návod kobsluze CS 3 - CS 13
HU Használati útmutató HU 3 – HU 13
PL Instrukcja obsługi PL 3 - PL 13
RO Instrucțiuni de utilizare RO 3 - RO 13
SK Návod na použitie SK 3 - SK 13
BG Инструкции за употреба BG 3 – BG 13
Pictograms used / Použité piktogramy / Alkalmazott piktogramok / Stosowane symbole /
Pictograme utilizate / Použité piktogramy / Използвани пиктограми
Important information / Důležité informace / Fontos tudnivaló / Ważne informacje /
Informații importante / Dôležité informácie / Важна информация
Tip / Tip / Tipp / Wkazówka / Sfat / Tip / Съвет
EN 3
TABLE OF CONTENTS
Your cooker hood
Introduction 4
Description 5
Control panel 5
Extraction systems 6
Operation
Explanation of the keys 7
How to use the cooker hood manually 9
How to stop the cooker hood automatically 9
The clean and fresh function 9
Maintenance
Cleaning the appliance 10
Cleaning the grease filter 10
Replacing the carbon filter 11
Replacing the lights 11
Ordering accessories
Ordering accessories 12
Environmental aspects
Disposal of packaging and appliance 13
EN 4
Introduction
Congratulations on your choice of this Gorenje cooker hood. This product was designed with
simple operation and optimum comfort in mind.
This manual describes the best way to use this cooker hood. In addition to information on
operation, you will also find background information that may come in handy when using the
appliance.
Please read the separate safety instructions carefully
before using the appliance!
Read this manual before using the appliance and keep it in a safe place for future use.
Technical data and Installation instructions are supplied separately.
YOUR COOKER HOOD
EN 5
YOUR COOKER HOOD
Description
1. Telescopic chimney
2. Panel
3. Grease filter
4. Cooker hood
5. Carbon filter
Control panel
6. Lighting key
7. Filter key
8. Timer key
9. Clean and fresh key
10. Capacity level keys
11. Start key / Stop key
The keys respond best if you touch them with a large area of your fingertip. A short
acoustic signal will sound each time you touch a key during use.
6
1110
7 8 9
32
2
3
5
3
1
1
4
EN 6
Extraction systems
There are two configurations of this hood.
Ducted (or vented) application
The cooking vapours extracted by suction are carried outside, once the
grease particles have been filtered. This is the best method.
Ductless (or recirculating) application
The grease particles and the smell in the extracted vapours are filtered.
The air that has been sucked in is not carried outside but recirculates in
the kitchen. In this case you must have a carbon filter fitted.
Attention! The carbon filter needs to be ordered separately.
YOUR COOKER HOOD
EN 7
Explanation of the keys
Start key / Stop key
Start
Touch this key to start the cooker hood.
Now the cooker hood is on, but not in operation!
Start the operation of the cooker hood by touching one of the capacity level keys.
The cooker hood stops automatically if you do not touch any key within
5 minutes.
Stop
Touch this key to stop the operation of the cooker hood.
Capacity level keys
Capacity level 1
Touch this key to start the operation of the cooker hood at level 1.
Capacity level 2
Touch this key to start the operation of the cooker hood at level 2.
Capacity level 3
Touch this key to start the operation of the cooker hood at level 3.
Capacity level boost
Touch this key to start the operation of the cooker hood at level boost (the maximal
capacity).
The cooker hood operates for max. 6 minutes. After that, the capacity is
automatically decreased to level 3.
Touch capacity level key 1, 2 or 3 to stop the operation of the cooker hood at level
boost.
Lighting key
Make the lighting to come on/to go o
Touch this key to make the lighting of the cooker hood to come on/to go o.
If you use the timer, the lighting goes o if you touch the timer key.
OPERATION
EN 8
Timer key
Stop the operation of the cooker hood automatically
Touch this key after starting the operation of the cooker hood.
The lighting goes o.
The cooker hood operates for 30 minutes at the capacity level that has been set.
After that, the operation of the cooker hood stops automatically.
It is possible to adapt the capacity level during the operation of the cooker hood.
Clean and fresh key
Start the operation of the cooker hood every hour automatically
Touch this key after the cooker hood is activated by touching the start key.
The cooker hood starts the operation every hour at level 1 for 5 minutes.
Touch any capacity level key to stop the operation of the cooker hood every hour.
Filter key
Pollution of the grease filter
The lighting of this key comes on after 100 hours of operation of the cooker hood. It
is necessary to clean the grease filter (see chapter ‘Maintenance’).
Touch and hold this key for 5 seconds after cleaning the grease filter. The counter of
operation hours is set to ‘0’.
OPERATION
EN 9
How to use the cooker hood manually
1. Touch the start key.
2. Touch one of the capacity level keys.
The cooker hood starts.
3. Touch the stop key.
The cooker hood stops.
How to stop the cooker hood automatically
1. Touch the start key.
2. Touch one of the capacity level keys.
The cooker hood starts.
3. Touch the timer key.
The lighting goes off. The cooker hood stops automatically after 30 minutes.
Press the timer key again to deactivate the timer during these 30 minutes.
The clean and fresh function
1. Touch the start key.
2. Touch the clean and fresh key.
The cooker hood starts the operation every hour at level 1 for 5 minutes.
Press the clean and fresh key again to deactivate the clean and fresh function.
OPERATION
EN 10
Cleaning the appliance
Attention!
For all maintenance first switch off the mains power to the cooker hood by pulling the
plug out of the socket or by turning off the home’s master switch.
The hood needs to be cleaned regularly, both inside as well as outside. Do not use
abrasive cleaners. Do not use alcohol!
Attention!
If the instructions regarding cleaning the appliance or replacing the filters are not
followed, this can cause a fire. These instructions should be followed! The manufacturer
is not liable for damage to the hood or fire damage resulting from incompetent
maintenance or from non-adherence to the recommendations above and delivered safety
instructions.
Clean the hood with soapy water and a soft cloth. Then wash off with clean water. Do not use
aggressive cleaning agents such as caustic soda and do not use scouring pads. Finish with a
non-abrasive, non-polishing agent and buff the stainless steel in the direction of the grain.
Cleaning the grease filter
The grease filter must be cleaned after 100 hours of operation of the cooker hood; the lighting
of the filter key comes on. Use non aggressive detergents, either by hand or in the dishwasher,
which must be set to a low temperature and a short cycle. The opening must be placed
downwards to let the water run out of the filter. The cleaning agents will make the aluminium filter
turn dull, this is normal.
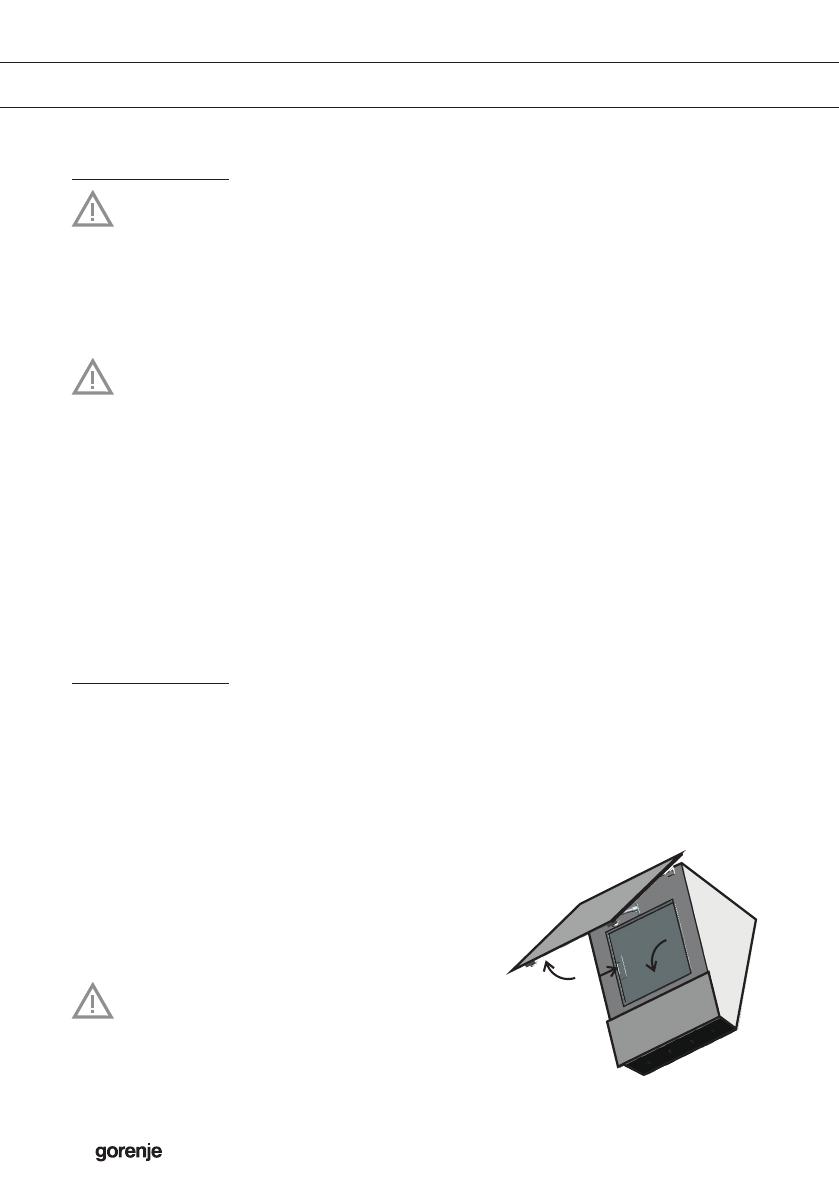
1. Push the panel upwards.
2. Press the catch of the grease filter downwards.
3. Lower the filter and remove it out of the hood.
4. Clean the filter.
5. Let the filter dry thoroughly before replacing it.
When replacing the filter, ensure that the release
catch faces forwards.
6. Touch and hold the filter key for 5 seconds.
The counter of operation hours is set to ‘0’.
MAINTENANCE
2
3
1
EN 11
MAINTENANCE
Replacing the carbon filter
Attention!
The carbon filter must be replaced at least twice a year, depending on how much the
cooker hood is used.
Attention!
A carbon filter must always be installed if the cooker hood is used as a recirculation hood.
Attention!
Carbon filters cannot be cleaned to use again.
Attention!
Saturated carbon is harmful to the environment, replace the filter regularly.
1. Remove the grease filter.
2. Remove the old carbon filter.
3. Position a new carbon filter behind the grease filter.
4. Replace the grease filter.
Replacing the lights
Attention!
The lamp in this household appliance is only suitable for illumination of this appliance.
The lamp is not suitable for household room illumination.
The light bulb (Technical data) is a consumer item and therefore not covered by warranty.
Attention!
This hood is fitted with LED light! These have to be replaced by an authorized technician.
Do not attempt to replace LED light by yourself.
EN 12
Ordering accessories
When contacting the service department to order accessories, have the complete article number
of the appliance to hand.
Carbon filter - set.
Prolongation of telescopic chimney.
Exhaust extraction hose ø 120mm or ø 150mm + fastening clip.
Recirculation set.
ORDERING ACCESSORIES
EN 13
Disposal of packaging and appliance
Sustainable materials have been used during manufacture of this appliance. This appliance
must be disposed of responsibly at the end of its service life. Ask your local authorities for more
information about how to do this.
The appliance packaging is recyclable. The following materials may have been used:
cardboard;
polyethylene film (PE);
CFC-free polystyrene (PS rigid foam).
Dispose of these materials in a responsible manner and in accordance with government regulations.
The product has been marked with a crossed-out dustbin symbol
to remind you of the obligation to dispose of electrical household
appliances separately. This means that the appliance may not be
included with normal domestic refuse at the end of its service life.
The appliance must be taken to a special municipal centre for
separated waste collection or to a dealer providing this service.
Separate collection of household appliances helps to prevent any
potential negative impact on the environment and on human health
caused by improper disposal. It ensures that the materials of which
the appliance is composed can be recovered to obtain significant
savings in energy and raw materials.
Declaration of Conformity
We hereby declare that our products satisfy the applicable European
Directives, Orders and Regulations, as well as the requirements stated
in the referenced standards.
ENVIRONMENTAL ASPECTS
EN 14
CS 3
OBSAH
Váš odsavač par
Pokyny 4
Popis 5
Ovládací panel 5
Odsávací systémy 6
Operace
Vysvětlivky ktlačítkům 7
Ruční používání odsavače par 9
Automatické zastavení odsavače par 9
Funkce čištění asvěžesti 9
Údržba
Čištění spotřebiče 10
Čištění filtru proti mastnotám 10
Výměna uhlíkového filtru 11
Výměna světel 11
Objednávka příslušenství
Objednávka příslušenství 12
Otázky ochrany životního prostředí
Likvidace obalu aspotřebiče 13
CS 4
Úvod
Blahopřejeme, že jste si vybrali tento kuchyňský odsavač par Gorenje. Tento produkt byl vyvinut
sdůrazem na jednoduchý provoz a optimální pohodlí.
Tento návod popisuje nejlepší způsob použití tohoto kuchyňského odsavače par. Kromě
informací o provozu zde najdete také základní informace, které se vám mohou hodit při používání
tohoto spotřebiče.
ed použitím přístroje si pečlivě přečtěte samostatné
bezpečnostní pokyny!
Před použitím přístroje si přečtěte tuto příručku auchovejte ji na bezpečném místě pro
budoucí použití.
Technické údaje apokyny kinstalaci jsou dodávány samostatně.
VÁŠ ODSAVAČ PAR
CS 5
32
2
3
5
3
1
1
4
VÁŠ ODSAVAČ PAR
Popis
1. Výsuvný komín
2. Panel
3. Filtr proti mastnotám
4. Kuchyňský odsavač par
5. Uhlíkový filtr
Ovládací panel
6. Tlačítko osvětlení
7. Tlačítko filtru
8. Tlačítko časovače
9. Tlačítko funkce čištění asvěžesti
10. Tlačítka úrovně výkonu
11. Tlačítko start/stop
Tlačítka reagují nejlépe tehdy, když se jich dotknete velkou plochou špičky prstu. Během
používání se při každém stisknutí tlačítka ozve krátký akustický signál.
6
1110
7 8 9
CS 6
Odsávací systémy
Tato digestoř umožňuje využít dvě konfigurace.
Použití svývodem (nebo ventilací)
Výpary zvaření extrahované sáním jsou po odfiltrování mastných částic
odváděny ven. To je nejlepší metoda.
Použití bez vývodu (recirkulační)
Zodsávaných výparů jsou odfiltrovány mastné částice a pachy.
Nasávaný vzduch není odváděn ven, ale cirkuluje stále vkuchyni.
Vtomto případě je třeba použít uhlíkový filtr.
Upozornění! Uhlíkový filtr je nutno objednat samostatně.
VÁŠ ODSAVAČ PAR
CS 7
Vysvětlivky ktlačítkům
Tlačítko start/stop
Spuštění
Stisknutím tohoto tlačítka spustíte odsavač par.
Nyní je odsavač par zapnutý, avšak není vprovozu!
Spusťte odsávání odsavače par stisknutím některého ztlačítek úrovně výkonu.
Pokud během pěti minut stisknete žádné tlačítko, odsavač par se automaticky
zastaví.
Zastavení
Stisknutím tohoto tlačítka zastavíte provoz odsavače par.
Tlačítka úrovně výkonu
Úroveň výkonu1
Stisknutím tohoto tlačítka spustíte odsavač par na úrovni1.
Úroveň výkonu2
Stisknutím tohoto tlačítka spustit provoz odsavače par na úrovni2.
Úroveň výkonu3
Stisknutím tohoto tlačítka spustit provoz odsavače par na úrovni3.
Zvýšení úrovně výkonu
Stisknutím tohoto tlačítka spustíte odsavač par na úrovni zvýšení výkonu (maximální
výkon).
Odsavač par funguje max. 6minut. Potom se výkon automaticky sníží na
úroveň3.
Stisknutím tlačítka úrovně výkonu 1, 2nebo 3zastavíte činnost odsavače par na
úrovni zvýšení výkonu.
Tlačítko osvětlení
Zapnutí/vypnutí osvětlení
Stisknutím tohoto tlačítka se rozsvítí nebo zhasne osvětlení odsavače par.
Pokud používáte časovač, osvětlení při klepnutí na tlačítko časovače zhasne.
PROVOZ
CS 8
Tlačítko časovače
Automatické zastavení provozu odsavače par
Stiskněte toto tlačítko po spuštění odsavače par.
Osvětlení zhasne.
Odsavač par funguje po dobu 30minut při nastavené úrovni výkonu. Poté se
odsavač par automaticky zastaví.
Při provozu odsavače par je možné přizpůsobit úroveň výkon.
Tlačítko funkce čištění a svěžesti
Automatické spuštění odsavače par každou hodinu
Toto tlačítko stiskněte po aktivaci odsavače par stisknutím tlačítka spuštění.
Odsavač par se spustí každou hodinu na úrovni 1po dobu 5minut.
Stisknutím jakéhokoliv tlačítka úrovně výkonu zastavíte spouštění odsavače par
každou hodinu.
Tlačítko filtru
Znečištění filtru proti mastnotám
Osvětlení tohoto tlačítka se rozsvítí po 100hodinách provozu odsavače par. Je
nutné vyčistit filtr proti mastnotám (viz kapitola „Údržba“).
Stiskněte apřidržte toto tlačítko po dobu 5sekund po vyčištění filtru proti
mastnotám. Počítadlo provozních hodin se nastaví na „0“.
PROVOZ
1 / 1

Gorenje 8140.0461 Návod na obsluhu

Kategória
Odsávače pár
Typ
Návod na obsluhu
Táto príručka je tiež vhodná pre